
Using the Baader FlipMirror II Star Diagonal (BFM II) at the Telescope
The Baader FlipMirror II Star Diagonal (#2458055 , € 228,-) is not only an accessory for professional users, but much more: It is a helpful tool for every amateur astronomer – especially for astrophotography.
First of all, the BFM II is designed to completely replace your standard star diagonal, so that you can keep observing as usual, just like with every good star diagonal. But the BFM II gives you much more options. You can create – from the beginnig, or step-by-step – your own system for photography and keep it always ready-for-use at your telescope. This will save you a lot of time and nerves. In the next months, we want to show some of the many options of this new product here.
In this article we will cover the adjustment options.


There are uncountable possibilities to combine the Baader FlipMirror II Star Diagonal (#2458055 , € 228,-) with eyepieces and cameras. To safe you from having to try out everything yourself, we would like to present some possibilities here – with and without a guiding camera.
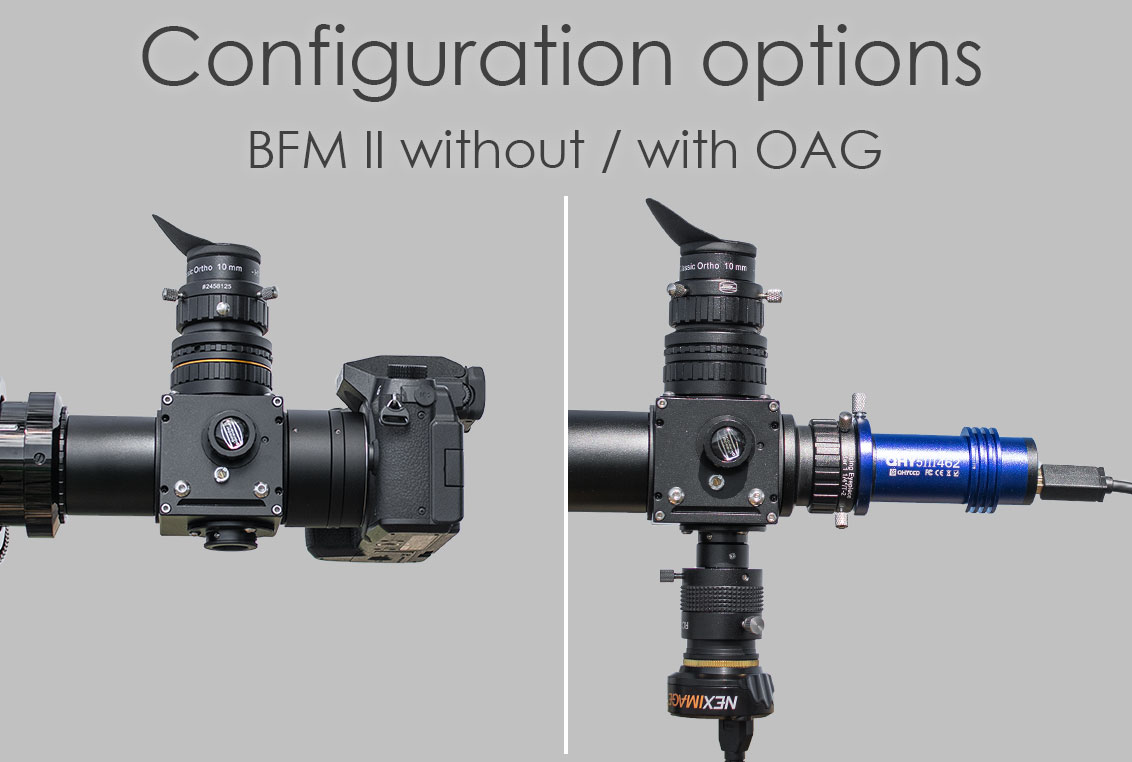
Choose a configuration:


BFM-II without Off-Axis-Guider
In the simplest case you will use the FlipMirror only to switch between camera and eyepiece – either because you are using a dedicated guidescope or because you do not need an autoguider for planetary photography. And especially high-end mounts such as a 10Micron track so perfectly thanks to the built-in encoders that guiding is no longer necessary.
The focus points of the top and rear ports are at the same distance from the body, which makes set-up easy.
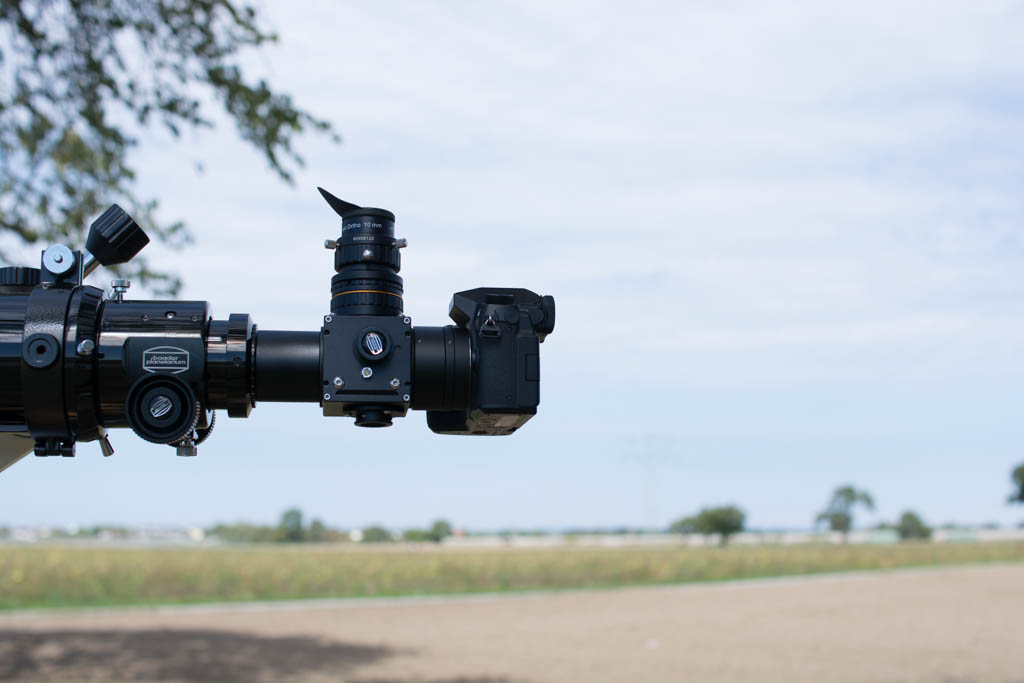
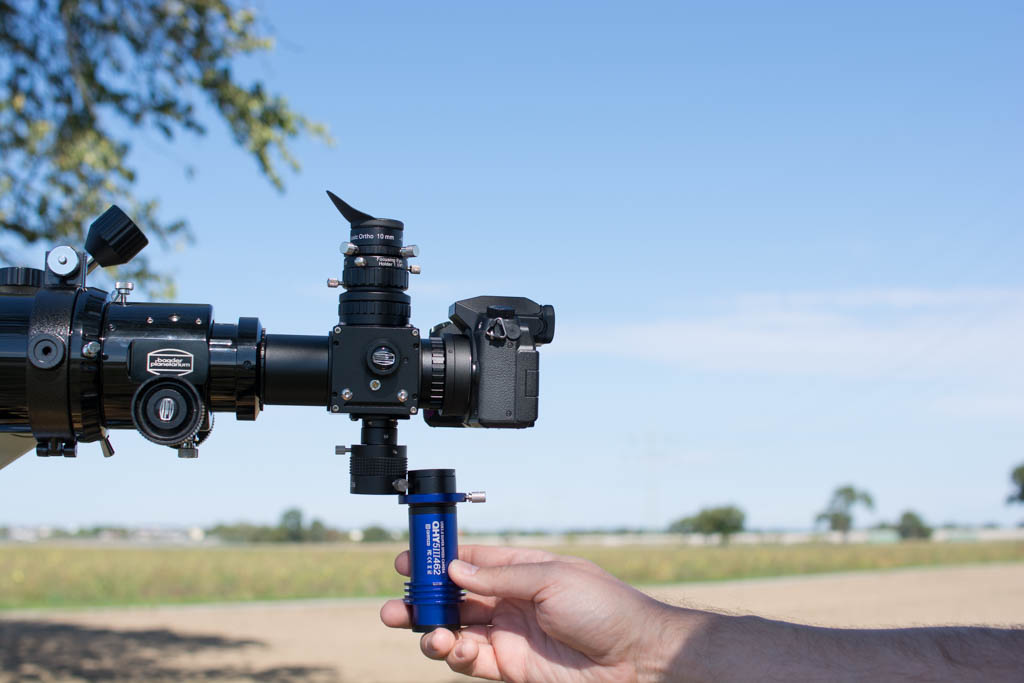
Eyepiece and DSLR
For a DSLR with a standard T-ring, the flange focal distance is 55mm. If the camera body is connected directly to the FlipMirror as shown in the picture - either via the T-2 thread oder das M48 thread – the camera sensor is therefore at least 55mm away from the FlipMirror. This also determines the distance of the eyepiece, whose field stop must also be 55mm above the FlipMirror.
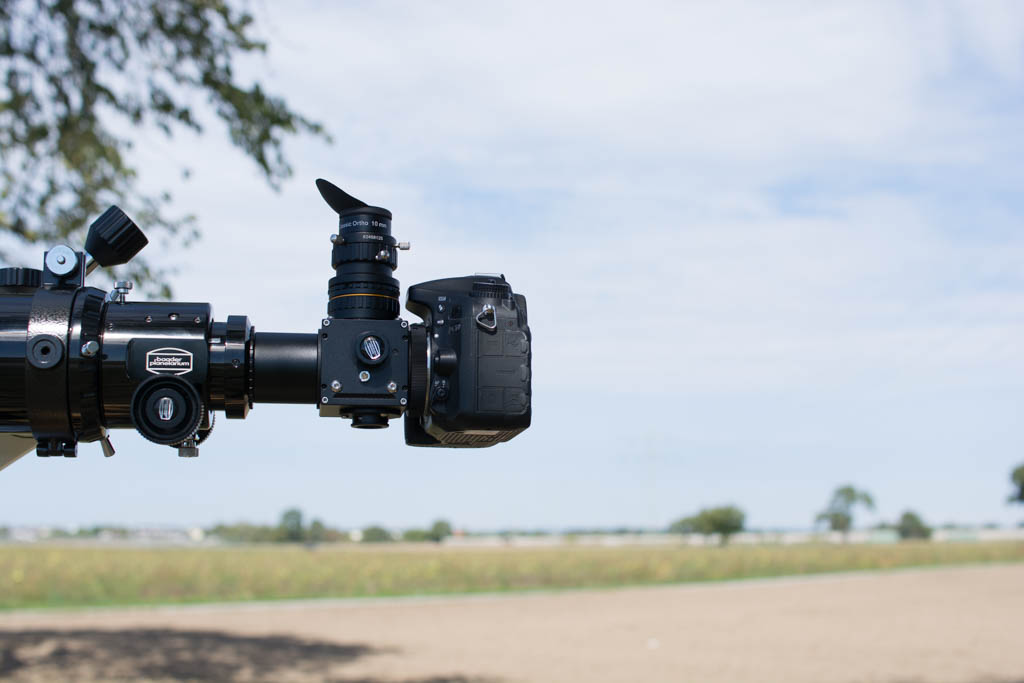
The DSLR is connected directly through a T-ring. Two T-2-extensions (7,5 and 15mm) lift the eyepiece to the necessary height of 55mm.
The first picture shows a possible setup. To bring the eyepiece into focus, the Baader Focusing Eyepiece Holder 1¼" / T-2 (T-2 part #08A) was used, which has a length of 29-35mm. Since this is not long enough, one Baader T-2 / 7.5 mm Extension Tube (T-2 part #25C) and one Baader T-2 / 15 mm Extension Tube (T-2 part #25A) were used. Together with the focusing eyepiece clamp they provide a distance of about 51-57mm. Since the field stop of the Classic Ortho eyepieces is three millimeters inside the nose piece, a ring from the T-2 Fine-Adjustment rings (0,3 / 0,5 / 1 mm) - Aluminium was also used.
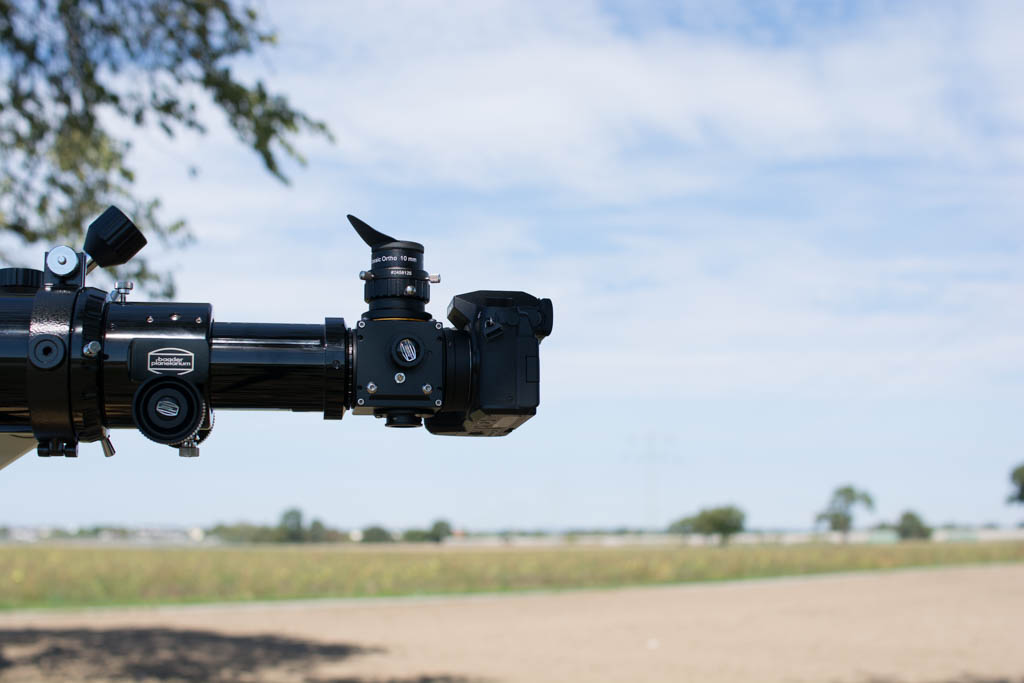
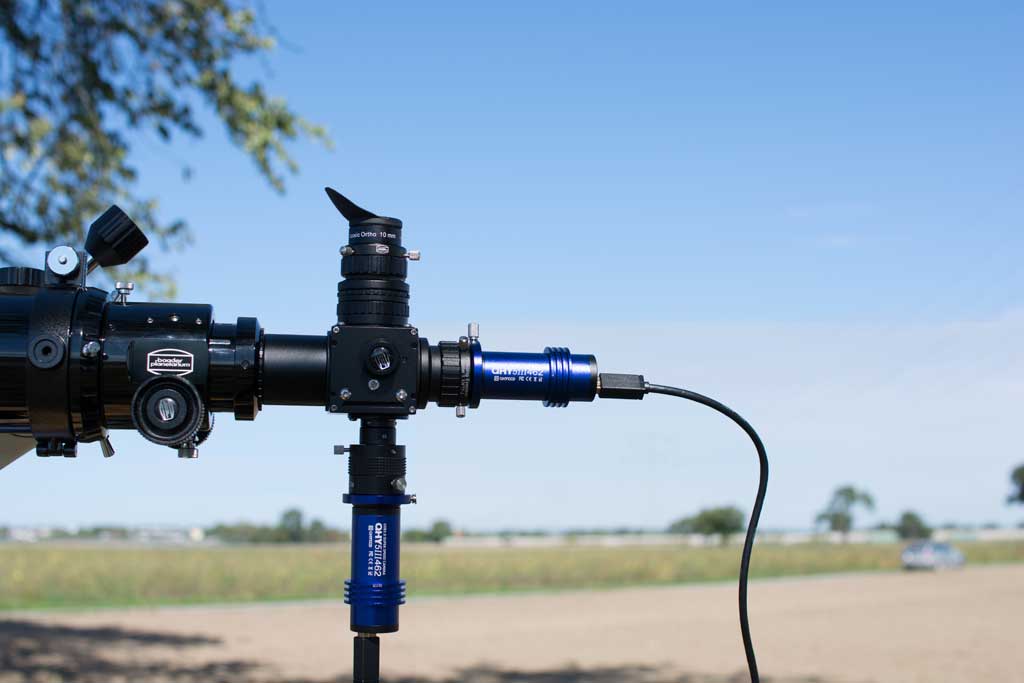
The T-2 flange focal distance is standardized – even a mirrorless camera needs 55mm with a standard T-ring.
In the second picture we have a Micro Four Thirds camera, which is connected via the Baader T-Ring Micro Four Thirds (m4/3) to T-2 + 19mm expansion (#2408330 , € 31,-) and thus also has a flange focal distance of 55mm. The sensor thus has the same distance as a classic DSLR, and the adaptation is identical because the T-2 flange focal distance is maintained.
Of course, this is not the only option to come into focus with the eyepiece. You might also simply not slide the eyepiece all the way down into the eyepiece clamp. Of course, this does not look so elegant and, depending on the distance, may even require the Baader 1¼" - 31.8mm nosepiece extension with 1¼" filter thread on both sides (T-2 part #05) , which can be used to extend the nose piece. Alternatively, you can use the Baader VariLock 29, lockable T-2 ExtensionTube 20-29mm with spanner tool (T-2 part #25Y) instead of T-2 extension tubes with fixed overall lengths.
By the way, be careful: Only "real", classic T-rings deliver the flange distance of exactly 55mm. Especially in astronomy there are often slight deviations. T-Rings with an integrated filter holder tend to be a little longer, while other models are extra slim to allow you to reach focus with more accessories.
Speaking of focus: The Baader FlipMirror II Star Diagonal (#2458055 , € 228,-) is 59mm long, the camera 55mm – the total length was too short to get into focus at this special telescope in all configurations. Therefore a Baader T-2 / 40 mm Extension Tube (T-2 part #25B) (#1508153 , € 27,-) and the Baader 2" nosepiece to T-2 / M48 (T-2 part #16) (#2408150 , € 40,-) were sometimes used for the connection to the telescope. For more aperture the 2" / S52 Nosepiece (#2958551 , € 41,-) would be more useful, but T-2 is completely sufficient for cameras up to APS-C.
Useful Parts:
Eyepiece Adaptation:
- Baader Focusing Eyepiece Holder 1¼" / T-2 (T-2 part #08A) (#2458125 , € 46,-) – 29-35mm, set to 32,5mm
- Baader T-2 / 15 mm Extension Tube (T-2 part #25A) (#1508154 , € 24,-)
- Baader T-2 / 7.5 mm Extension Tube (T-2 part #25C) (#1508155 , € 22,-)
- T-2 Fine-Adjustment rings (0,3 / 0,5 / 1 mm) - Aluminium (#2457910, € 14,63) (also available separately) for eyepieces with the field stop inside of the nose piece
=> total length: 55mm - optionally, instead of T-2-extensions: DT-4 Baader 1¼" - 31.8mm nosepiece extension with 1¼" filter thread on both sides (T-2 part #05) (#1905130 , € 19,-) or Baader VariLock 29, lockable T-2 ExtensionTube 20-29mm with spanner tool (T-2 part #25Y) (#2956929 , € 69,-)
Camera Adaptation:
Standard-T-Ring or Wide-T-Ring for 55mm flange distance.
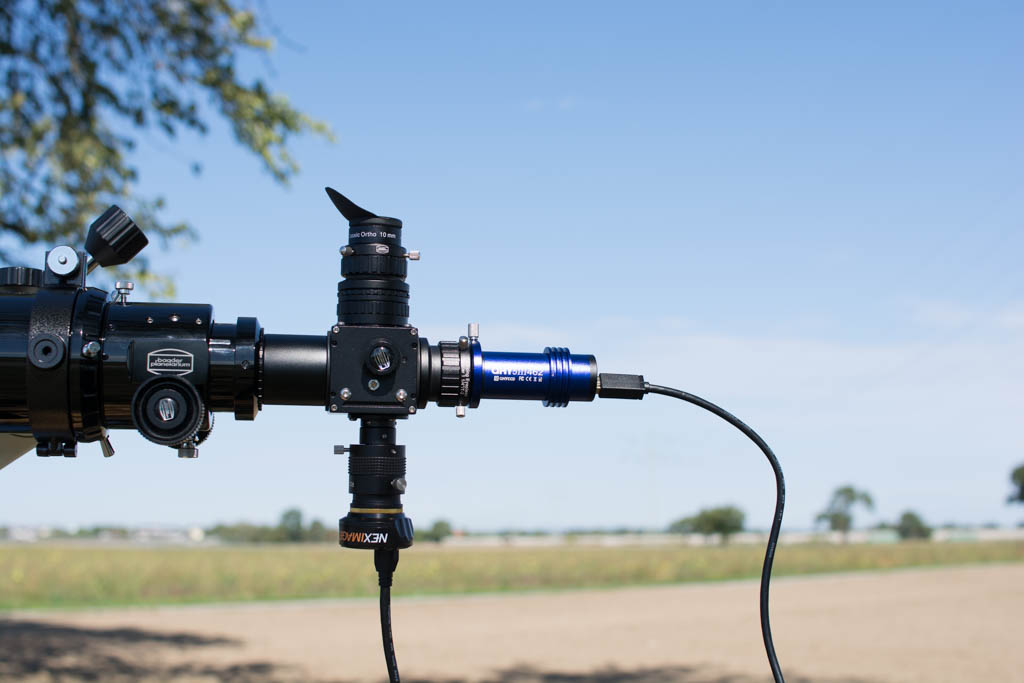
Mirrorless Cameras and Astronomical Cameras
Mirrorless and CCD cameras need less back focus, so we don't need the T-2-extensions – but the focuser has to move farther out.
Mirrorless cameras, as the name suggests, do without a mirror and therefore have a shorter flange focal distance. The Panasonic G70 from our example has (without T-ring) a flange focal distance of 19.25mm. The Baader T-Ring Micro Four Thirds (m4/3) to T-2 + 19mm expansion elongates the back focus to the standard of 55mm. But it can also be shortened by 19mm so that only 36mm of backfocus are needed. In the picture on the left you can see that the distance of the camera sensor to the telescope is the same as in the first photo - only the focuser tube is further extended, this time without extension and almost to the stop.
Accordingly, the eyepiece adaptation is shorter - here again the Baader Focusing Eyepiece Holder 1¼" / T-2 (T-2 part #08A) (Baulänge 29-35mm) was used, the T-2 extension can be omitted. This results in a maximum length of 35mm. Together with the Classic Ortho eyepiece, whose field stop is 2mm inside the plug-in sleeve, the distance thus shrinks to 33mm - in order to focus nevertheless, we still have to pull the eyepiece out of the eyepiece clamp a little, which is no problem. If you don't like that, you can use e.g. the Stop Ring 1¼" (T-2 part #30) to set the eyepiece permanently to the same focus position as the camera. Or you can extend the overall length a bit more with the T-2 Fine-Adjustment ring 1mm (gold) - Aluminium - in the picture the golden 1mm ring was used, other lengths are also available.
Those eyepieces where the field stop is closer to the eye or exactly at the transition from the eyepiece body to the 1.25" nose-piece can be inserted into the eyepiece clamp up to the stop.
On an astronomical (CCD) camera, the sensor is closer to the connection thread than on a DSLR – if it is closer to the FlipMirror than the 29mm of the eyepiece clamp on upper port , you may need to insert a T-2 extension in front of the camera.
Useful Parts:
Eyepiece Adaptation:
- Baader Focusing Eyepiece Holder 1¼" / T-2 (T-2 part #08A) (#2458125 , € 46,-) – 29-35mm, set to 32,5mm
- Stop Ring 1¼" (T-2 part #30) (#1905131 , € 29,-) for eyepieces with the field stop inside of the nose piece
- T-2 Fine-Adjustment rings (0,3 / 0,5 / 1 mm) - Aluminium (#2457910, € 14,63) (also available separately) for eyepieces with the field stop inside of the nose piece
Total length: ~35mm
Camera Adaptation:
Baader T-Ring Micro Four Thirds (m4/3) to T-2 + 19mm expansion (#2408330 , € 31,-) for 36mm flange distance (without the 19mm extension).
Planetary Cameras
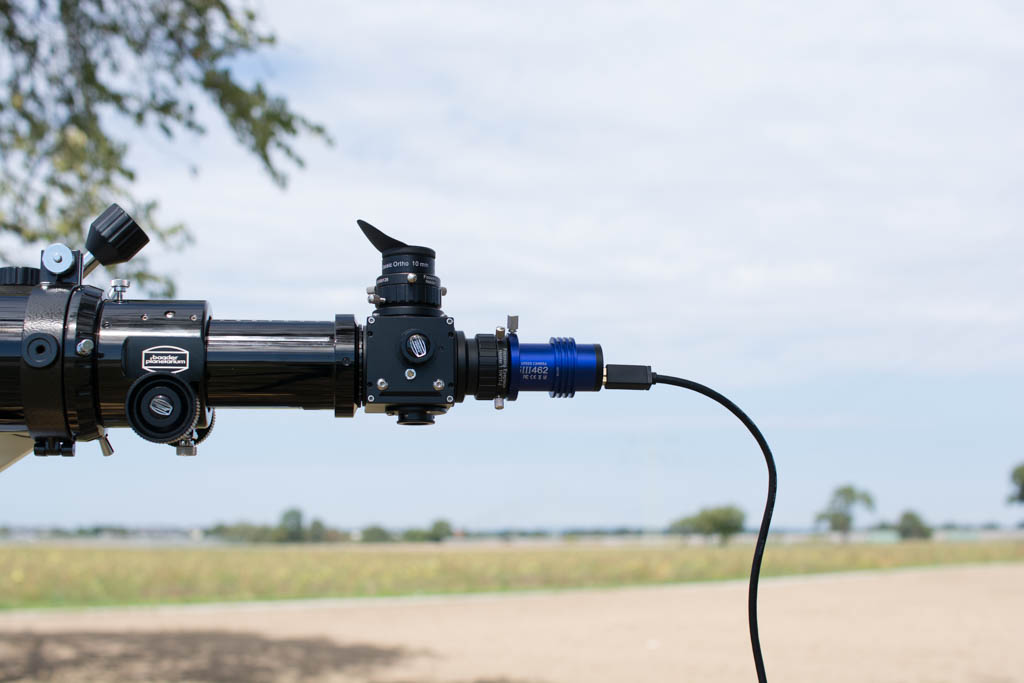
Many planetary cameras don't have a fixed stopper and often don't need an extension. Camera sensor and eyepiece are in the same distance to the FlipMirror.
A video module or a planetary camera with 1.25" nose piece can also easily be used, when there is a Baader Focusing Eyepiece Holder 1¼" / T-2 (T-2 part #08A) at the rear port, too.
In this example, we have created a setup with as few adapters as possible. On both ports of the FlipMirror, we have used only an Baader Focusing Eyepiece Holder 1¼" / T-2 (T-2 part #08A) . In this case, we could also skip the 40mm-T2-extension between FlipMirror and focuser.
The blue stop ring of the QHY 5-III-462C CMOS Camera (#1931026 , € 295,-) shows quite good the location of the camera sensor, 11mm deep inside of the camera boda.

A stop ring helps you to place a camera or eyepiece always in the same distance.
In many planetary cameras, the sensor is located very far in front, at the end of the body near the connection thread - so they require very little back focus. Since the camera body is then hardly or not at all in the focuser, you will need a 1.25" plug-in sleeve or a Baader 1¼" - 31.8mm nosepiece extension with 1¼" filter thread on both sides (T-2 part #05) The camera body can then be completely outside of the eyepiece clamp and still have a secure hold.
Useful Parts:
Eyepiece Adaptation:
- Baader Focusing Eyepiece Holder 1¼" / T-2 (T-2 part #08A) (#2458125 , € 46,-) – 29-35mm
- Baader T-2 / 15 mm Extension Tube (T-2 part #25A) (#1508154 , € 24,-) (optional, depending on the position of the camera sensor)
- Baader T-2 / 7.5 mm Extension Tube (T-2 part #25C) (#1508155 , € 22,-) (optional, depending on the position of the camera sensor)
Camera Adaptation:
- Baader Focusing Eyepiece Holder 1¼" / T-2 (T-2 part #08A) (#2458125 , € 46,-) – 29-35mm
- DT-4 Baader 1¼" - 31.8mm nosepiece extension with 1¼" filter thread on both sides (T-2 part #05) (#1905130 , € 19,-) (optional, depending on the position of the camera sensor)
- Stop Ring 1¼" (T-2 part #30) (#1905131 , € 29,-) (optional)
BFM-II with Off-Axis-Guider
If you use the Off Axis Guider for Baader FlipMirror II (BFM-OAG) (#2956951 , € 122,-) with the FlipMirror, the working distance is determined by the minimum flange distances of both the main (recording) camera and the guiding camera – it can't be inserted into the OAG "until infinity".
If the image plane of the guiding camera is flush with the bearing surface of the OAG, the recording camera and eyepiece must still be 30mm away from the FlipMirror. The inside of the eyepiece clamp of the off-axis-guider is about 23mm deep, so the guiding sensor can come a little closer to the FlipMirror, depending on the camera body. Knowing these distances, we can plan a configuration: The minimum distance between the guiding sensor and the top edge of the flip mirror determines the distance for the camera and eyepiece - plus 30mm each, because of the length of the OAG. But don't plan too tightly: There are always tolerances, and you may need adjustment travel at the eyepiece for diopter compensation. In case of doubt, screw the camera firmly so that there is enough tolerance tp pull the camera out a little if necessary.
DSLR and Guiding Camera

The back focus of DSLR and guiding camera sets the distances – here, we need a T-2-extension for the DSLR.
Let's look at a typical use-case and connect a DSLR with 55mm flange distance. Again, this can be done via the T-2- or M48-thread of the FlipMirror.
In an ideal world we would simply use the already known setup for a DSLR, install the off-axis-guider (OAG) on the FlipMirror and insert the guiding camera into the off-axis-guider. However, the back focus of guiding cameras is not standardized. With a little luck, the sleeve is short enough to fit into the off-axis-guide so that the focus fits.
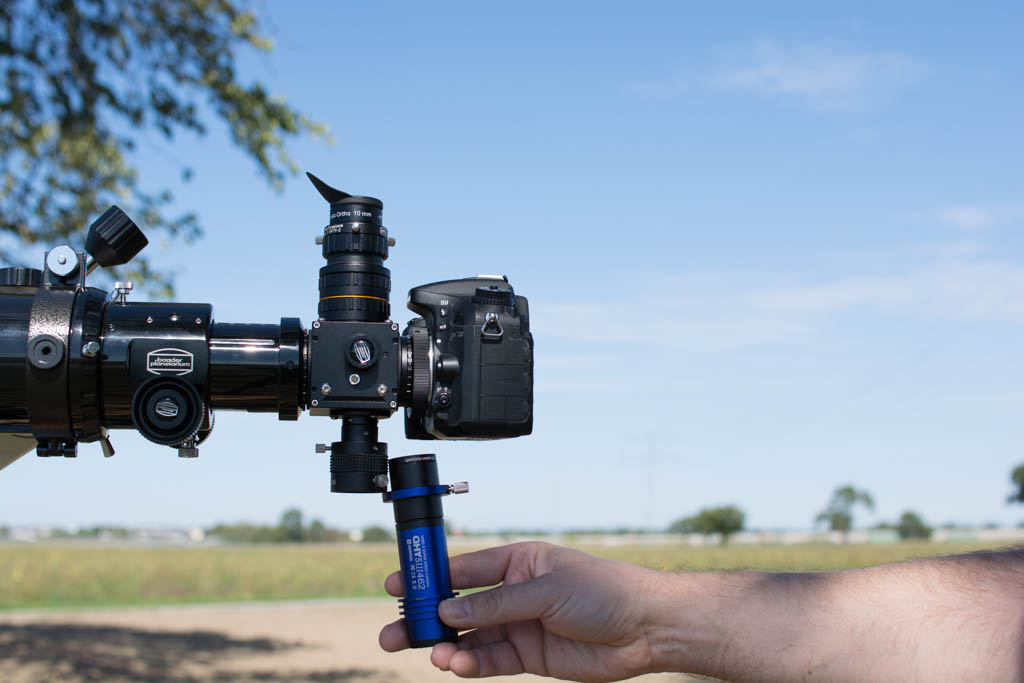
For a safe fit with the additional 1.25"-fiter, two 1.25"-extensions were necessary, as well as one T-2-extension for the DSLR.
In the case of the QHY 5-III-462C CMOS Camera (#1931026 , € 295,-) the camera sensor is close to the front of the blue camera body. In our setup, the image plane is just a little bit outside of the OAG. Out-of-the-Box, the camera would barely be inside of the eyepiece clamp, and the clamping screws would be right on the UV/IR-Cut filter. The solution is one Baader 1¼" - 31.8mm nosepiece extension with 1¼" filter thread on both sides (T-2 part #05) (#1905130 , € 19,-) – then the camera fits perfectly, but only if we do not use the filter, otherwise the camera would be too far away from the FlipMirror.
That's why we chose another solution: DSLR and eyepiece were each mounted with a 7.5mm extension a little further away from the FlipMirror - for the eyepiece a 15mm extension was used instead of the 7.5mm extension from above. A second DT-4 nosepiece extension on the QHY gives us enough distance to get into focus in any case. The 40mm sleeve in front of the FlipMirror can thus also be omitted.

The distances vary, depending on nosepiece and focus of the guiding camera – it may as well work without a 1.25"-extension.
Alternatively, we would gain a little more leeway and make do with an extension sleeve if we put a golden 1mm T-2 spacer instead of the 7.5mm sleeve in front of the camera - but we want to show as many options as possible here.
It all depends on the backfokus of the camera. Cameras with an integrated UV/IR cut filter are less versatile than QHY (which can used as well as a guiding camera and as a planetary camera for both the visual and the near infra-red part of the spectrum), but their nosepieces have got different lengths and don't need a screw-on filter, so that they may be used without an additional extension tube. If we take for example a Celestron NexImage where the sensor is close to the nose piece and the filter is integrated into the body, we do not need an extension – and with a shorter nose piece, we can also forget about the additional 7,5mm extensions for DSLR and eyepice.
Useful Parts:
Eyepiece Adaptation:
- Baader Focusing Eyepiece Holder 1¼" / T-2 (T-2 part #08A) (#2458125 , € 46,-) – 29-35mm
- Baader T-2 / 15 mm Extension Tube (T-2 part #25A) (#1508154 , € 24,-)
- Baader T-2 / 7.5 mm Extension Tube (T-2 part #25C) (#1508155 , € 22,-)
Camera Adaptation:
- Standard T-Ring for 55mm flange distance
- Baader T-2 / 7.5 mm Extension Tube (T-2 part #25C) (#1508155 , € 22,-)
Guiding-Camera Adaptation – Sensor is placed ca. 24mm above the upper end of the Off-Axis-Guiders:
- DT-4 Baader 1¼" - 31.8mm nosepiece extension with 1¼" filter thread on both sides (T-2 part #05) (#1905130 , € 19,-) (optional, depending on the position of the camera sensor and the length of the nose piece)
- Stop Ring 1¼" (T-2 part #30) (#1905131 , € 29,-) (optional)
MFT and Guiding
A 1.25" extension at the QHY and a T-2-extension for the MFT help you to skip a disadvantageous position of the clamping screws.
When using a mirrorless system camera like in our example a Panasonic MFT camera with shortened Baader T-adapter and therefore 36mm back focal length, everything moves closer to the FlipMirror, as we have seen above.
We could now connect the MFT camera directly and bring the eyepiece into focus with a 7.5mm T-2 extension. Then the sensor of the guiding camera would have to be about 6mm outside the off-guider. No problem in principle, but the clamping screws of the off-axis-guide would then sit on the filter of the QHY, which is only barley inside of the eyepiece clamp.

All cameras are safely in place.
The solution is again a T-2 extension of 7.5 or 15 mm each for camera and eyepiece as well as a 1.25" extension sleeve for the QHY. With this the camera is inserted deep enough for a secure hold, as in the picture above (with 15mm sleeves). The eyepiece is equipped with a Stop Ring 1¼" (T-2 part #30) , which brings the eyepiece outwards by another 5mm. Pulling the guiding camera further out is no problem, only inserting it deeper is not possible.

A guiding camera with a longer nosepiece: T-2-extensions on eyepiece and camera provide the same focus position for everything.
You can use the same setup to use a e.g. a NexImage camera. You need to know the back focus of your cameras to find out the correct working distances.
Useful Parts:
Eyepiece Adaptation:
- Baader Focusing Eyepiece Holder 1¼" / T-2 (T-2 part #08A) (#2458125 , € 46,-) – 29-35mm
- Baader T-2 / 7.5 mm Extension Tube (T-2 part #25C) (#1508155 , € 22,-)
- (optional, depending on the position of the camera sensor)
- Stop Ring 1¼" (T-2 part #30) (#1905131 , € 29,-) (optional)
Camera Adaptation:
- Baader T-Ring Micro Four Thirds (m4/3) to T-2 + 19mm expansion (#2408330 , € 31,-) for 36mm flange distance (without the 19mm extension).
Guiding-Camera Adaptation – in the example with a the sensor placed ca. 6mm above the Off-Axis-Guider:
- DT-4 Baader 1¼" - 31.8mm nosepiece extension with 1¼" filter thread on both sides (T-2 part #05) (#1905130 , € 19,-) (optional, depending on the position of the camera sensor and the length of the nose piece)
- Stop Ring 1¼" (T-2 part #30) (#1905131 , € 29,-) (optional)
Planetary Camera and Guiding
Finally, you can of course also use two planetary cameras – again, the guiding cam sets the focus distances.
As a last option, we can of course take another video module as a recording camera and – if our guiding software supports it – keep it locked on sunspots or moon craters. This way it becomes really obvious that the off-axis guider sees a different image section than the main camera! But modern planetary cameras are so good that they can even be used for deep-sky photography or EAA - that's when autoguiding becomes interesting.
For this purpose, a T-2 eyepiece clamp is installed on both the rear and the upper connector. If we leave the 1.25" extension sleeve on the camera, the eyepiece has to be moved a bit upwards with one or two T-2 extension sleeves.
The same setup can also be used if different cameras are used.
And finally: Different cameras for guiding and image aquisition.
Note: Once cameras and eyepiece are set up, you can use a stop ring, so that you can always bring them into the same positions by putting them into the eyepiece clamp until the stop ring does its job. Such a stop ring is included with the QHY 5-III-462C CMOS Camera (#1931026 , € 295,-) , which we have used here, or you can buy one seperately like Stop Ring 1¼" (T-2 part #30) (#1905131 , € 29,-) .
Useful parts:
Eyepiece Adaptation:
- Baader Focusing Eyepiece Holder 1¼" / T-2 (T-2 part #08A) (#2458125 , € 46,-) – 29-35mm
- Baader T-2 / 7.5 mm Extension Tube (T-2 part #25C) (#1508155 , € 22,-)
Camera Adaptation:
- Baader Focusing Eyepiece Holder 1¼" / T-2 (T-2 part #08A) (#2458125 , € 46,-) – 29-35mm
- DT-4 Baader 1¼" - 31.8mm nosepiece extension with 1¼" filter thread on both sides (T-2 part #05) (#1905130 , € 19,-) (optional, depending on the position of the camera sensor and the length of the nose piece)
Guiding-Camera Adaptation:
- DT-4 Baader 1¼" - 31.8mm nosepiece extension with 1¼" filter thread on both sides (T-2 part #05) (#1905130 , € 19,-) (optional, depending on the position of the camera sensor and the length of the nose piece)
- Stop Ring 1¼" (T-2 part #30) (#1905131 , € 29,-) (optional)
About the author: Alexander Kerste
Alex is a studied biologist and works as a freelancer as an author, consultant and translator. After his studies and the publication of the Kosmos Starchart-Set in 2004, he was a regular freelancer for Astronomie Heute and the yearbook Der Himmel for the Spektrum-Verlag in Heidelberg. He is in charge of the Beginner courses on www.Astronomie.de and is a voluntary active member in the Robert-Mayer-Observatory since 1993. Since then, he has published a number of books on Celestron-Telescopes as well as Digiscoping and Astrophotography. One of his books on Astronomy with binoculars is also freely available at freebook.fernglasastronomie.de. In addition he supervises the Northern lights and star tours from Hurtigrute – these were also published in a travel guide, further articles can also be found on his blog kerste.de.


Hi
A well detailed article.
Please telll me if with the equipment I have will the Baader Flip 2 Diagonal be suitable for my set up and if so what will be the adapters I need to make this system usable for visual, imaging and possibly guiding.
Skywatcher Mak New 190, 1000
ZWO 1600 mm
ZWO 224 mm
If I use a software like Firecapture for planetary imaging do not need a guider. The 224 mm would be used here. But if I wanted to use the ZWO 1600 as a planetary imager could I add my ZWO 8 position filter wheel to the imaging train?
Please if appropriate for my setup indicate all necessary adapters required.
Before trying an answer: The FlipMirror requires 55mm of backfocus, or 59mm, if you use T-2. Adding a filter wheel requires even more backfocus. Usually, Newtonians (and Mak-Newtons) don't have very much backfocus, so you should check first if you have that much back focus left when a camera is attached.
Just purchased the Baader BFM II. Question is, do I install the filter wheel in front of the flip mirror or behind the flip mirror before the cmaera.
Telescope > Filter Wheel > Flip Mirror > Camera
Thanks.
Although both options are possible, we recommend to install the filter wheel behind the camera - especially if you use RGB or narrowband filters, which are used for photography. This has got several benefits:
- Imperfections of the filters are less of a problem when they are closer to the camera
- The filters do not block light from the guiding camera
- The camera is closer to the telescope, so that the light beam is still wider, and more light can be picked up by the prism of an off-axis-guider
If you use the filters also for the eyepiece (e.g., if you use mainly UHC or O-III filters, or colour filters for the planets), you should install filter wheel or filter drawer of course in front of the BFM.