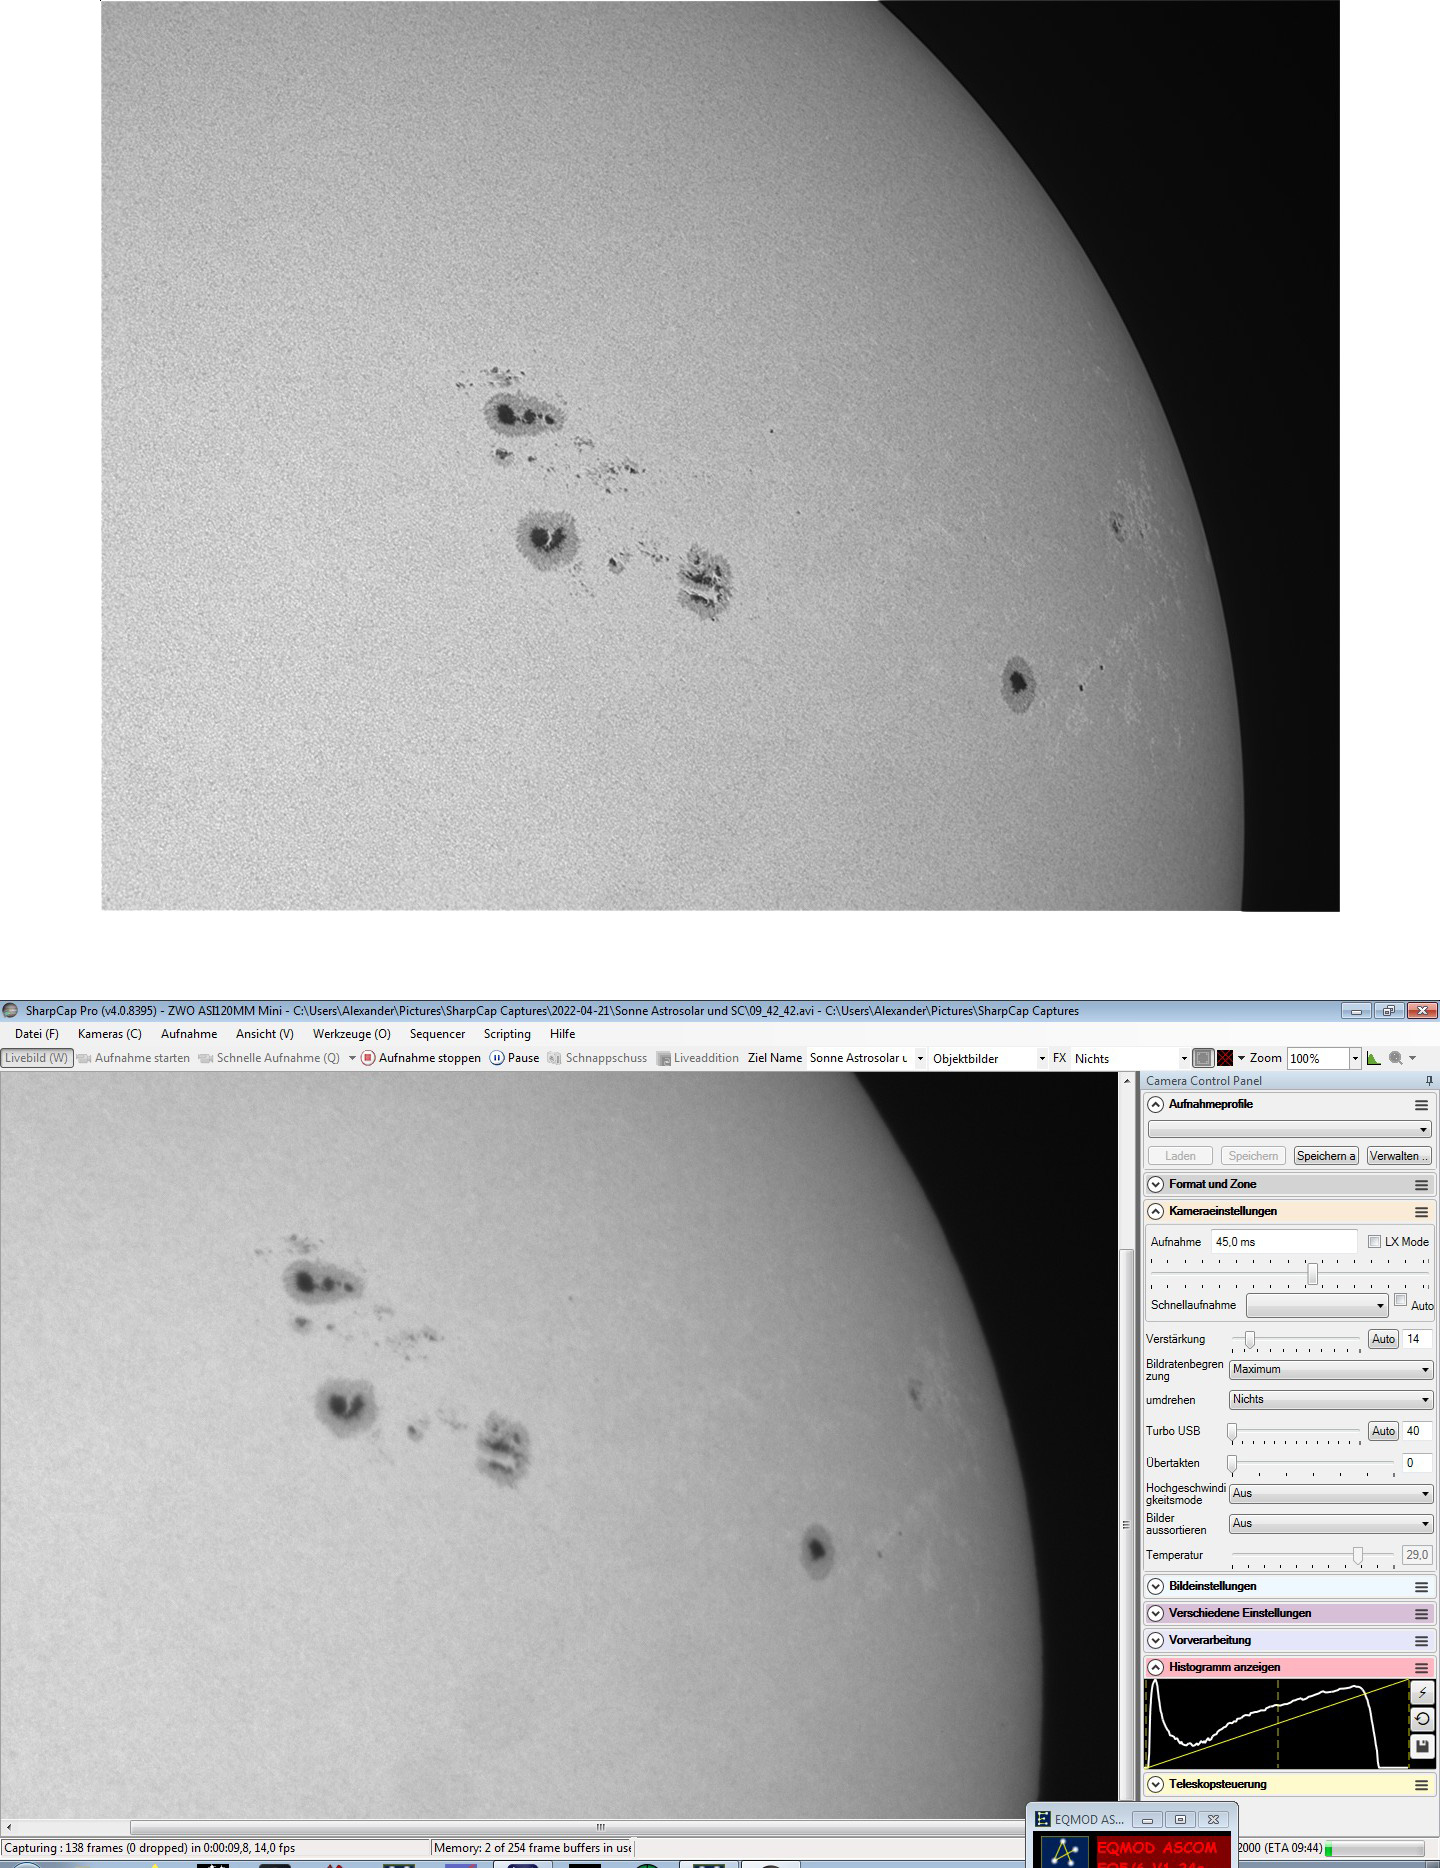
I had the chance to test the DeltaRho 350 f/3 Astrograph (DR350) with the serial number 0003 – all in all this solution is absolutely remote capable! You can read my first impressions and experiences here:
Setup and installation
The unit is very well made and in combination with PlaneWave's focuser and de-rotator, it is quite a massive unit and surprisingly heavy. The center of gravity is at the back of the telescope.
The PWI4 (beta) software that operates the DR350 telescope installs quickly and works immediately with Maxim DL. If you have problems, take a look at the USB settings in PWI4, which is used to operate the fans, the heating of the secondary and primary mirrors, the focuser, and the rotator. The DR350 is controlled purely by the software.
With Maxim DL, I have been able to perform every working routine of focusing and field tilt measurement very well. The results are consistent and extremely important for accurate alignment! After I attached the [product sku="1931162"] with the help of the Baader M68 system, the DR350 was ready for use.
There is a saying among astronomers that with a new hardware the weather is bad for many weeks... Now I have to give some credence to this, because due to high and ground fog, or clouds that did not have a gap, the process of adjustment dragged on for a long time... and the first result was still far away.
The adjustment procedure before the First Light
The bottom line is that the adjustment is easy to do - but it is very important that the image fits! The primary and secondary mirrors are laser-aligned at PlaneWave in the US; the secondary and the tilter must then bring the camera into optimal alignment.
TIP: The night must be good and clear for the field tilt measurement results to be correct! In case of haze, fog or clouds I advise against it![br]
Following are my steps in an overview to get the DR350 to work.
- Determine the focus! Use a normal focus routine. The focus point that you have determined must be used as a basis for the field tilt measurement.
- The field measurement: For this I use a total of 5 shots: two before and two after the focus, plus one corresponding to the entered base value. The distances are 500 steps each at Bin2!
- From this the best focus is now determined. The evaluation shows the field and how the tilt is. Afterwards the field can be corrected either at the PW-Tilter with the platelets or with the Baader M68-Tilter (if it is available in the system).
- And now: run the routine again and repeat the steps of the adjustment until the deviation is below 5micron!
- Check the center of the secondary mirror at Bin1, if all in all is exactly centered!
- Then do one last final pass with the focus / field tilt routine!
Once I had achieved the values that Planewave specifies, imaging began!
The Basics
For each shot, I paid attention to the following points:
- Cool-down: This is where I run the fans until the difference between ambient and catch + primary mirror is less than 1.5°C;
- I did not have any fan active during the exposures!
- The mirror heaters were in use when I had a lot of dew (unfortunately often). But they only ran until the mirror was completely clear again; then it was brought back to temperature with the side fans!
[br]
First Light
I shot in luminance and with RGB (the new Baader LRGB CMOS optimized filter are just top!). I compared the focus in Lum with R/G/B, again the system is very balanced, there is not much variation in the values.
Now I just had to have a really good night with no moon (not a good combination at f/3), and good to very good conditions. Often there was good weather until the end of twilight, but then very often it became difficult. (Fog formation!)
The image of IC59 and IC63: Here the conditions were good for red, just good for green, and for blue I unfortunately already had a lot of haze and ground fog. Exposures were only 60sec per single shot, with the QHY 600M in Bin2 (Gain 26).
The number of all exposures was well over 100, leaving 74min in RGB. The flats were taken with film, darks and bias for data reduction in PixInsight.
The result is very promising with the background of not ideal conditions! For ONLY RGB this is really good!
IC 59 and IC63 taken in less than ideal conditions (lots of haze when taking blue images) with PlaneWave Delta Rho 350 f/3 telescope with Cassegrain focus, camera QHY600M in Bin2 (Gain 26), exposure: 60 seconds per frame
© Christoph Kaltseis
Software:
Data reduction, stacking: PixInsight
Image editing: Adobe Photoshop CC 2023 + APF-R
[br]
My first CONCLUSION
It is a top hardware, which needs absolute care with the adjustment, but rewards you with very good image results. And the system is absolutely remote capable!
A dream telescope? Yes – without a doubt!
A field report after photographic acquisition of five different celestial objects.
From Dr. Claus Possberg, Freyung Observatory (www.possi.space) – October 2022
The use of ultra-highspeed systems such as Celestron RASA, Hyperstar, or special astrographs has revolutionized the acquisition of faint nebular objects in recent years, but requires a special filtering technique that I would like to discuss here.
The private observatory of the author Claus Possberg, also to be found with further information on our observatory world map
An emission line, such as H-alpha at 656.28 nanometers, optimally experiences very little attenuation when passing through a line filter in the central beam. The world's best filters achieve a good 90% transmission here. However, if the beam passes through the periphery of the telescope system, the emission line shifts slightly toward shorter wavelength light (blueshift). If the filters have a very narrow-band transmission characteristic, the wavelength moves from the maximum of the transmission curve toward the slope, undesirably attenuating the beam. The popular photonewtons, which usually have a luminous intensity of f4, are not yet so wide open that the edge rays are significantly weakened even with very narrowband filters (3nm). Such narrowband line filters are in principle especially desirable when doing astrophotography in a not perfectly dark environment (due to light pollution or moonlight) – almost every astrophotographer is affected by this at some point, because really stable clear nights are not too common in our latitudes.
When using extremely fast system (I use a Celestron RASA 36 with aperture f/2.2 in a Bortle 3-4 sky) the blueshift is already so pronounced that towards the edge of the telescope the rays are first attenuated, near the edge they are completely suppressed. Since reflecting telescopes in principle have no central beam – at the RASA e.g. the camera is mounted here – in principle all beams are more or less "edge beams" with differently pronounced blueshift. In former times one had helped oneself by using line filters with a wide "window" (e.g. 12nm or more half-width), so that the edge rays are not yet extinguished. However, such wide line filters also let through a lot of light pollution.
A better possibility is a so-called "preshift", where the center frequency of the line filter is shifted slightly towards blue (usually between 1.5 and 3nm). Special filters for high speed systems use this technique nowadays. The new [product sku="cmosSetUltraHighspeed" style="imgright"] combine this for the first time with a very narrow half-bandwidth of only 3.5nm (for H-alpha) or of 4nm (for SII and OIII). With such narrow passbands, the magnitude of the blueshift and thus the center frequency of the filter must be matched exactly to the light intensity of the telescope – otherwise the edge rays or even the rays close to the center are cancelled out. Baader also had to learn this lesson, because customers using a telescope with a luminous intensity of e.g. f/3.2 already suffered from significant light loss in the more central rays. The problem could only be solved in a physically correct way by Baader's recent addition of another version "f/3" filters, recommended for fast optical systems from f/3.4 to f/2.3.[br]
The f/2 Ultra-Highspeed Filters in use
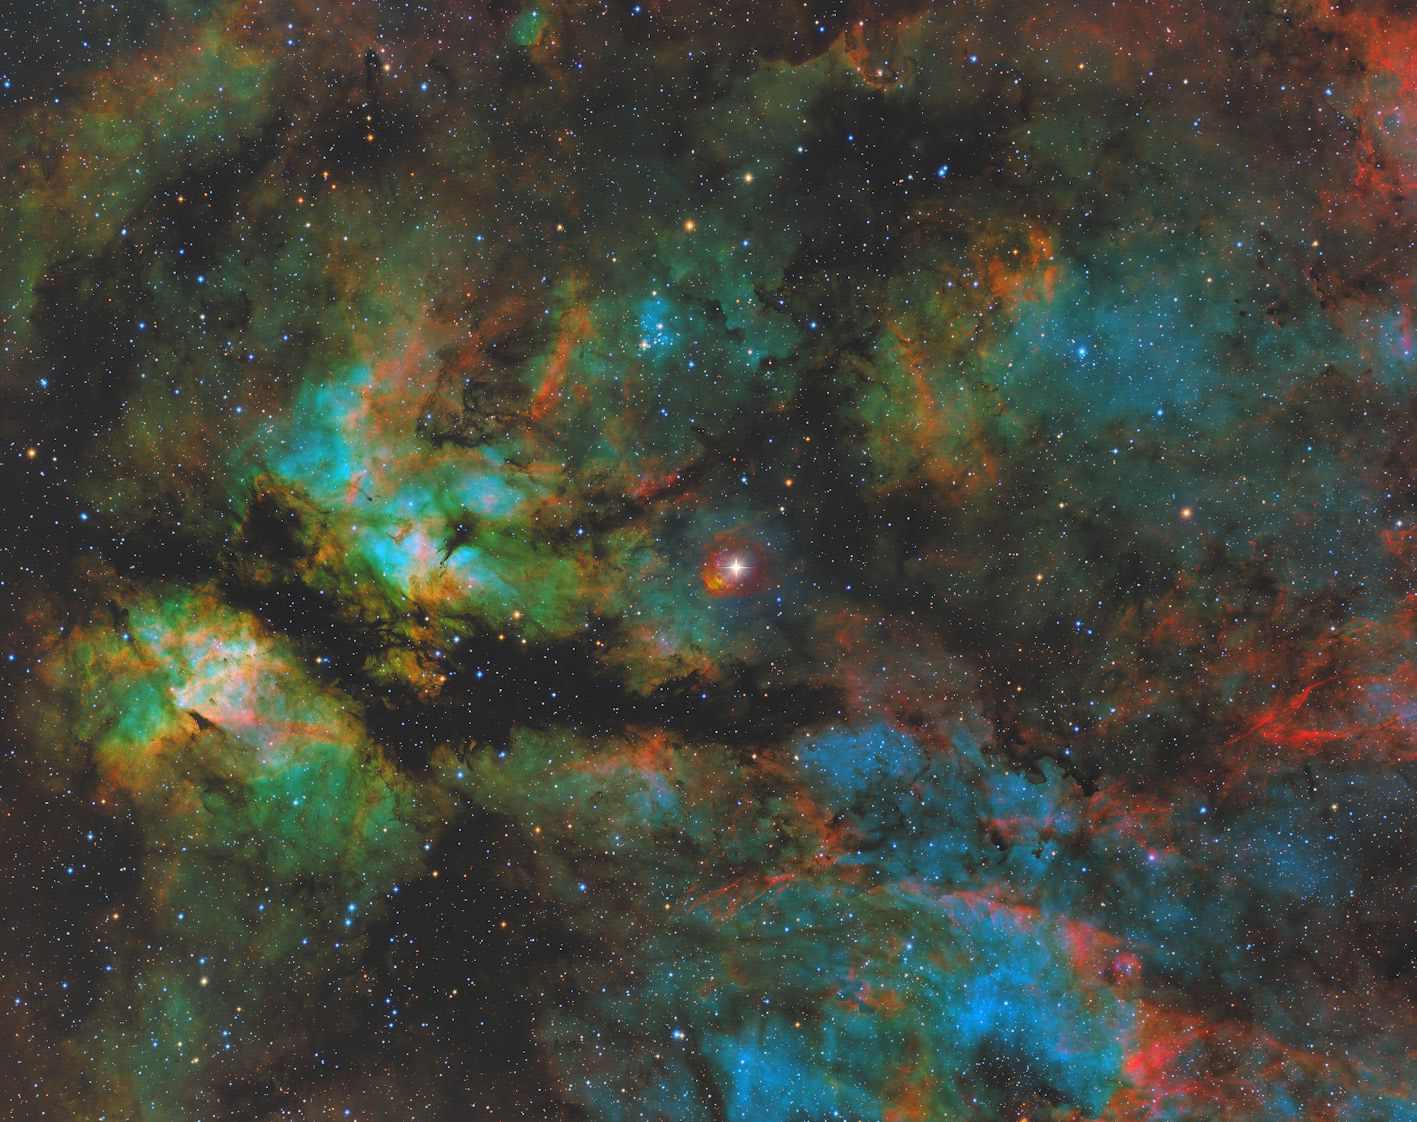
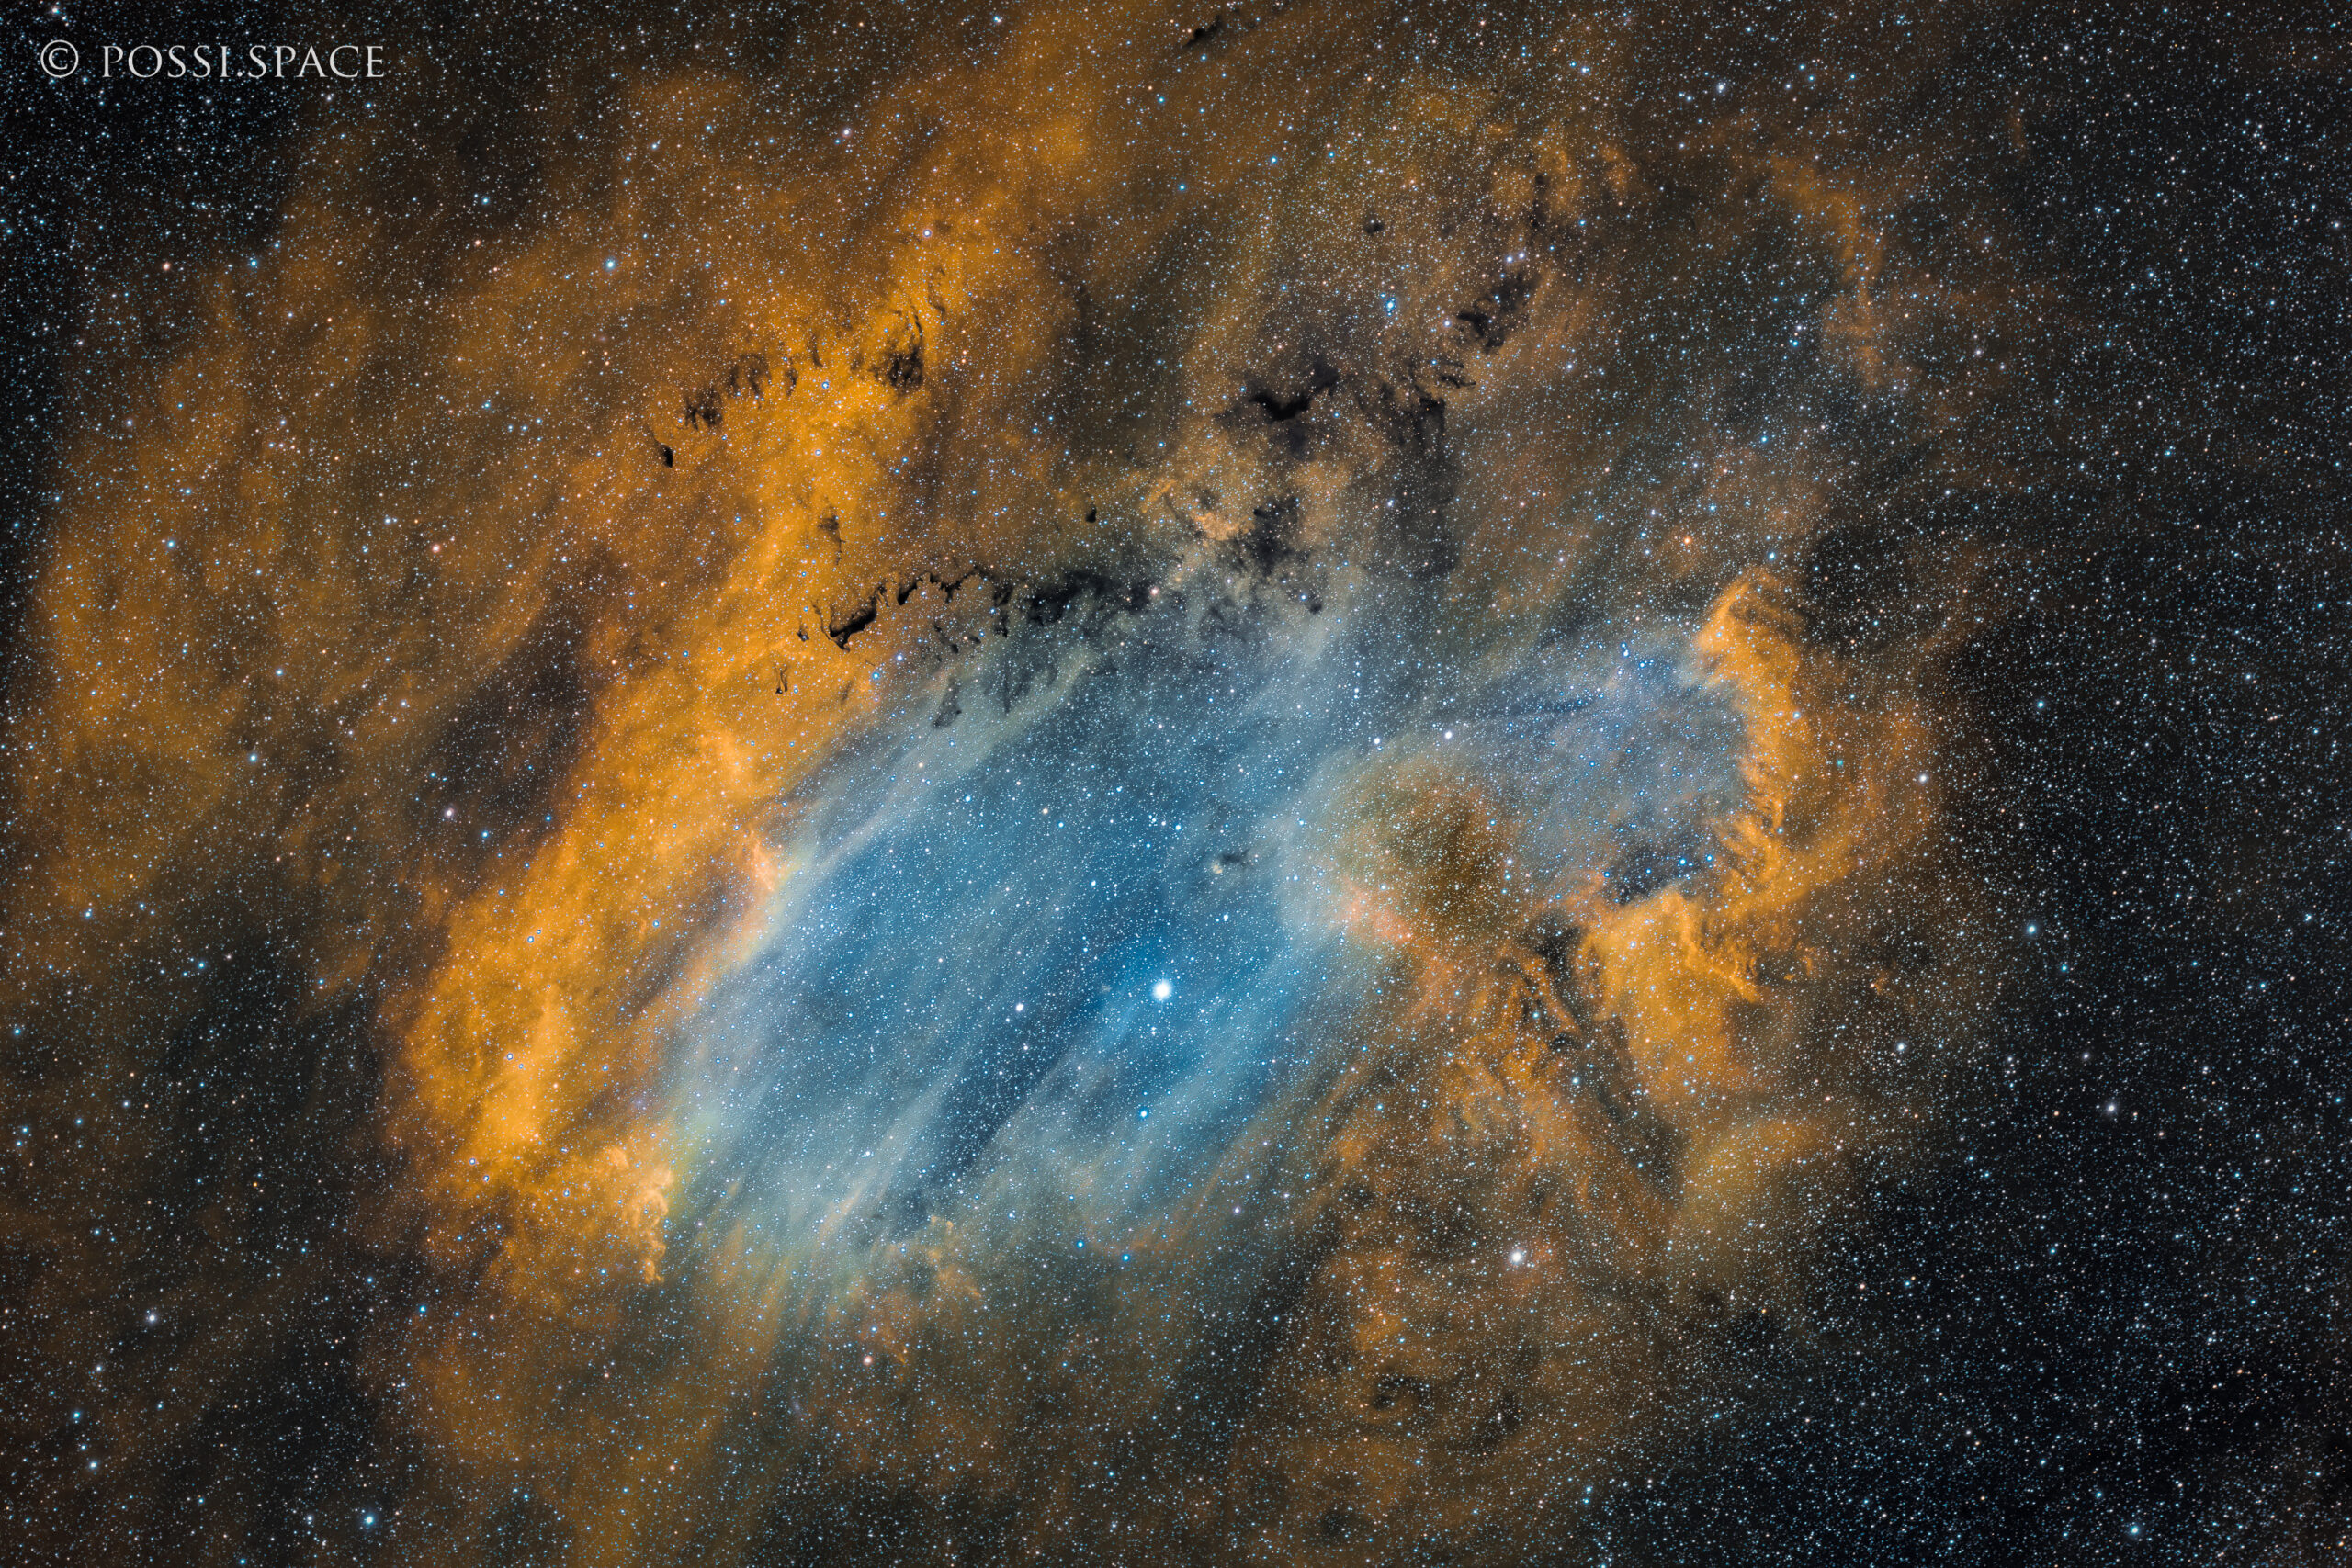
IC1318 Sadr Region: Mosaic 2x4 with 2.03 Gbyte original file size stacked and fused in APP. Exposure time together 22,6h (24 Panes with 60' each, 95% of them computed. HSO with own palette). Camera ZWOO ASI6200MM PRO with Baader f2 high speed narrowband filters. Download Full JPG Size: 15MB, 20.000px Seitenlänge
For my RASA 36 (f/2.2) I used a test set of the version "f/2 UNB" with 50.4mm diameter. This version is recommended for extremely fast optical systems of faster than f/2.3, but might not work for f-stops even faster than f/1.8 (extremely fast photo lenses for example).
I had the opportunity – my thanks go to Tobias Baader for the long test period – to test the new filters without any specifications for about two months and took pictures of five different objects with them (pictures see below). For comparison I also had a HSO set of 6nm Astronomik "FR" here, which also show a blueshift, but are just not as narrowband.
I attach some results as examples for the new Baader "f/2" filters. I would like to list here the properties that the new filters exhibit in my images:
- very narrow band, very little light pollution comes through. This is especially important for the OIII filter. In this point better than 6nm wide filters
- hardly any light loss with the ultra-fast system in all three lines
- very low halo tendency. A hint of halo can be found only at extremely bright stars
- no reflections (at least I did not notice any)
- blackened edges also reduce internal reflections
- special coating seals the edges (still extreme caution - avoid bumping and fingerprints)
- H-alpha and SII are parfocal, OIII has to be refocused (doesn't matter for RASA, since a filter slider has to be used anyway, since there is no room for a filter turret)
- Individual measurement protocols were not included. The customer must trust that there is no significant specimen scatter.
- like all high quality narrow band filters expensive (but in my view still competitively priced). In return, the narrowest line filters for ultra-fast systems on the current market with the best stray light suppression.
Conclusion:
I have personally decided that I will keep these excellent new filters. The high quality 6nm filters I have used so far will be sold.
Text and Images: © Dr. Claus Possberg, Freyung Observatory (www.possi.space) – October 2022
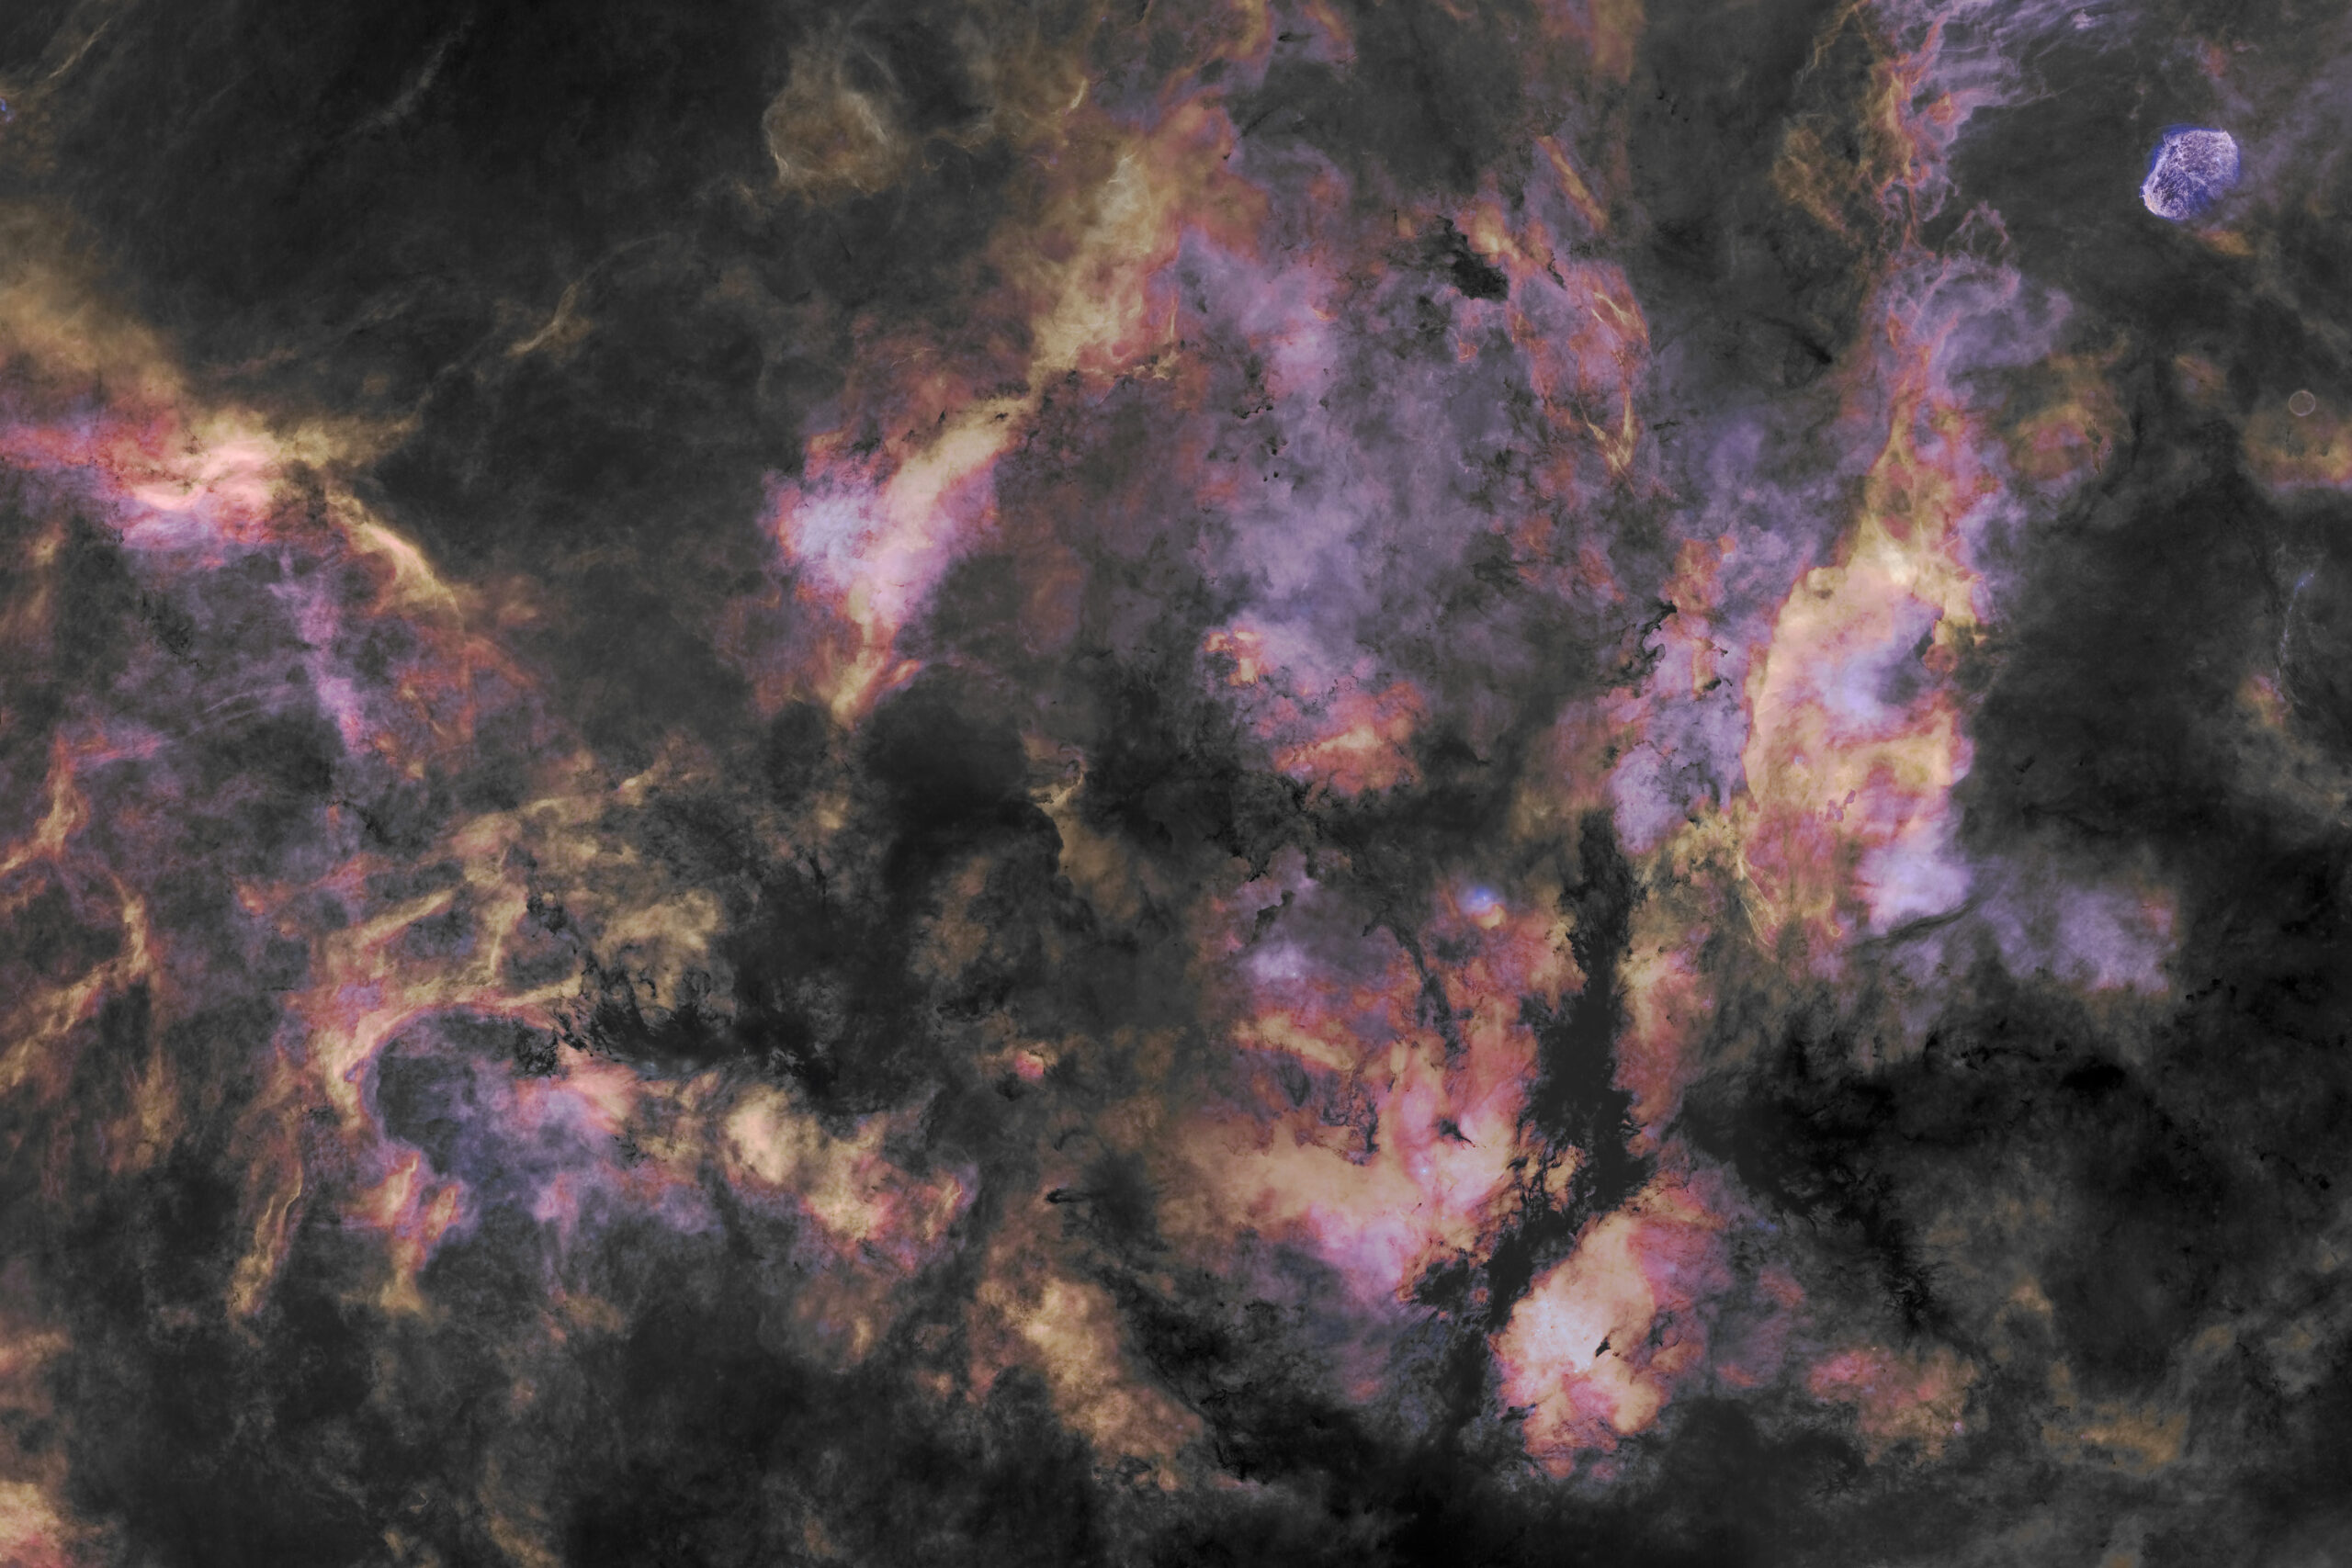
SH2-115 and Abell 71: Narrowband image Hubble II (modified), ASI6200MM PRO as 2x1 mosaic, altogether 15.6h exposure time in three nights, 12.5h of it offset. Good seeing 1,2...1,4".
SH2-119: Narrow band Hubble II (modified), ASI6200MM PRO, total 17.6h exposure time in four nights, of which 14.1h (80%) offset. Good, at times very good seeing 1.2...1.5".
SH2-134: Narrowband image RGB palette (modified), ASI6200MM PRO, total 11.1h exposure time in three nights, of which 8.9h (80%) offset. Good, at times very good seeing 1.2...1.5".
SH2-103: Bicolor image HOO (modified), ASI6200MM PRO, 7.2h calculated exposure time. Seeing very good- good. Baader filter 3.5/4nm test exposure.
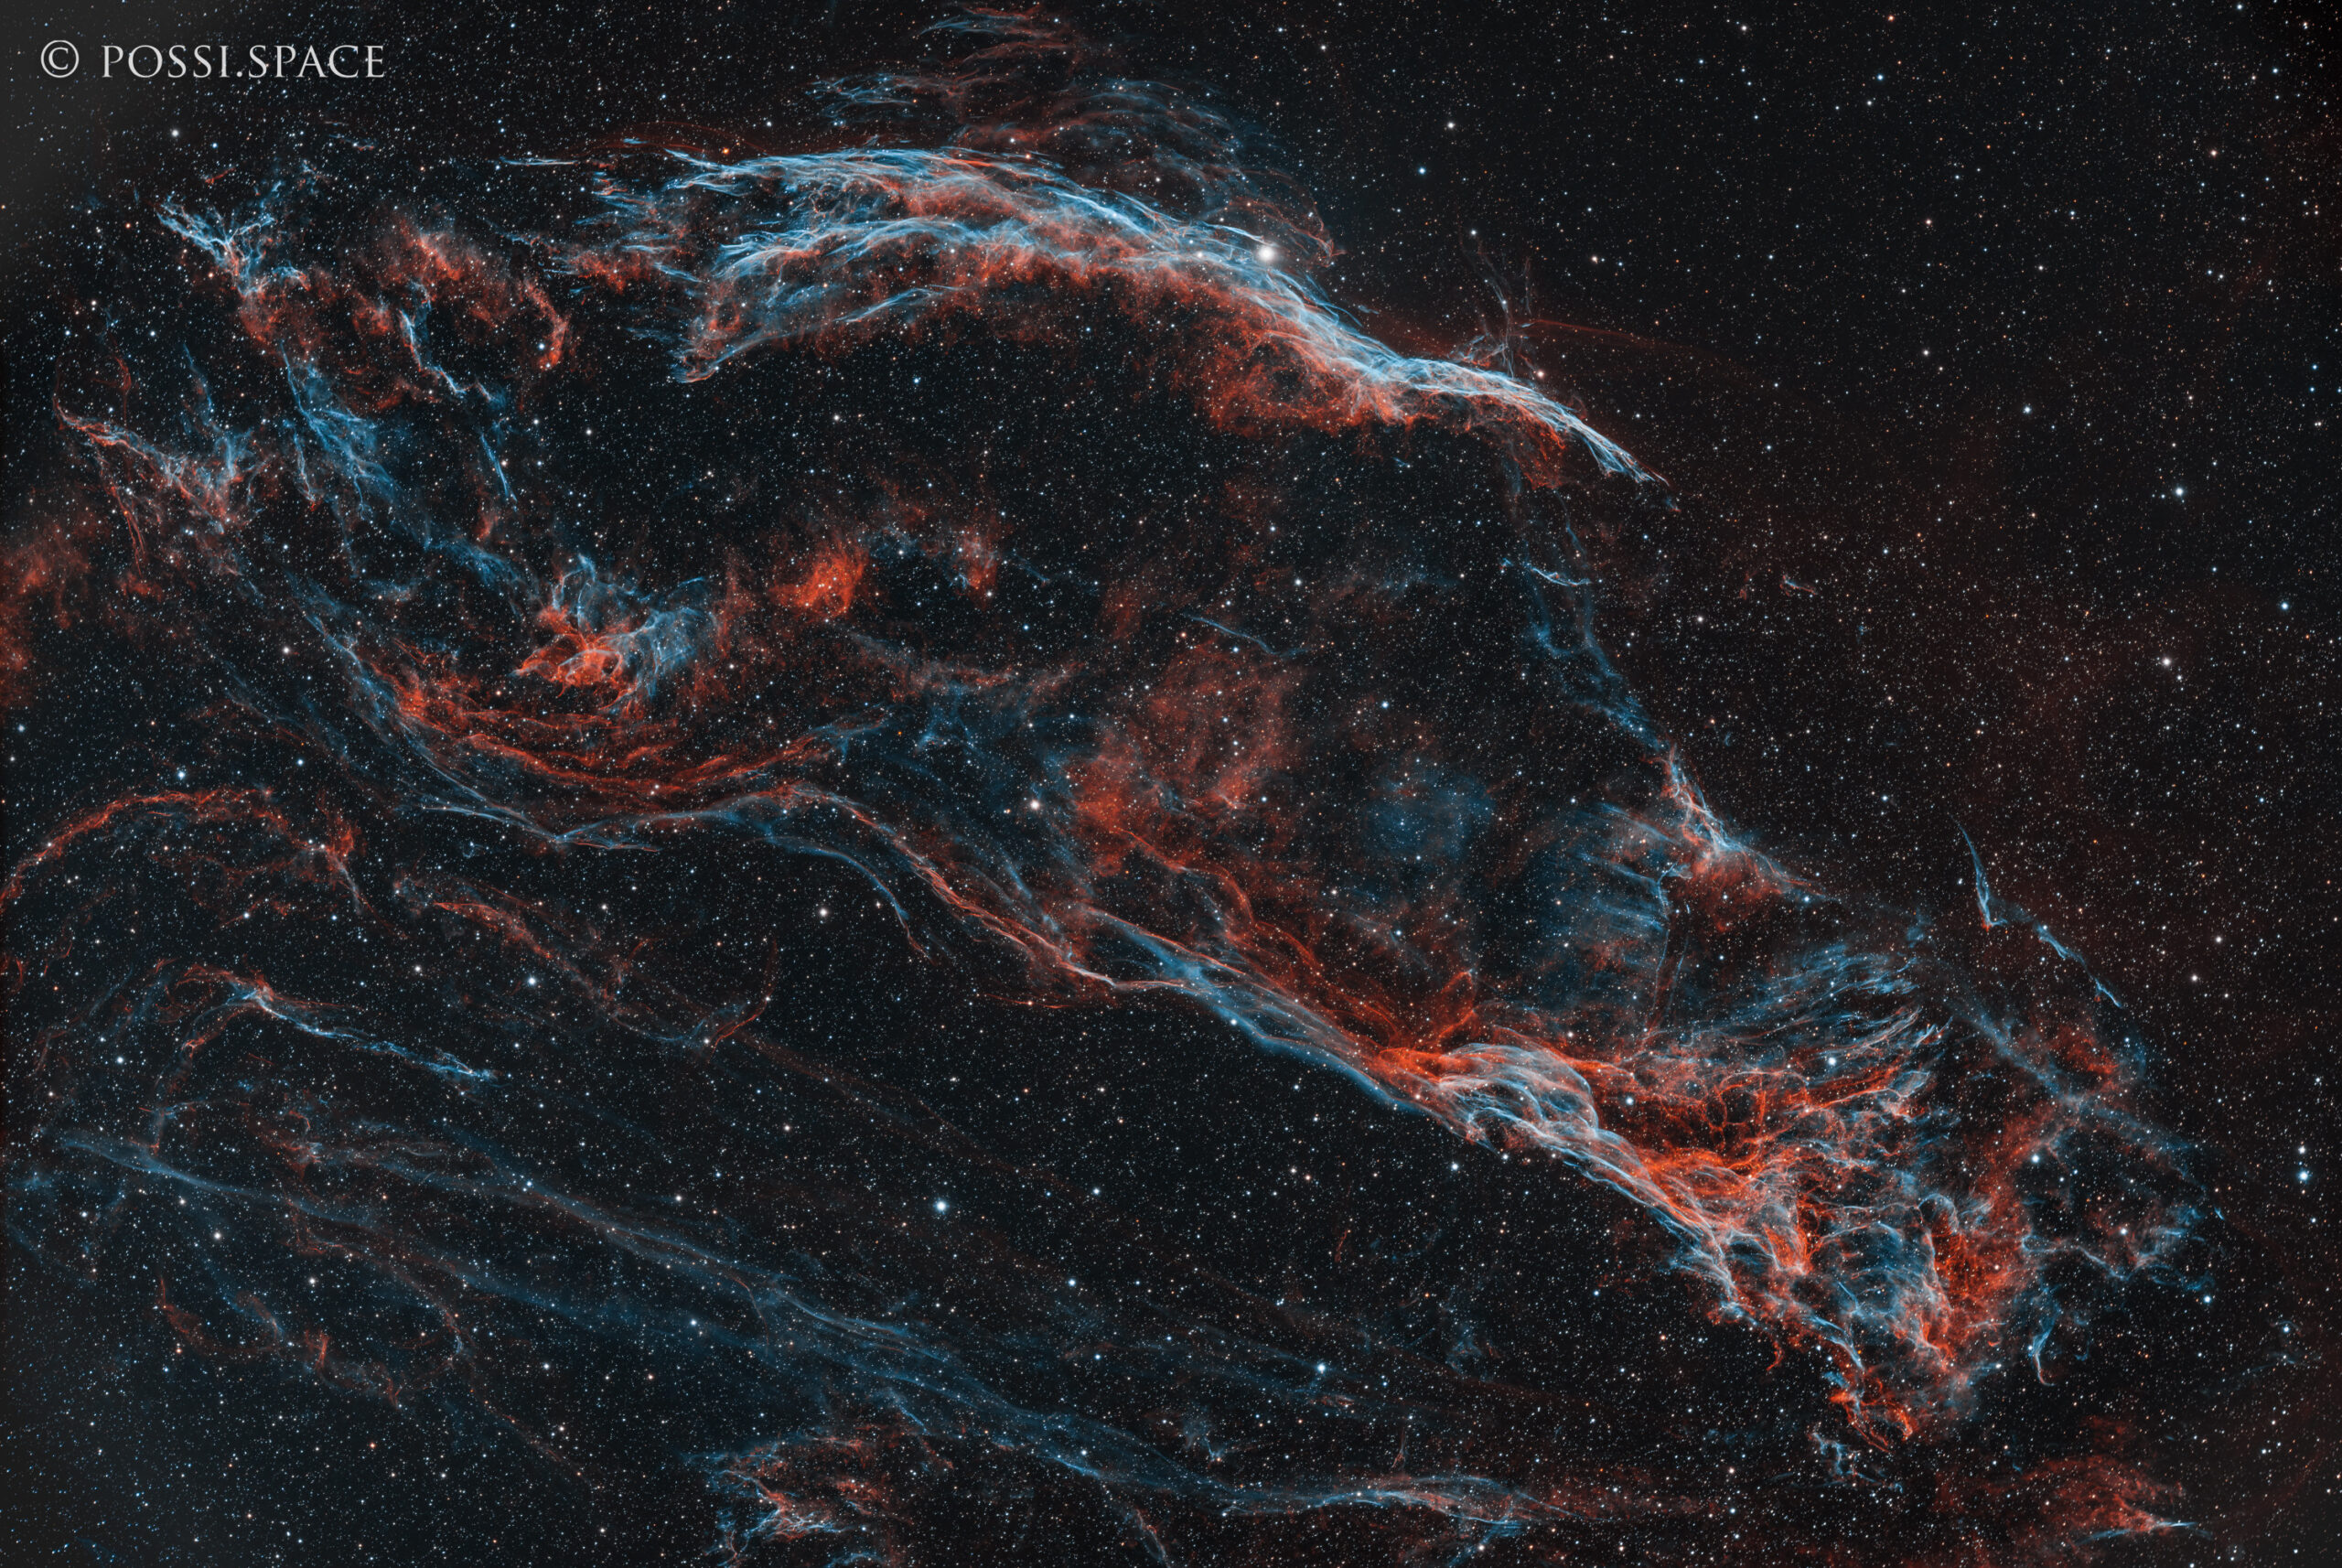
IC1318 Sadr Region: Image as above, but de-starred and reduced in size. Note the fine structure of the Crescent Nebula at the upper right edge and the small bubble JU1 below, which was discovered by an amateur only 10 years ago.
Sometimes it is worth giving things a second chance after many years. Panta rhei, as the saying goes…
The Baader Solar Continuum Filter is such an inconspicuous thing that I had largely ignored after a first quick test 15 years ago and which has now completely convinced me in its current incarnation with 7.5nm FWHM: [product sku="solarcontinuumfilter" style="imgright"]. This is due both to my observing experience and to product development and a larger variety of telescopes now in my reach.
Spoiler: Correctly used, it has got an incredible potential – not only to remove the colour aberrations of achromatic lens telescopes as expected, but to my great surprise also when imaging the Sun through apochromatic telescopes.
Here is an image comparison, taken through a Zeiss AS 150/2250 telescope, with Baader Herschel wedge and an additional ND3-Filter – on the left, supplemented with a ND0,9-filter (exactly as for visual observations, and to get comparable exposure settings), on the right supplemented with a Baader 7,5nm Solar Continuum filter. The camera was a monochome ZWO ASI Mini. Below the images is a screenshot of the live view and the exposure settings, above is the final, stacked image.
Zeiss AS 150/2250 with Herschel wedge, ND3 and ND0.9
Zeiss AS 150/2250 with Herschel wedge, ND3 and Baader 7,5 nm Solar Continuum
[br]Although the Baader Solar Continuum requires a longer exposure time, the gain of contrast on the semi-apo is impressive, so I did some more experiments with this filter.
As this test has become more extensive than expected, here is a small index, so that you can skip to the most interesting parts for you:
Theory – Why a Baader 7.5 nm Solar Continuum Filter?
First, let's take a brief look at the theory: the Sun can be observed either in white light (aka: continuum, i.e. in all colours at once which are emitted by the photosphere - its glowing hot surface), or only within selected spectral lines (especially H-alpha at 656.3nm and calcium at 396.8 nm and 393.4nm).
Just for comparison: The same region of the Sun, which was photographed on April 19th, 2022 with the Baader 7,5nm Solar Continuum – but now with a 0,6Å [product sku="1363056"], also through a Vixen 80/910Mf. The image was colorized in post-processing.
On the other hand, the wider 396.8 nm and 393.4nm Calcium-filters (K-line filters with half-band-widths of ca. 8nm) in comparizon do allow the observation of both calcium lines at once and supply excellent contrast even if they are considerably broader to show both Calcium-lines than H-alpha. Calcium observation – only with a camera! – though will require a front aperture white-light solar filter (AstroSolar ND3.8, a Herschel wedge or a special D-ERF as it is used only in the Triband-Schmidt-Cassegrains) in front of a narrowband calcium filter.
Calcium-filters with a half-band-width of less than 1Å show even more details on the Sun. Basically, they use be the same the same technic as with the use of H-alpha filters and both filters are similarly expensive. However, the calcium line is almost in the UV, which has two disadvantages: it is already harmful to the eye, and even if the optical calculation of the telescope would transmit this wavelength with suffficient quality, we hardly notice the calcium light with our eyes. The Calcium-Sun is therefore purely a target for photography!
When we look at the solar continuum - that is the uninterrupted spectrum, or the Sun in white light - these special Fraunhofer fluorescence lines are lost because they are weaker than the light from the glowing hot surface of the Sun. In white light, therefore, we can see only the photosphere. In a Herschel wedge with good neutral density filters for additional brightness attenuation, the Sun therefore appears pure white; some filters give it a bluish or yellowish tint - but this is purely caused by the filters.
Therefore, when observing the Sun in white light (continuum), we can also limit ourselves to any part of the solar spectrum without loss of information. The 2022 version of the Baader 7,5nm Solar Continuum Filter has a half-band-width of 7.5 nm (instead of 10 nm before). This is much wider than the specialised H-alpha or calcium filters, but has amazing effects. Its transmission window is at 540nm and thus in the green part of the spectrum. It thus shows the Sun in that part of the spectrum where most refracting (lens) telescopes provide the best image without loss of any details - as the structures in the solar continuum are present in all wavelengths of the visible spectrum.
First Impressions – Visual Use: Best Views with Achromatic Telescopes
I made my first, few observations with a Solar Continuum circa 15 years ago with a (non-stacked) Baader 10nm Solar Continuum filter of the first generation, which came with my Herschel wedge in 2006/2007. At that time I was mainly a visual observer and was not very impressed by the filter: I gave it a shot on the Zeiss AS 150/2250 refractor of the Heilbronn Observatory and on my own Celestron ED80/600 - both telescopes that provide a very colour-clean image as long as you do not look at the Vega in a spectroscope. The effect was rather subtle: The clack green sun showed a little more detail on the Zeiss refractor at low magnification (around 50-100x), at high magnification the difference to observing with an ND filter was smaller. On the ED80, on the other hand, it showed a little more detail at high magnification above 100x. After all: the image was better than with a standard green filter, but as long as I was using colour-free telescopes for visual observations, I preferred a simple polarising filter with which I can adjust the brightness by turning the eyepiece behind the Herschel wedge and still see a pure white Sun.
Well, the times are a-changing, I've gathered more experience and equipment, and in spring 2022 I received the newest version of the [product sku="solarcontinuumfilter" style="imgleft"]. It includes blackend edges and Baaders age-resistant LifeCoat which is also designed to reduce reflexes and improve contrast) and only 7,5nm FWHM instead of 10nm.
For visual observations, the Baader 7,5nm Solar Continuum works best with large, achromatic telescopes with fast f/ratios.
Looking through the eyepiece, there were no surprises: The effect was slight on the 150/2250 Zeiss AS and the ED80/600. The filter was much more effective on the achromats that had been added to our collection since then - a 150/1200 achromat that had come to Heilbronn from the former Schriesheim observatory, and a Vixen 80/910Mf in my own collection. Here, as expected, the colour error disappeared and the solar image became much richer in contrast. Here it is actually worthwhile to observe a green sun, as you can now magnify much higher profitably. So far, so good.
The Wow-Effekt with a Monochrome Camera
Unlike more than 15 years ago, I now have several digital cameras at my disposal. In 2006, my solar photography was still limited to single shots of the entire solar disk with a Nikon D50 DSLR. I was all the more amazed by the image results when I first tested the new Baader 7.5nm Solar Continuum Filter on the 150/2250 Zeiss AS with Baader Herschel wedge and a monochrome camera, which I have already shown at the beginning of this article. I would not have expected such a big difference between a neutral density filter and the Baader 7.5nm Solar Continuum, especially not at a semi-apo with almost no colour aberrations!
A few days later, after Easter, I had the next chance with clear skies. This time I used my little Vixen 80/910Mf, which I use mainly for H-alpha. Thanks to f/11 it doesn't suffer too much from colour aberrations, but it does show some colour when you magnify higher. You can tell that Vixen didn't use Japanese optics here.
Well, a cheap telescope "needs" a cheap filter, so instead of the Herschel wedge, I put the simpler, not temperature-compensating ASSF80 filter ([product sku="assf" style="imgright"]) in front of the lens for the first tests. In addition, I also used an additonal ND1.8-filter to achieve similar exposure times as later with the Baader 7,5nm Solar Continuum.
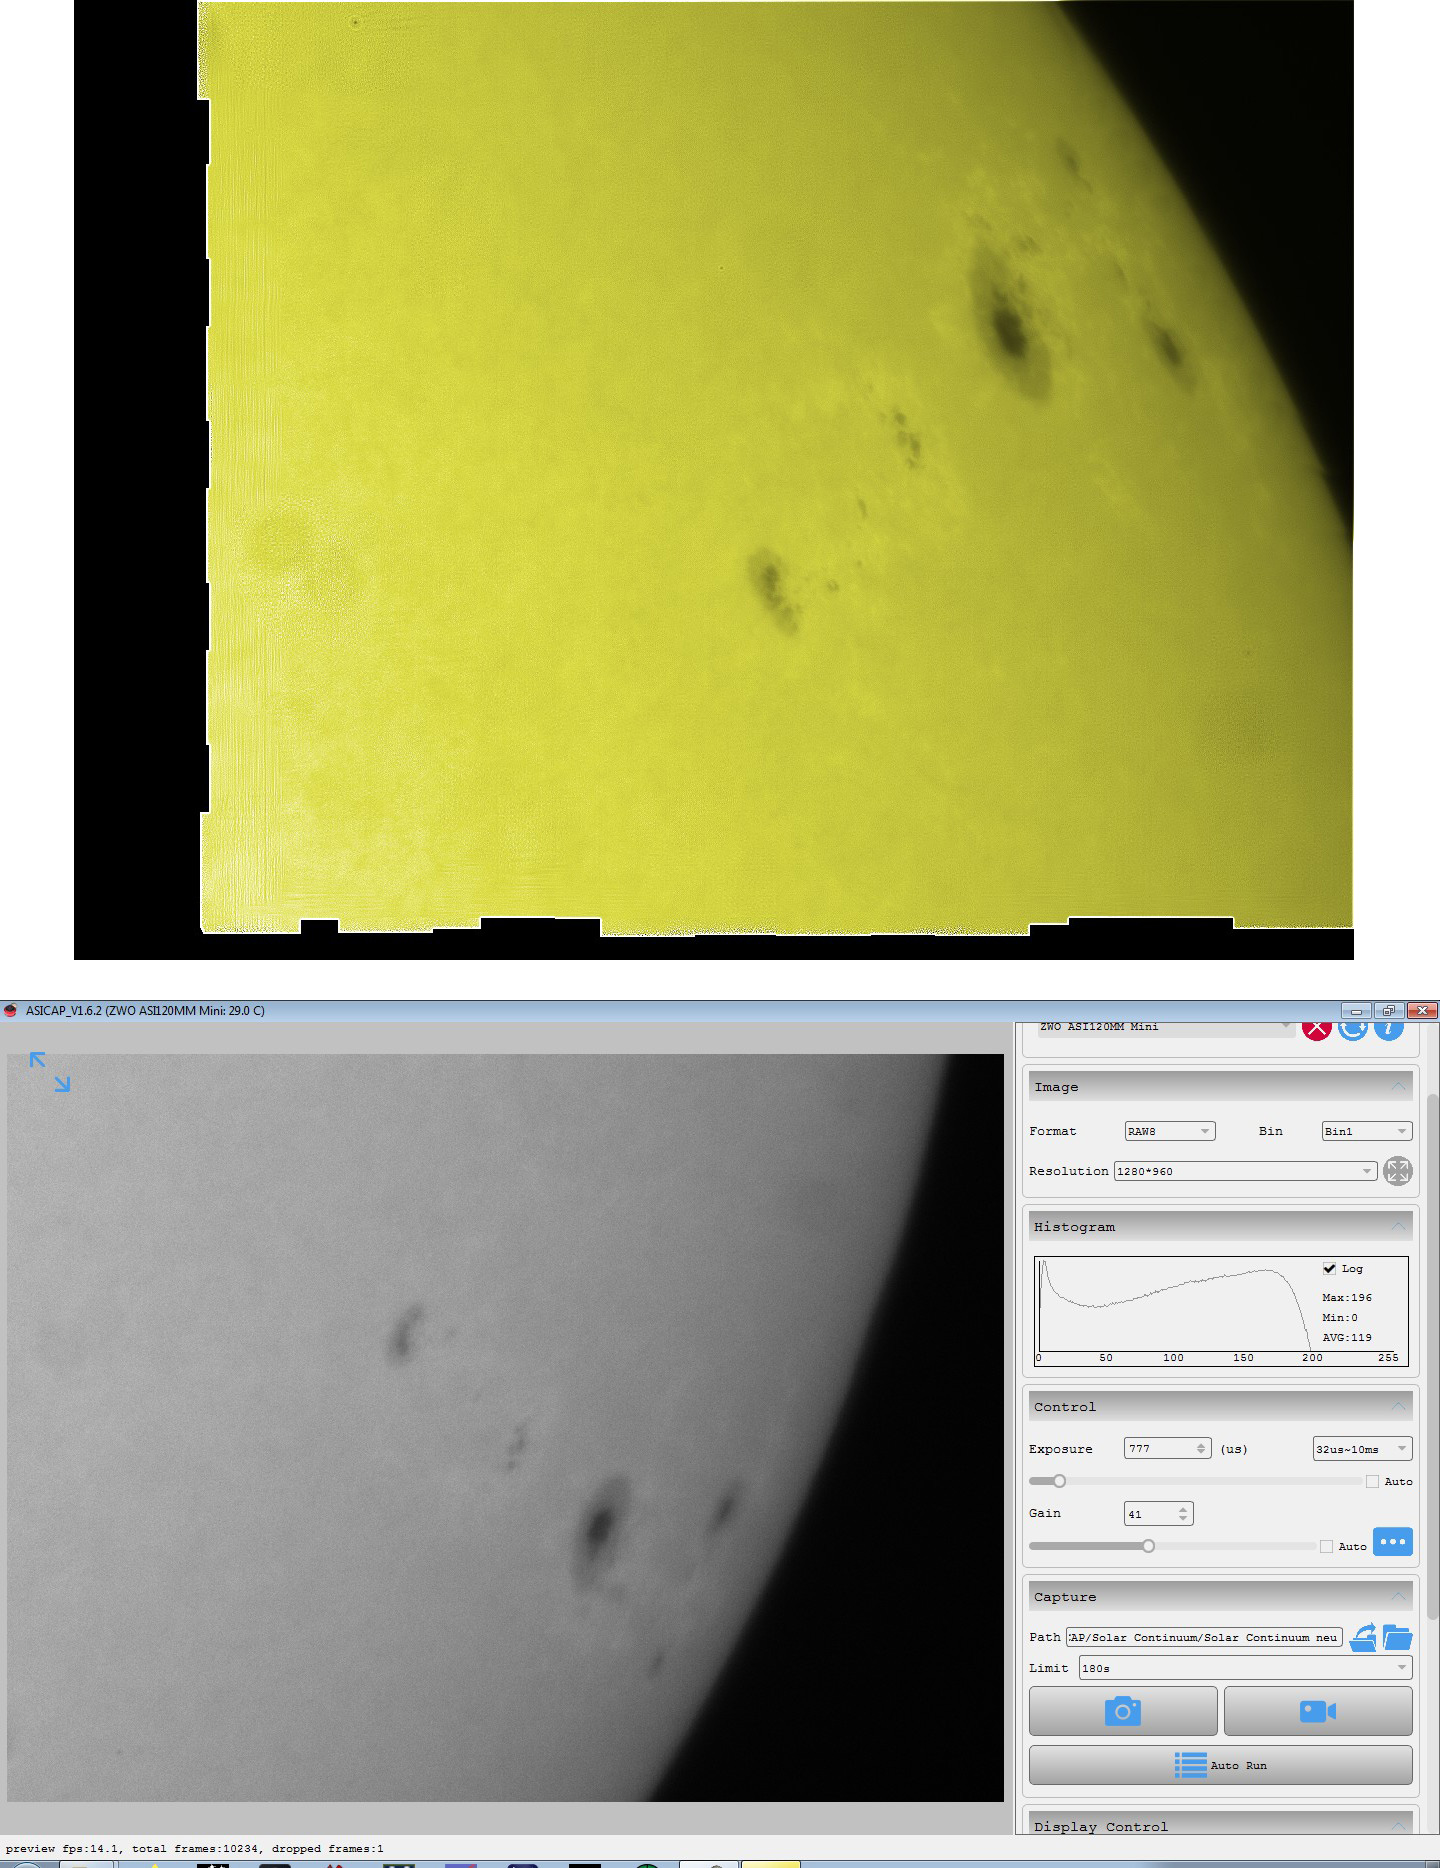
The preview on the laptop display (this time I was using SharpCap, which also helps focusing) wasn't too impressive, but the data weren't too bad: The image processing with Autostakkert and Registax gave a quite nice image, although with a surprising number of stripes.
Next shot: Again with AstroSolar film, but now replacing the ND-filter with the Baader 7,5nm Solar Continuum: The preview image was already much sharper and easier to focus. The result was again processed with Autostakkert and Registax, and it shows much more than the previous shot without the Solar Continuum filter:[br]
Vixen 80/910 Mf with AstroSolar ND5 and ND1.8
Vixen 80/910 Mf with AstroSolar ND5 and Baader 7,5 nm Solar Continuum
[br]
Vixen 80/910 Mf with Herschel wedge and ND3, without any further filters
After the test with comparable exposure times, it is of course still interesting to see what is possible with shorter exposure times. I used the Vixen 80/910Mf with Herschel wedge and ND3 again, but without any other filters. The result was a surprise: Although I could use much shorter exposure times, the image of the ZWO ASI Mini was unusable. Lots of stripes. Stacking and subsequent colouring don't help much either.
So I need a stronger filter to make the camera work? So much about short exposure times...
Finally, two more pictures, this time not with AstroSolar film, but with Herschel wedge, ND3 and either ND0.9 or Baader 7.5nm Solar Continuum. First with the ND0.9, then with the Baader 7.5nm Solar Continuum: [br]
Vixen 80/910 Mf with Herschel wedge, ND3 and ND0,9
Vixen 80/910 Mf with Herschel wedge, ND3 and Baader 7,5nm Solar Continuum
[br]Here, too, a clear gain in contrast can be seen. It is also surprising how well the Astrosolar film performs in comparison - although a higher magnification was not possible with the seeing on this day.
DSLR and Mirrorless Cameras – The Sun in Colour
What's left? Of course the whole Sun in one frame, with a one-shot colour camera. I fetched my Panasonic G91; the MFT-Sensor is large enough for 910mm focal length. Unfortunately, I can't control this camera through my laptop, so I had to focus with the camera display. Not so easy in bright daylight...
Here it became noticeable again that with a colour camera and a narrow-band colour filter only a part of the sensor is used; the red and blue pixels are "left in the dark". Therefore, the advantages are not so obvious. On the other hand, Autostakkert has problems with 24-megapixel files, and the wavelets from Registax had practically no effect. Instead, I then processed the stacked image in Luminar, with sharpening and detail enhancement.
Vixen 80/910 Mf with Herschel wedge, ND3 and ND09 – stacked image made of 15 frames with Panasonic G91
Vixen 80/910 Mf with Herschel wedge, ND3 and Baader 7,5nm Solar Continuum – stacked image made of 15 frames with Panasonic G91
So I did one image with ND3 and ND09 placed behind the Herschel wedge: There are some artifacts from stacking, but the result is not too bad compared to the next try with ND3 and Baader Solar Continuum filter.[br]
Conclusion
My conclusion of the test has to be split in two parts. First of all, the visual use:
The filter is a must-have for users of achromats, as the telescopes then finally can show sharp images of the Sun even at higher magnification.
The effect is more subtle on high-quality apochromats without colour aberrations. With an apo, the [product sku="solarcontinuumfilter"] is worth a try if you are really looking for fine details at high magnification; occasional observers can probably do without it. On the Herschel wedge, I prefer a simple polarising filter to attenuate light while keeping the Sun's image white.
Photographically, it looks quite different. Anyone who seriously wants to photograph the Sun and uses a black and white camera will benefit enormously from the Baader Solar Continuum filter, even on an apochromat. On reflecting telescopes, the effect should be similarly impressive.
On the other hand, if you only photograph the entire Sun with a colour DSLR and maybe even work without stacking, you will benefit less from the filter, as only half of the camera's pixels are used. Here, the contrast gain is similar to the visual impression and depends on how strong the colour error of the telescope is.
In contrast to H-Beta (see the blog post on the 5.5nm H-Beta filter), there have long been options on the market for OIII filters that go beyond the filters marketed as "visual". While the "visual" OIII filters feature half-widths of 12nm and 10nm, respectively, the photographic OIII filters range down to 3nm, which represents a significant contrast gain.
I have already had good visual experiences with the 8.5nm OIII CCD filter from Baader Planetarium in the past. When Baader introduced its [product sku="cmosO3Narrow"] in the fall of 2021, I asked if I could borrow the new filter to explore its visual capabilities in observing galactic nebulae. To my delight, I then received the desired filter in both 1.25" and 2" screw mounts.
The purpose of narrow band CCD and CMOS filters is to improve the signal to noise ratio in the photograph. This gain occurs in visual observation as well - especially where there is a lot of noise in the form of light pollution, moonlight, or outshining stars in the field of view. In the following observation report, I give an example of how the 6.5nm filter can be used to wring a bouquet of nebulae from the moon.
[br]
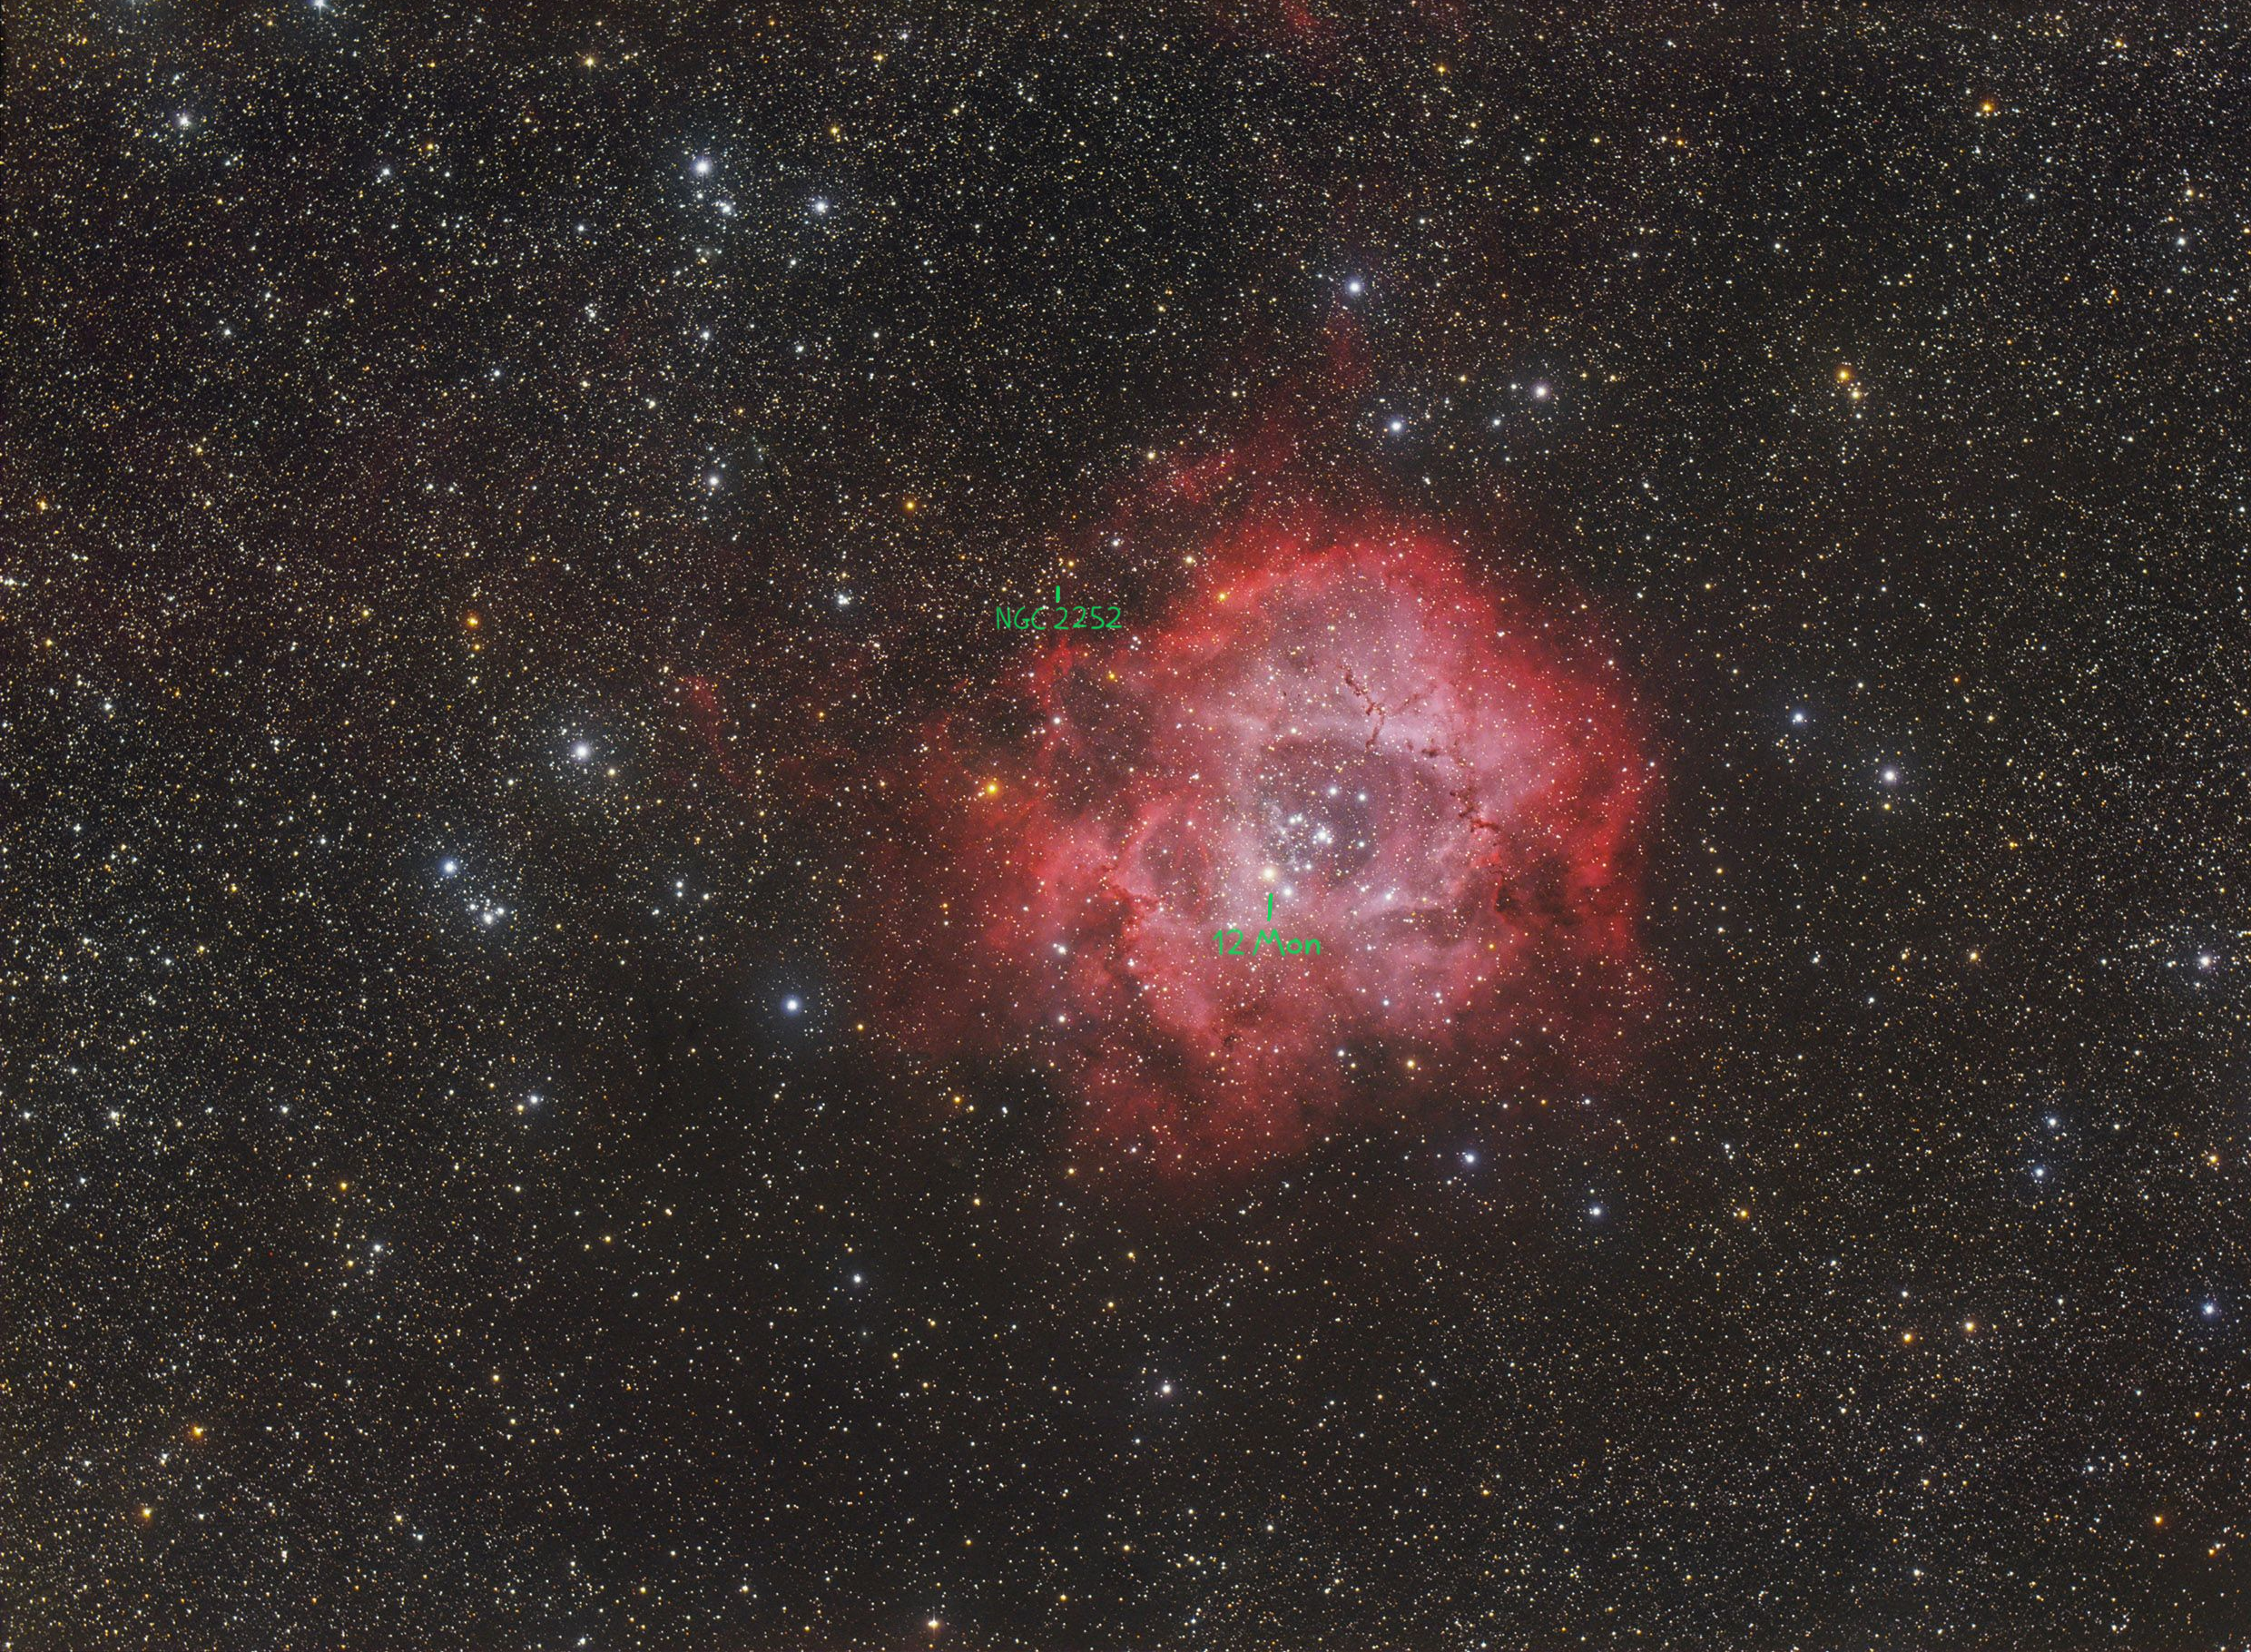
On the night of February 7, 2022, the sky transparency was good, but the moon was half full in the transition from Aries to Taurus. This pushed the FST value to 4m5, meaning the faintest star visible to the naked eye had a magnitude of 4m5. I pointed a pair of 100mm binoculars at 23x first at the Rosette Nebula NGC 2237 in the constellation Unicorn, successively screwing the Baader UHC-S filter and three different types of OIII filters into the eyepieces in pairs. The observations in detail:
Image source: Astronomischer Arbeitskreis Salzkammergut, CCD Guide 2020. Image authors: Franz Klauser und Manfred Wasshuber.
-Unfiltered: No nebula visible. The open star cluster NGC 2252, which is located directly northwest of the nebula, shows up as a glittering star condensation, which underlines the very good sky transparency.
-Baader UHC-S: The nebula cannot be detected with certainty. There is some unrest around the central cluster NGC 2244, but this is equally the case everywhere northeast of the cluster in a wide area.
-Baader OIII 10nm Visual: With this filter a restless nebulous ring can be seen around NGC 2244. The closer surroundings of the cluster are relatively dark. The ring is determinate enough to make out that 12 Mon (a foreground star, not a cluster member) stands at its inner southeastern margin.
-Baader OIII 8.5nm CCD: This filter provides a significant contrast gain compared to the 10nm filter. The nebular ring is now clearly visible. Additionally: it has a 15 to 20 arcminute bulge to the southeast.
-Baader OIII 6.5nm CMOS: When changing from 8.5nm to 6.5nm it takes some time until my eyes are adapted to the much darker image. It is worth it, because now the nebula ring is strong and very present. I see three brighter patches in the ring that I hadn't noticed with the 8.5nm filter.
[br]
[br]
Afterwards I turned 15° north to the Monkey Head Nebula NGC 2174, which is located in the constellation Orion but physically belongs to the association Gemini OB1.
Image source: Astronomischer Arbeitskreis Salzkammergut, CCD Guide 2020. Image author: Bernhard Hubl.
-Unfiltered: To estimate the sky transparency I first look for the open star cluster NGC 2158, which is located about 4° north of the Monkey Head Nebula in Gemini close to the star cluster Messier 35. NGC 2158 is clearly visible as an unresolved small cloud. Yes, the transparency is good! The Monkey Head Nebula is not visible without a filter. Pismis 27, a small cluster evolutionarily related to the nebula and located at its northeastern edge, is clearly visible as a compact group with half a dozen members.
-Baader UHC-S: With this filter I can still make out the open star cluster NGC 2158 in Gemini. This proves that the transmission of this type of filter is high. Sweeping back and forth in the target area reveals the Monkey Head Nebula NGC 2174 as a very faint nebula around the central star HD 42088 (7m6 visual magnitude and the nebula's main source of excitation).
-Baader OIII 10nm Visual: Now the Monkey Head Nebula is quite distinct and does not need field sweeping to be detected. I cannot perceive any particular shape.
-Baader OIII 8.5nm CCD: This filter provides a contrast gain compared to the 10nm filter. It appears to me, though somewhat uncertainly, as if I can see the brow of the monkey (i.e., the southwestern edge of the nebula).
-Baader OIII 6.5nm CMOS: The change from 8.5nm to 6.5nm provides a significant gain in contrast. Also noteworthy is that the star depth is barely reduced compared to the 8.5nm filter, even though the sky background is much darker. I can now clearly see the monkey's brow - very satisfying, this filter is worth it!
[br]
I summarize, that with increasingly narrower half-widths more nebulosity became visible, in an impressively clear way. The above observations took place under a sky that was considerably brightened by the half-full moon. It should not be inferred from this that the 6.5nm OIII filter is only gainful under brightened skies. On the contrary, I have used this filter repeatedly under darker skies with distinct visual gain.

Mr. Hay is a visual observing amateur astronomer and co-author of the "
Beobachteratlas für Kurzentschlossene" (BAfK). This observing guide is available for free download at:
www.freunde-der-nacht.net .
There Mr. Hay reports (only in German) on other successful observations with the OII 6.5nm CMOS filter in the section "Filter Experiments - OIII".
Of course, there will be situations where the 8.5nm, 10nm filter or even a 12nm OIII filter of a competitor is advantageous. After all, no one would want to claim that a single eyepiece is optimal for all situations. However, it can be said that with the arrival of the Baader 6.5nm OIII filter, skywatchers have access to a very narrow yet affordable OIII filter that will provide the critical visual contrast gain in many situations.
My thanks to Baader for their awareness of the potential visual performance of photographically designed narrowband filters, and for their willingness to let me borrow them, making it possible for me to explore this performance.
Christopher Hay,
64342 Seeheim-Jugenheim, Germany
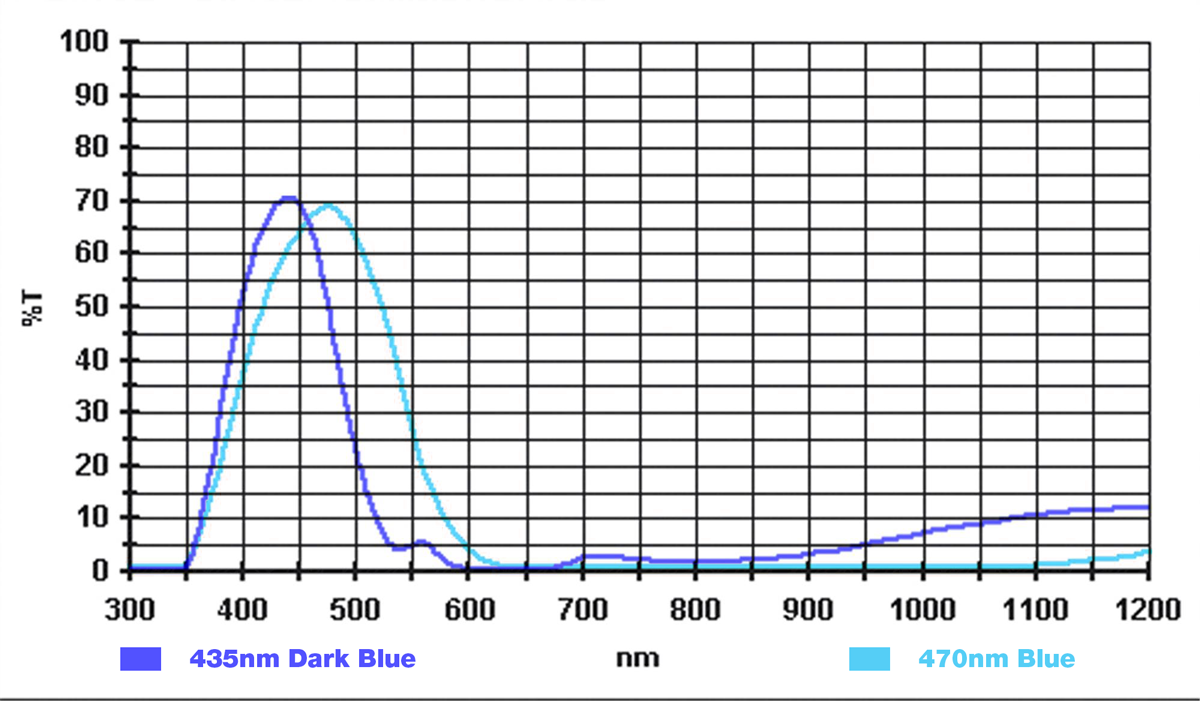
March 2021: The idea behind the visual use of blue filters from RGB palettes is that they have much higher transmittances in the blue value and steeper curve slopes than the usual blue filters known from planetary observation - e.g. the Wratten 80A/B/C filters or also Baader's dark blue 435nm and light blue 470nm filters. A CCD or CMOS blue filter allows much more light of the blue reflection nebulae of our galaxy to reach the eye and at the same time filters out the stray light in the green and yellow very effectively.
Comparison Baader blue color filters
Based on these considerations, soon after the release of their new CMOS filter range, I asked Baader Planetarium if they would lend me a CMOS blue filter [product sku="cmosRGBb"] in all visually usable formats:
- 1¼" screw-in thread for eyepiece-side mounting,
- 2" screw-in thread for 2" eyepieces on telescopes as well as for lens-side mounting on binoculars up to 45mm aperture, and finally
- 65x65mm square for lens-side mounting on 60mm binoculars.
I was preaching to the choir, because Baader was very interested in the visual possibilities of these filters. Within a few days I received a bulging package
Especially for the Pleiades nebulosity I had high hopes for the blue filters. So I used a moonless night at the end of February 2022 to compare the filters on the Merope Nebula and Maja Nebula. The sky quality was FST 5m0 - a typical suburban value. A Cassegrain telescope with 180mm aperture and 2400mm focal length with a 2-inch filter wheel in front of the zenith mirror was used.
Over the years, the [product sku="2454636"] has emerged as the first choice for nebula observation because of its excellent transmission in combination with a large field of view and pleasant viewing behavior in my experience . With this eyepiece, a magnification of 67x and a field of view of just over 1° was obtained on the Cassegrain.
Image source: Astronomischer Arbeitskreis Salzkammergut, CCD Guide 2020. Image author: Sebastian Voltmer.
The observations in detail (The labels are inserted by me. North is on top, East on the left.):
-Unfiltered: There is a visual unrest in the whole area of the Pleiades. I attribute this more to glare from the many bright stars than to the nebulae.
-Baader UHC-S: This filter reduces the glare. Now in the triangle between Merope and the two 8mag stars southwest (HD 23326) and south (HD 23512) a nebulosity can be seen, which is missing in the area east of the Ally's Braid star chain (marked in German as Alys Zopf in the photo): thus at least a clear sighting!
-Baader CCD Blue: Now the eastern edge and the southern edge (the "Hood") of the Meropenebula are more clearly set off than with UHC-S. The western edge of the Meropene Nebula remains pretty unclear. A faint hint of the nebula south of Maja appears.
-Baader CMOS Blue: Now the Meropene Nebula is well set off, also to the west. The background of the sky is darker than with Baader CCD Blue, at the same time the star depth is a bit larger. The Maja Nebula is clearly visible over approximately 4' to the southwest away from Maja.
On the same night I pointed the telescope at the Running Man nebula NGC 1973/1975/1977 in Orion:
This drawing was made in January 2020 by Mathias Sawo without filter using a 12.5-inch telescope at 90x in the Chilean Andes at very good transparency, with Running Man almost at zenith. The labels A to G are inserted by me. North is top-right, east top-left.
My observations with 7 inches at 67x, FST 5m0:
-Unfiltered: stars A and B each have a nebulous halo to the south, these halos are not connected. A nebular halo is clearly discernible around star E (actually a pair of stars, but I don't see the northern companion), and a nebular halo at the perceptual limit around star pair F.
-Baader UHC-S: The nebulae around A and B are now more clearly separated from the surroundings and connected. The nebula around E is present, that around F is no longer visible.
-Baader CCD Blue: The southern nebula part at A and B is now connected and reaches almost to star C. The nebula around E seems to have a small extension towards star G and the nebula around F is visible.
-Baader CMOS Blue: All nebula parts are again better separated compared to the image with Baader CCD Blue. The background of the sky is darker. The southern part of the nebula still reaches C and even slightly beyond D. The extension from E to G is more distinct than with CCD Blue.
The gain of the blue filters over both unfiltered and [product sku="uhcs"] was substantial at Running Man Nebula this night. Among the two blue filters, again, the advantage of the CMOS filter was subtle but clear. Stars at the perceptual limit were easier to hold, the sky background darker, and the overall image richer in contrast. Star B took on a strong aquamarine coloration with the CMOS filter and appeared so bright that it almost outshone the nebula – an interesting effect that did not occur with the other filters.
The differences between the filters at the Pleiades nebulosity were also clear. It is often read that a UHC filter does not help with the reflection nebulae. Apparently, however, the transmission window of the Baader UHC-S extends far enough into the blue while maintaining very high transmission to certainly allow detection of the brightest reflection nebulae.
Mr. Hay is a visual observing amateur astronomer and co-author of the Beobachteratlas für Kurzentschlossene (BAfK). At www.freunde-der-nacht.net, Mr. Hay reports on other successful observations with the CMOS blue filter in the section "Filter Experiment - Blue Filter".
However, it was the CCD/CMOS blue filters that provided a really big gain on the Pleiades nebulosity as well as on the Running Man. It is interesting to note the further gain of the new CMOS filter over the old CCD filter despite very similar looking transmission curves. Apparently, the performance of a filter is determined by complex features that cannot be simply determined from the transmission curve. In any case, I consider the Baader CMOS blue filter to be a real asset to the visual observer's filter kit.
Christopher Hay,
64342 Seeheim-Jugenheim, Germany
Amateur astronomers successfully explore Venus with Baader SLOAN Filter
Even today, amateur astronomers can still contribute to scientific research. For example, our new photometric filters now open another window into the depths of the atmosphere of the planet Venus.
Venus amazes researchers. It is as big as the Earth, but extremely different from it. Venus is a hellish world with temperatures of up to 450 degrees at the surface. The reason for this is an enormously dense atmosphere, which generates a pressure that only exists at an ocean depth of 900m on Earth. This atmosphere consists of 90% carbon dioxide, a dense layer of sulphur dioxide clouds makes it opaque to us. There are only a few narrowly limited wavelengths in which a space probe camera or even a terrestrial telescope can hint at what lies beneath the cloud cover, which for the visual observer is simply brilliant white and contourless.
It has been known for some time that various structures in the clouds are visible in ultraviolet light. The US space probe Mariner 10 delivered the first images during a flyby in 1974.
They show the clouds at an altitude of about 60km. It was not possible to go deeper with the technology of the time. With our [product sku="ufilter" style="imgright"], which is also called Venus filter, even astro-amateurs have been able to observe these UV structures of Venus with common telescopes for some years now.
The atmosphere of Venus, captured with a C11-telescope and Baader U-Venus Filter. Credit: Sebastian Voltmer
Exemplary are the photos of our customer Sebastian Voltmer. The origin of these structures is still not completely clear. [br]
It was not until 1990 that the US Magellan Venus probe was able to map the surface of our sister planet in detail using radar. For the first time, a solidified world without seas and continents became visible, with numerous extinct volcanoes, but only very few meteorite craters in the highlands and lowlands.
The question of whether the very bottom of the surface can really only be explored with radar, or whether the infrared radiation of the hot rock can be recorded directly with appropriate technology, could only be answered decades after the Magellan mission. The best results so far have been achieved by the Venus probe Akatsuki. Its infrared photos show not only a completely overexposed day side of the planet, but also the almost ghostly infrared glow from the depths of the planet on the night side - and above it the sulphur dioxide clouds as dark shadows
In 2021, images of the Parker Solar Probe gave an idea of how far we still are from a complete understanding of Venus' atmosphere. On its way to the Sun, this probe passed Venus several times and delivered images with instruments that were actually intended for observing the solar corona. To the amazement of the scientists, photos of the night side of Venus very clearly showed the surface structures known from the radar scans of the Magellan probe - in the infrared part of the spectrum. This is thermal radiation directly from the surface of the rock. No scientist had expected these results. It is still a subject of discussion why the photos show the surface
Amateur astronomers do science

[product sku="SLOANz"]
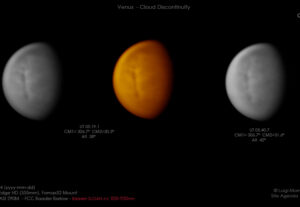
As the well-known website www.spaceweather.com reported on 8.6.2021, a strange effect was rediscovered in the course of amateur monitoring of the Venus atmosphere: the so-called "Venus cloud discontinuity". Equipped only with a Celestron C14 telescope and using a Baader SLOAN z` near-IR filter, it was possible to visualise a wall of cloud thousands of kilometres long which circles Venus at high speed.
This structure has been the subject of research since its discovery by the Japanese Venus probe Akatsuki, and it is thought that by observing it, we can gain insights into the extremely fast rotation of Venus' atmosphere. Amateur astronomers are encouraged to help investigate the phenomenon. This pdf explains the observation techniques.
Actually, the SLOAN filters are designed for photometric measurements, i.e. for determining the physical properties of stars in particular. Using these filters on planets and thus contributing to research is again proof of how creative amateur experiments with new technology can complement professional research. Surely many more amateur astronomers will try out more new ideas with our filters in the coming years. We are happy about any report on this, which we will gladly publish in our blog.
Test report on our new Baader dielectric Bessel filters (prepared by Gianni Galli)
During the last weeks I made several tests and analysis about your new Baader UBVRI filters.
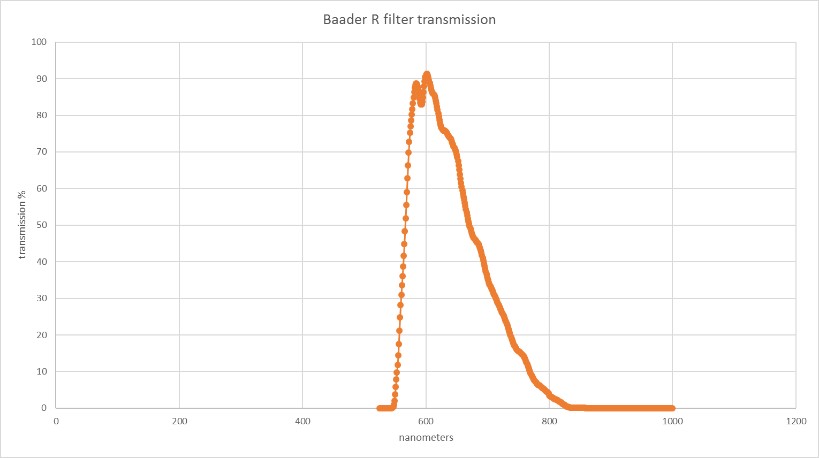
First, I obtained the transmission curves of the filters from the OD data I find in your website. To transform the OD data in curves, I used the following equation:
Transmission = 1/10^OD.
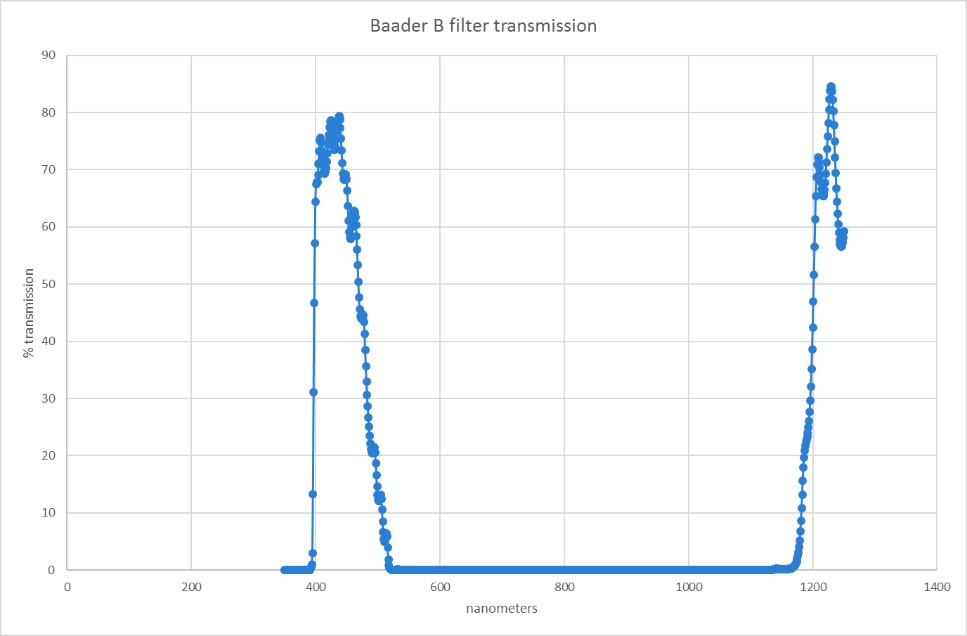
In this way, I was able to get the following curves for U, B, V, R and I filters:
[br]
[br][br]
So now I can compare the transmission curve of your filters with the Bessell standard UBVRI filter curves.
My opinion is that your U,V,R filters are well aligned to the standard, while B and I filters show some differences.
B filter shows the so-called “read-leak”, a transmission peak at about 1200 nm: this is a well-known problem in AAVSO and in ANS Collaboration. The first version of Astrodon B filter showed this characteristic: Henden (at that time AAVSO President) asked to Astrodon to modify the B filter and the last version of this one was correct. The “read-leak” can give some problems when you want to measure a very red target, because the CCD not always have zero response over 1000 nm.
It’s difficult to judge the I filter curve, because it shows large transmission over 900 nm, instead I Bessel filter has zero response just over 900 nm.
The V filter shows a minor problem: it is better that at 656,2 nm the transmission is very low (1% or less) because greater transmission can make the measures wrong when the target has a great emission at this wavelength (for example, a nova star). The transmission of your filter is about 5%: this is a percentage higher than Astrodon (0,40%) and Schuler (0,90%) filters while the Optec one is slightly inferior (4,00%).[1]
The Baader filters have shown me the same reflection problem I saw with Astrodon dielectric filters: the reflection of my focal reducer is very evident. But I was able to find a good solution to this problem.
My Schmidt-Cassegrain has a mirror lock and my CCD is fixed to the telescope, so my astronomic setup cannot move reciprocally: I use the TCF-S Optec focuser and I can focus with great precision and above all in an absolutely repeatable way. When I take CCD images of the target I can note the position of the focus (for example, 3500 counts) and when I take flat field images (through a led panel) I can use the same focus position, so the distance between filter and focal reducer in the target images is the same than in the flat ones. In this way, the reflection in my target images and in the flat ones is almost the same and I am able to eliminate it almost completely with the usual calibration technique (I usually use Maxim DL to calibrate my images). The calibrated image shows a good uniformity, with a percentage difference between the brighter zone and the darker one (respect to the average measure of the field) between 1% and 4%, so I am satisfied with this result.
Finally, I measured the transforms of B, V and R filters (the filters I want to use in my photometric activity) following the instructions given by Brian D. Warner in his book “A pratical guide to lightcurve photometry and analysis”.
I observed with the filters above mentioned the Henden field of V371 Per and I measured the transforms of B, V, R filters and the Hidden transforms of (B-V) and (V-R) color index [2] through Canopus software.
The results are the following:
| With reference to (B-V) color index: |
With reference to (V-R) color index: |
| T(B-V) = +1,125 +/- 0,030 |
T(V-R) = +1,170 +/- 0,020 |
| T(B) = +0,183 +/- 0,027 |
T(B) = +0,367 +/- 0,030 |
| T(V) = +0,066 +/- 0,021 |
T(V) = +0,131 +/- 0,021 |
| T(R) = -0,006 +/- 0,024 |
T(R) = -0,024 +/- 0,024 |
[br]
The transforms of V and R filters are good, while the B transform is fairly good.
Some years ago, using a C11, a SBIG ST8XME and Astrodon B, V, R filters, I measured the following transforms:
| With reference to (B-V) color index: |
With reference to (V-R) color index: |
| T(B-V) = 1,085 +/- 0,012 |
T(V) = -0,009 +/-0,010 |
| T(B) = 0,072 +/- 0,014 |
T(R) = -0,031 +/- 0,008 |
| T(V) = -0,009 +/- 0,007 |
T(V-R) = 1,034 +/-0,009 |
[br]In the Baader filters tests I used:
Celestron C14 + focal reducer Optec 0,50x with a focal length 2.050 mm (focal ratio 5,76x), CCD Moravian G2-3200 with KAF 3200. The graph of KAF3200ME Quantum Efficiency is:
Datasheet from ON Semiconductor
- 1) Misure di trasmittanza dei filtri fotometrici ANS, by Stefano Moretti ARAR Ravenna
ANS Collaboration, web site http://ans-collaboration.org
- 2) Lorenzo Franco, private communication
Author: Gianni Galli GiaGa Obs. MPC 203, Pogliano Milanese (MI) Italy
Mr. Francesco di Biase had the opportunity to test the new Baader Ultra Narrowband Filters 36mm in unmounted version in his small observatory with a sliding roof under a suburban sky (19.40 SQM). Among other things, the observatory is equipped with a 10micron GM2000 HPS II mount and a 12" GSO RC telescope, which he uses at full focal length with a KAI 4022 CCD sensor.
We are very pleased about the positive feedback on the new CMOS-optimized [product sku="cmosSetUltraNarrow"] and his field report.
Original: My general opinion on performance, supported by the tests carried out and my experience with other high-end products, is fully positive. I believe that they can be equated with the most famous brands, with the advantage of a cheaper price. Of course, as soon as I need them, I will seriously consider using these filters for my setup.
[br]Have you had any experience with the new CMOS-optimized Baader filters? We are happy to receive more reviews.
In the summer of 2021 I approached Baader Planetarium to ask whether I could test the new [product sku="cmosO3Narrow"] to explore its visual capabilities for binocular observation of galactic nebulae. To my delight and surprise, Messrs. Baader offered not only to provide on loan the 6.5nm OIII Filter which I had requested, but also a prototype of the [product sku="cmosHbetaNarrowband"] now available on the market – and to do so in pairs in both 1.25” and 2” filter cells!
I must admit that, initially, I had no particular expectations of the 5.5nm filter. For I, too, had allowed the prevailing myths about H-Beta obervation to cloud my view. These myths include: 1) visually the image already becomes too dark with 12nm H-Beta filters and even more so with tighter filters, 2) very few objects profit visually from H-Beta, and 3) these are only observable under excellent skies and with large apertures. Nonetheless, I was pleased by the confidence that Messrs. Baader placed in me and was impressed by their pioneering spirit, so I gave it a go.
My very first test debunked Myths 1) and 3) thoroughly:
In the second half of the night from 3 to 4 September 2021 sky quality had reached NELM 5m4 – the best I can hope for in my suburban garden – and Perseus had climbed high by this time of night. So I turned the 10x70 binoculars to the California Nebula NGC 1499, placing, one after the other, three types of H-Beta filter pairs over the eyepieces. My observing notes read:
- Unfiltered: No nebula seen. Given the great sights made possible by filters it never ceases to surprise me that the nebula is totally invisible without them
- Astronomik H-Beta 12nm: Definite broad nebular band, curving concave to Xi Per. Approx. 1.5° long and 0.7° wide. Hard to determine definitely where it ends, but the long northeastern and southwestern flanks are clear
- Baader H-Beta 8,5nm CCD: A striking curved nebula. Much better contrast to sky background than with Astronomik H-Beta 12nm and also longer, now reaching approx. 2° length. A noticeable protrusion in the middle of the northeastern flank much like a very flat, long fin of a fish.
- Baader H-Beta 5,5nm CMOS: Dramatically best view. Nebula stands out in sharp contrast to dark surroundings, particularly to the northeast. Margins are even more distinct than with 8.5nm CCD. Gain in contrast is not at the expense of details or extent of the nebula. Quite on the contrary: a further 2° long extension becomes tangible towards the southeast, very faint, curving finally south and almost reaching the star HD 26311. The nebula is 4° long!
In lieu of a sketch I refer to the photo shown here. This gives a good impression of the size of the nebula as seen with the 5.5nm filter pair on the eyepieces of the 10x70 binoculars.
I really saw the nebula over this extent – naturally not in such contrast or detail, but in this size. HD 26311 is the bright star (visual brightness: 5m7) close to the bottom edge of the photo. The photo also gives an idea of the fishfin feature in the northern flank of the nebula opposite to Xi Per.
Since then, in various observations of the California Nebula and further nebulae of the summer and autumn sky, I have been able to repeatedly confirm the enormous gain provided by the 5.5nm filter. The filter is a game-changer – so much so that I decided to purchase it in pairs in both filter cell sizes. I do not consider myself wealthy, and this purchase leaves a dent in my wallet. But I would say that, considering the new vistas it opens up, this filter is economically priced.
I have a strong interest in stellar associations and their star-forming regions, which are home to many of the showcase pieces in the skies. These are often enveloped in extended nebular shells emitting mainly in H-Alpha/Beta/Gamma. Such H-Beta nebulae are at least as numerous and diverse as the OIII-dominated parts of star-forming regions, the latter only occurring in the active cores of those regions. They certainly cover much more of the sky than the OIII-dominated nebulae do. About 200 objects await visual exploration in H-Beta. I’m looking forward to progressively debunking Myth 2)!
There will of course be situations in which Baader’s 8.5nm CCD H-Beta filter or the commonplace 12nm H-Beta filters will be visually preferable to the 5.5nm filter. After all, nobody would claim that a single eyepiece is the optimal tool for all situations. What matters is that now, with the arrival of the Baader 5.5nm filter, amateur astronomers are at long last in a position to select from a set of different H-Beta filters – each with significantly different properties and all visually gainful – the one that is ideally suited to the situation, just as we select the proper eyepiece for the moment from our eyepiece case.
 Christopher Hay is the co-author of the “Beobachteratlas für Kurzentschlossene” (BAfK), a German-language observing guide to the night sky. This is the first work in German which presents the OB stellar assocations systematically and sets out their physical and observational links with galactic nebulae. The BAfK is available for download free of charge (only in German) here: www.freunde-der-nacht.net
At the time of observation the H-Beta 5.5nm CMOS filter pair was a prototype on loan from Baader Planetarium and not yet on the market. I wish to express my appreciation of Messrs Baader for their awareness of the visual potential of narrowband filters, and my gratitude to them for their willingness to make the loan that allowed me to explore this potential.
Christopher Hay,
64342 Seeheim-Jugenheim[br]
About filter application on binoculars
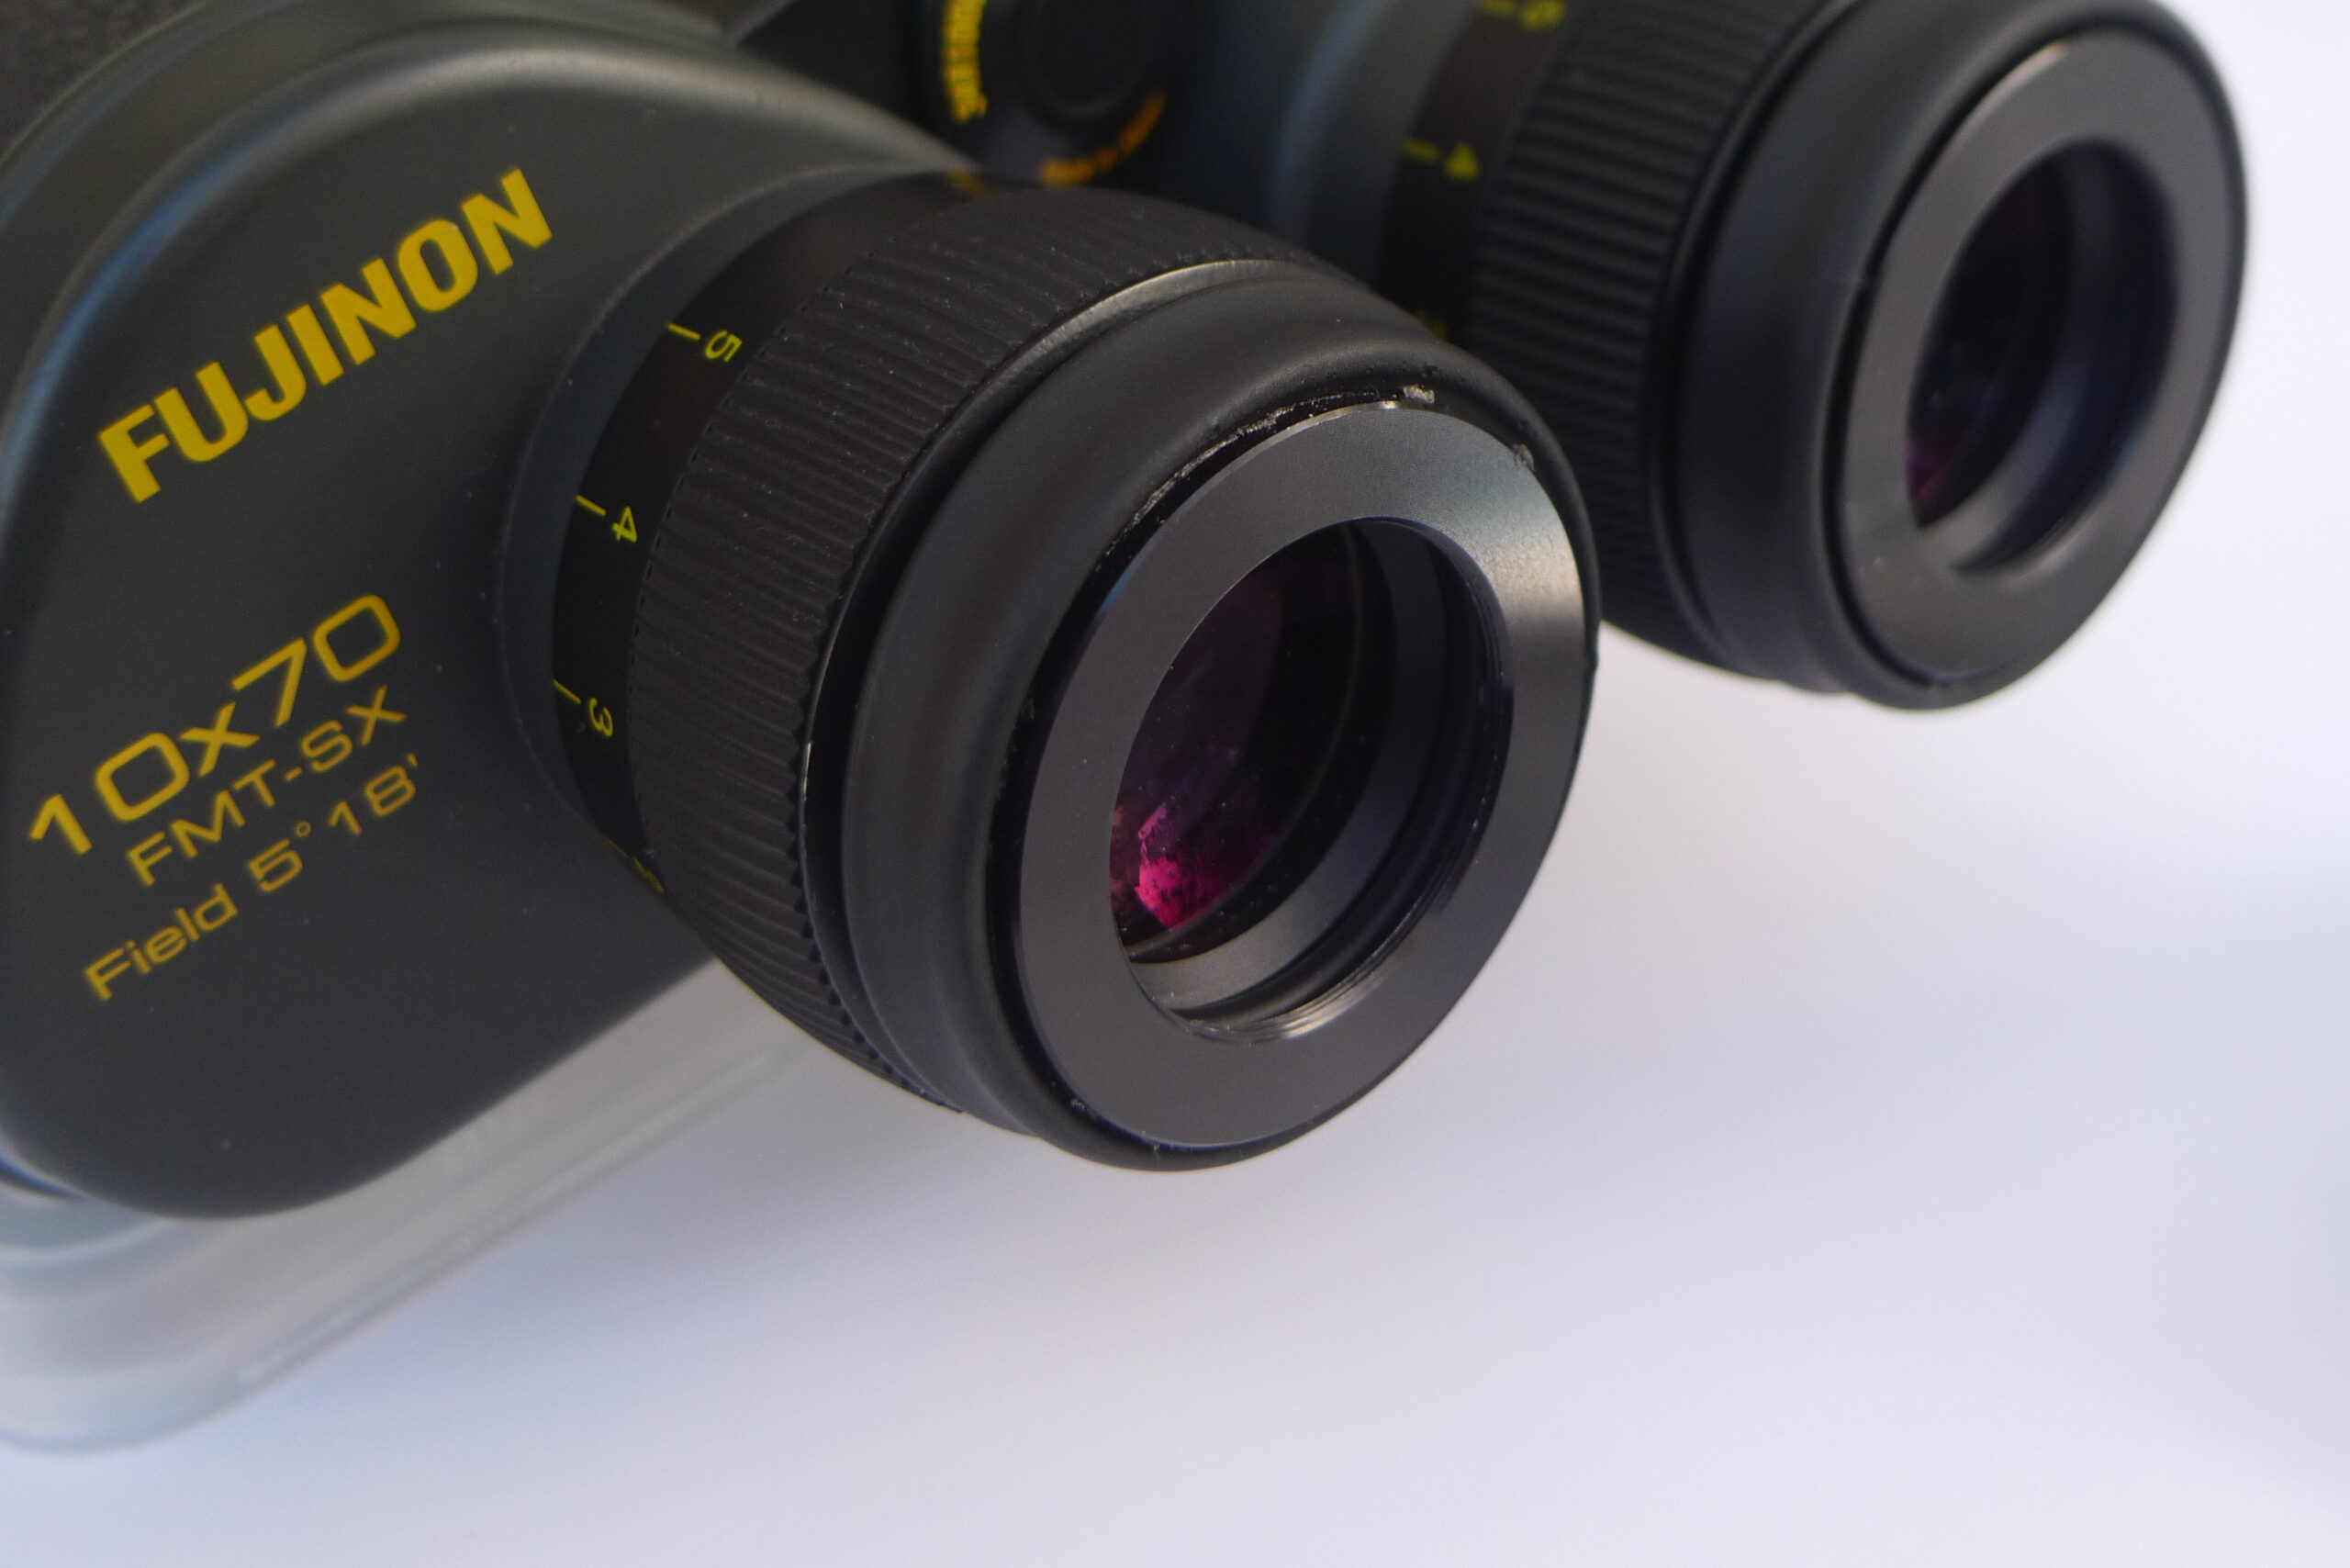
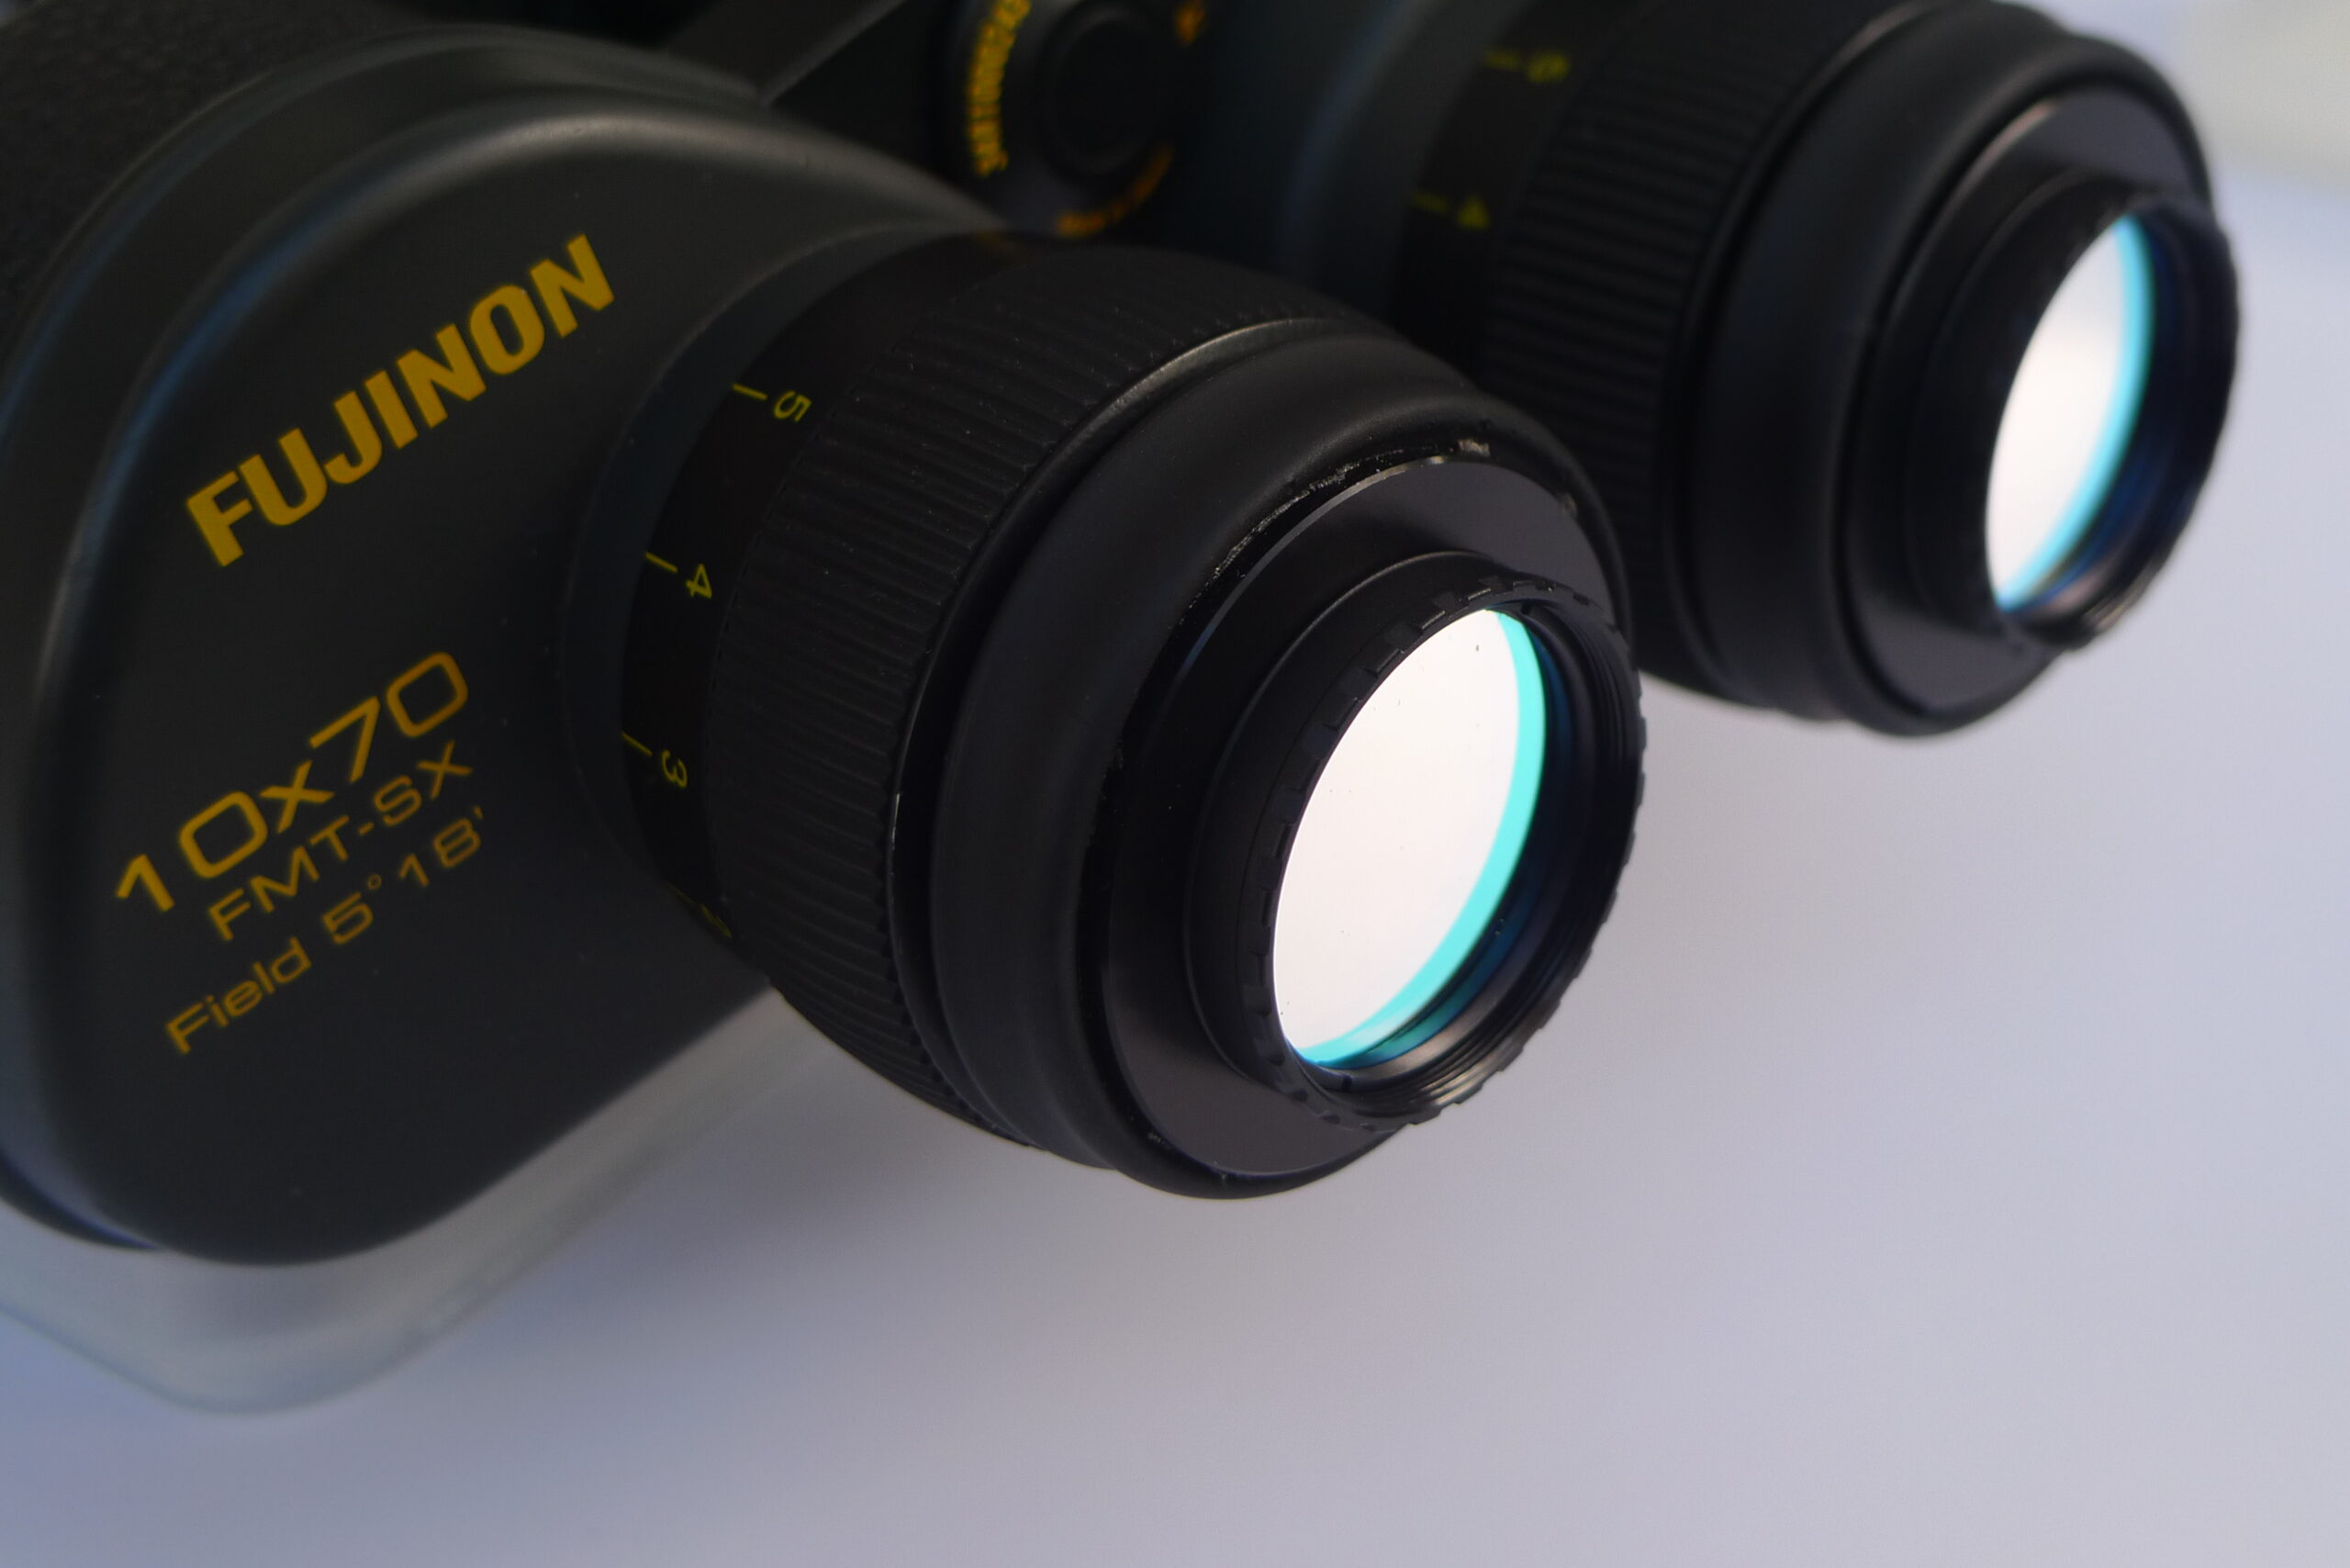
Myth 4): Narrowband filter placement on eyepieces is not purposeful. My experience with many binoculars and filters over the years shows this to be false. It is important that the binoculars have plenty of eye relief so that a filter in its cell has enough room between eye and eyepiece lens and the entire field of view can still be taken in comfortably. For spectacle-wearers (such as me) it is important to be able to keep one’s glasses on when exit pupils are large, as is the case in nebula observations of this kind. This presents a further need for sufficient eye relief. The Fujinon FMT SX2 10x70 meets all requirements: large eye relief (23mm); excellent transmission in blue wavelengths; light enough to be used briefly without a mount (1,9kg); and the whole field of view is easy to take in (ease of view doesn’t have a neat English name but the Germans have one: Einblickverhalten).
[br]The shape of the eyecups combined with the large eye relief makes filter adaptation easy: Using very thin double-sided adhesive tape I stuck an adapter in, consisting simply of a disc with outer diameter 42mm (it comes from the T2 system) and 28.5mm female thread (available e.g. in Germany from Astro-Shop Vesting für ca. 15 EUR pro Stück). Done! Filters in 1.25”-threaded cells can now be screwed in and out in seconds. Care should be taken that they are of the low-profile type that is standard today. Older high-profile filter cells can cost crucial millimetres.
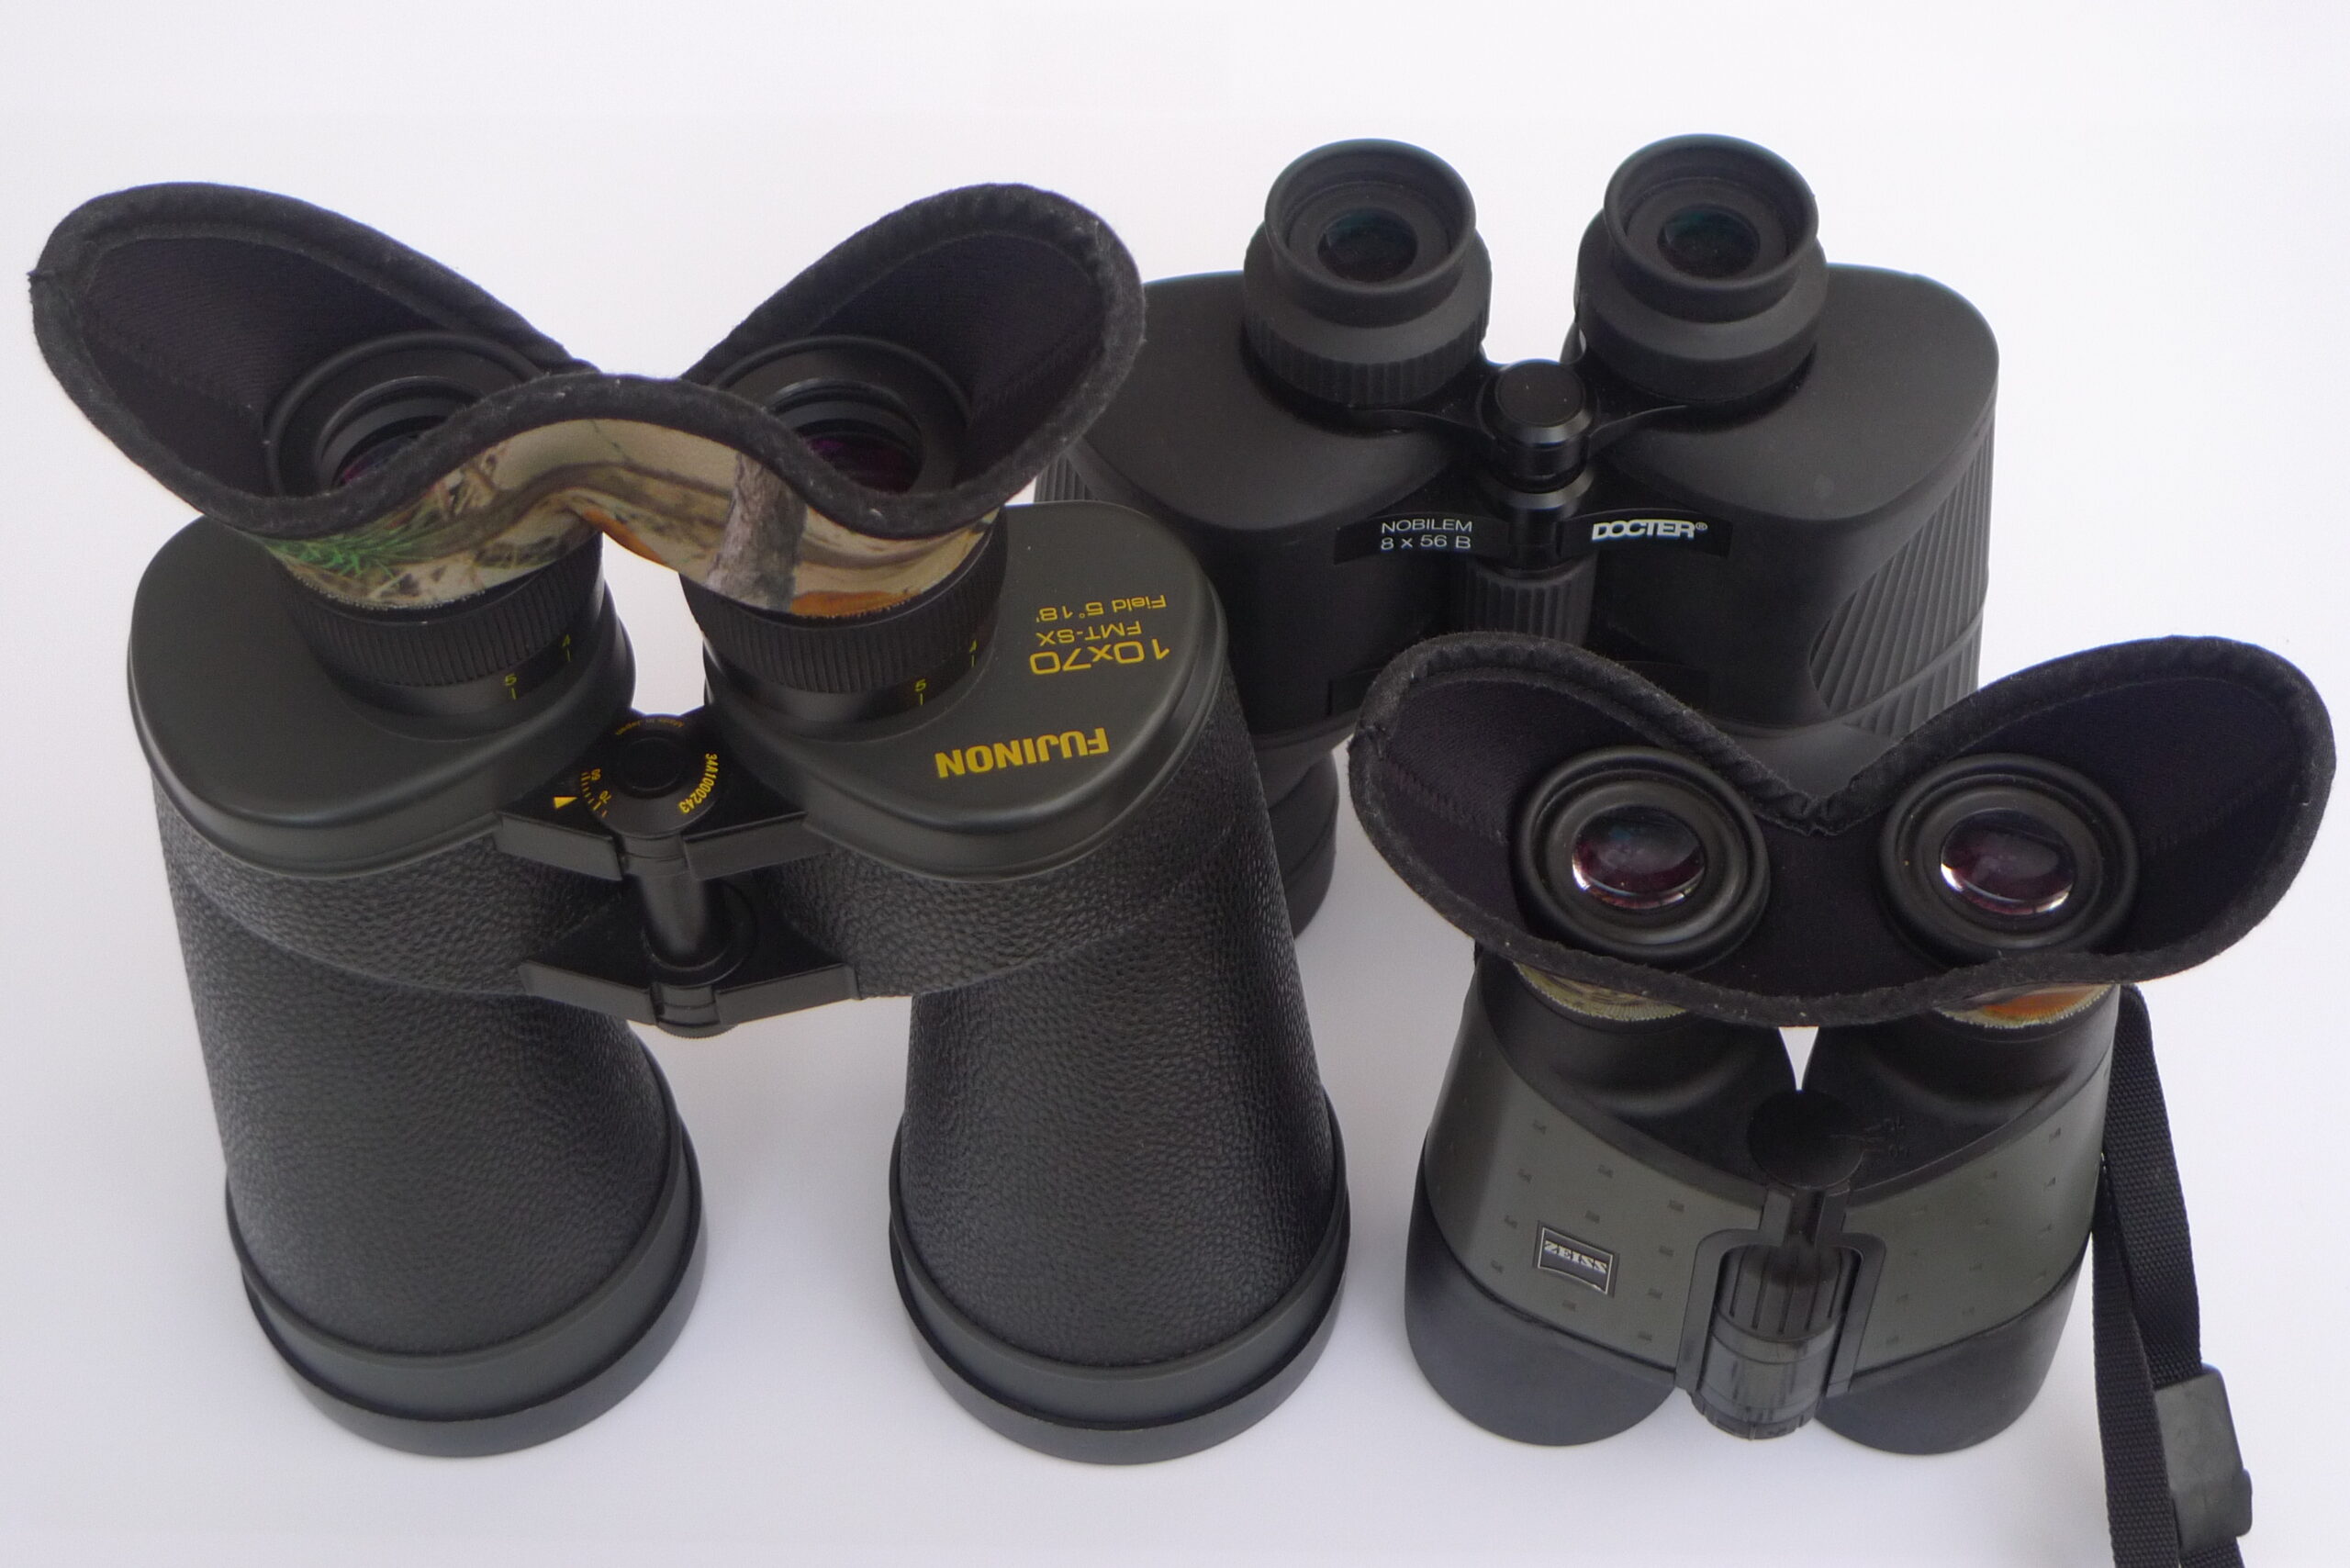
Extraneous light reflecting off the eye lens of the eyepiece is a major issue in narrowband observation. It must be shielded as effectively as possible. The “Bino Bandit” glare blocker is the best solution I have come across, particularly as a spectacle-wearer. It makes all the difference when the observing site is not fully dark – and when is it? Shown here front-left on the Fujinon FMT 10x70, front-right on the Zeiss Design Selection 7x45. The Docter Nobilem 8x56B in the background also combines all the attributes desired for filter placement on eyepieces. When I am looking for a larger field of view or aim to hold the binoculars steady for a longer period (the 10x70 is the best-performing instrument in this group, but its 1.9kg do get tiring quite soon), I take the 8x56 or 7x45. The 7x45 makes optimal use of the 45mm free aperture of 2-inch filter cells when these are placed over the objectives.
Some readers may find the 7/6.5mm exit pupils of these instruments excessive. However, when using the 5.5nm filters the sky background becomes truly dark, even under a NELM 5.0 sky. The observer’s eye pupil then opens up fully! The precondition is that extraneous light is shielded so well that the eye’s dark adaptation is maintained. Filtered and shielded in this manner, even under a suburban sky 10x70 binoculars show galactic nebulae brighter, larger and in better contrast to their surroundings than 10x42 binoculars do.
Our customer Andreas Bringmann was one of our first testers of the new CMOS-optimized Baader Ultra-Highspeed F/2 filters. The all new f/2 Ultra-Highspeed Filters not only lead to amazing images but even enabled the photographic proof of the newly discovered planetary nebula StDr13, check out the detailed test review.
Now Mr. Bringmann had the opportunity to test the new CMOS optimized Baader 5.5nm H-Beta filters:
First of all, I would like to thank you very much for allowing me to test the new Baader filters and I can report that the new CMOS-optimized 5.5nm H-beta filter works photographically perfectly even at f/1.9!
Andreas Bringmann, www.astrobin.com/equinoxx/
The new CMOS-optimized 5.5nm H-beta filter was compared against the old 8.5nm H-beta filter from 2014, which was in Mr. Bringmann's possession.
Read the entire test report by Mr Bringmann here:
Notes about the test:
The images were taken with my Baader roof observatory with the following equipment:
- Celestron C11 Edge HD + Hyperstar v4 @ f/1.9
- 10micron GM3000 HPS without guiding
- ZWO camera ASI 6200 MM Pro @ -15°C
The test shots are JPGs of the unprocessed raw data as they come out of the camera. Darks, flats and FIT files are available on request.
The tests were carried out on 02 September 2021. The night was practically moonless. Stars of 5 magnitude were visually well visible.
Test images:
- The Sadr region in the constellation Swan with the 2.2 mag bright star gam Cyg Sadr was used to compare the halo situation and the contrasts.
- The 0 mag bright star alp Lyr Vega, which was exposed up to saturation, can be used to study the halo situation in extreme cases.
Pretty Picture:
„Sard region: the first test of the new H-beta filter (5.5nm) – CMOS-optimized“:
https://www.astrobin.com/htvgqr/
https://www.astrobin.com/full/htvgqr/0/
https://www.astrobin.com/full/htvgqr/0/?mod=&real=
https://www.astrobin.com/htvgqr/B/
1. The Sadr region with the approximately 2.2 mag bright star gam Cyg Sadr in the centre
The old 8.5nm H-beta filter (1 frame 600s long exposure)
The new CMOS-optimized 5.5nm H-beta filter (1 frame 600s long exposure)
[br]
gam Cyg Sadr , Crop:
gam Cyg Sadr, 600s exposed on C11 Hyperstar, left the old 8.5nm H-beta filter from 2014 right new Baader CMOS-optimized 5.5nm H-beta filter
2. alp Lyr Vega:
alp Lyr Vega, 600s exposed on C11 Hyperstar, left the old 8.5nm H-beta filter from 2014 right new Baader CMOS-optimized 5.5nm H-beta filter
Pretty Picture in SII, Ha, OIII, Hb + LRGB:
„Sard region: the first test of the new H-beta filter (5.5nm) – CMOS-optimized“
Technical image data:
https://www.astrobin.com/htvgqr/
As a suitable test object I decided for the Sadr environment, because the following list for nebula filters marks this region as "good H-beta filter effect": http://www.astro-okulare.de/nebelliste.htm
This image was exposed in the Hubble palette enriched by the H-beta line. In the image processing I tried to assign the OIII data more to the turquoise colour and the H-beta data more to the blue colour. The stars were exposed separately as LRGB.
 In the following GIF animation (see also on the right) you can also view the individual narrowband channels, the sequence is described on the website:https://www.astrobin.com/htvgqr/B/
[br]
In the meantime I was able to capture more pretty pictures with the new 5.5nm H-beta filter and published them on astrobin:
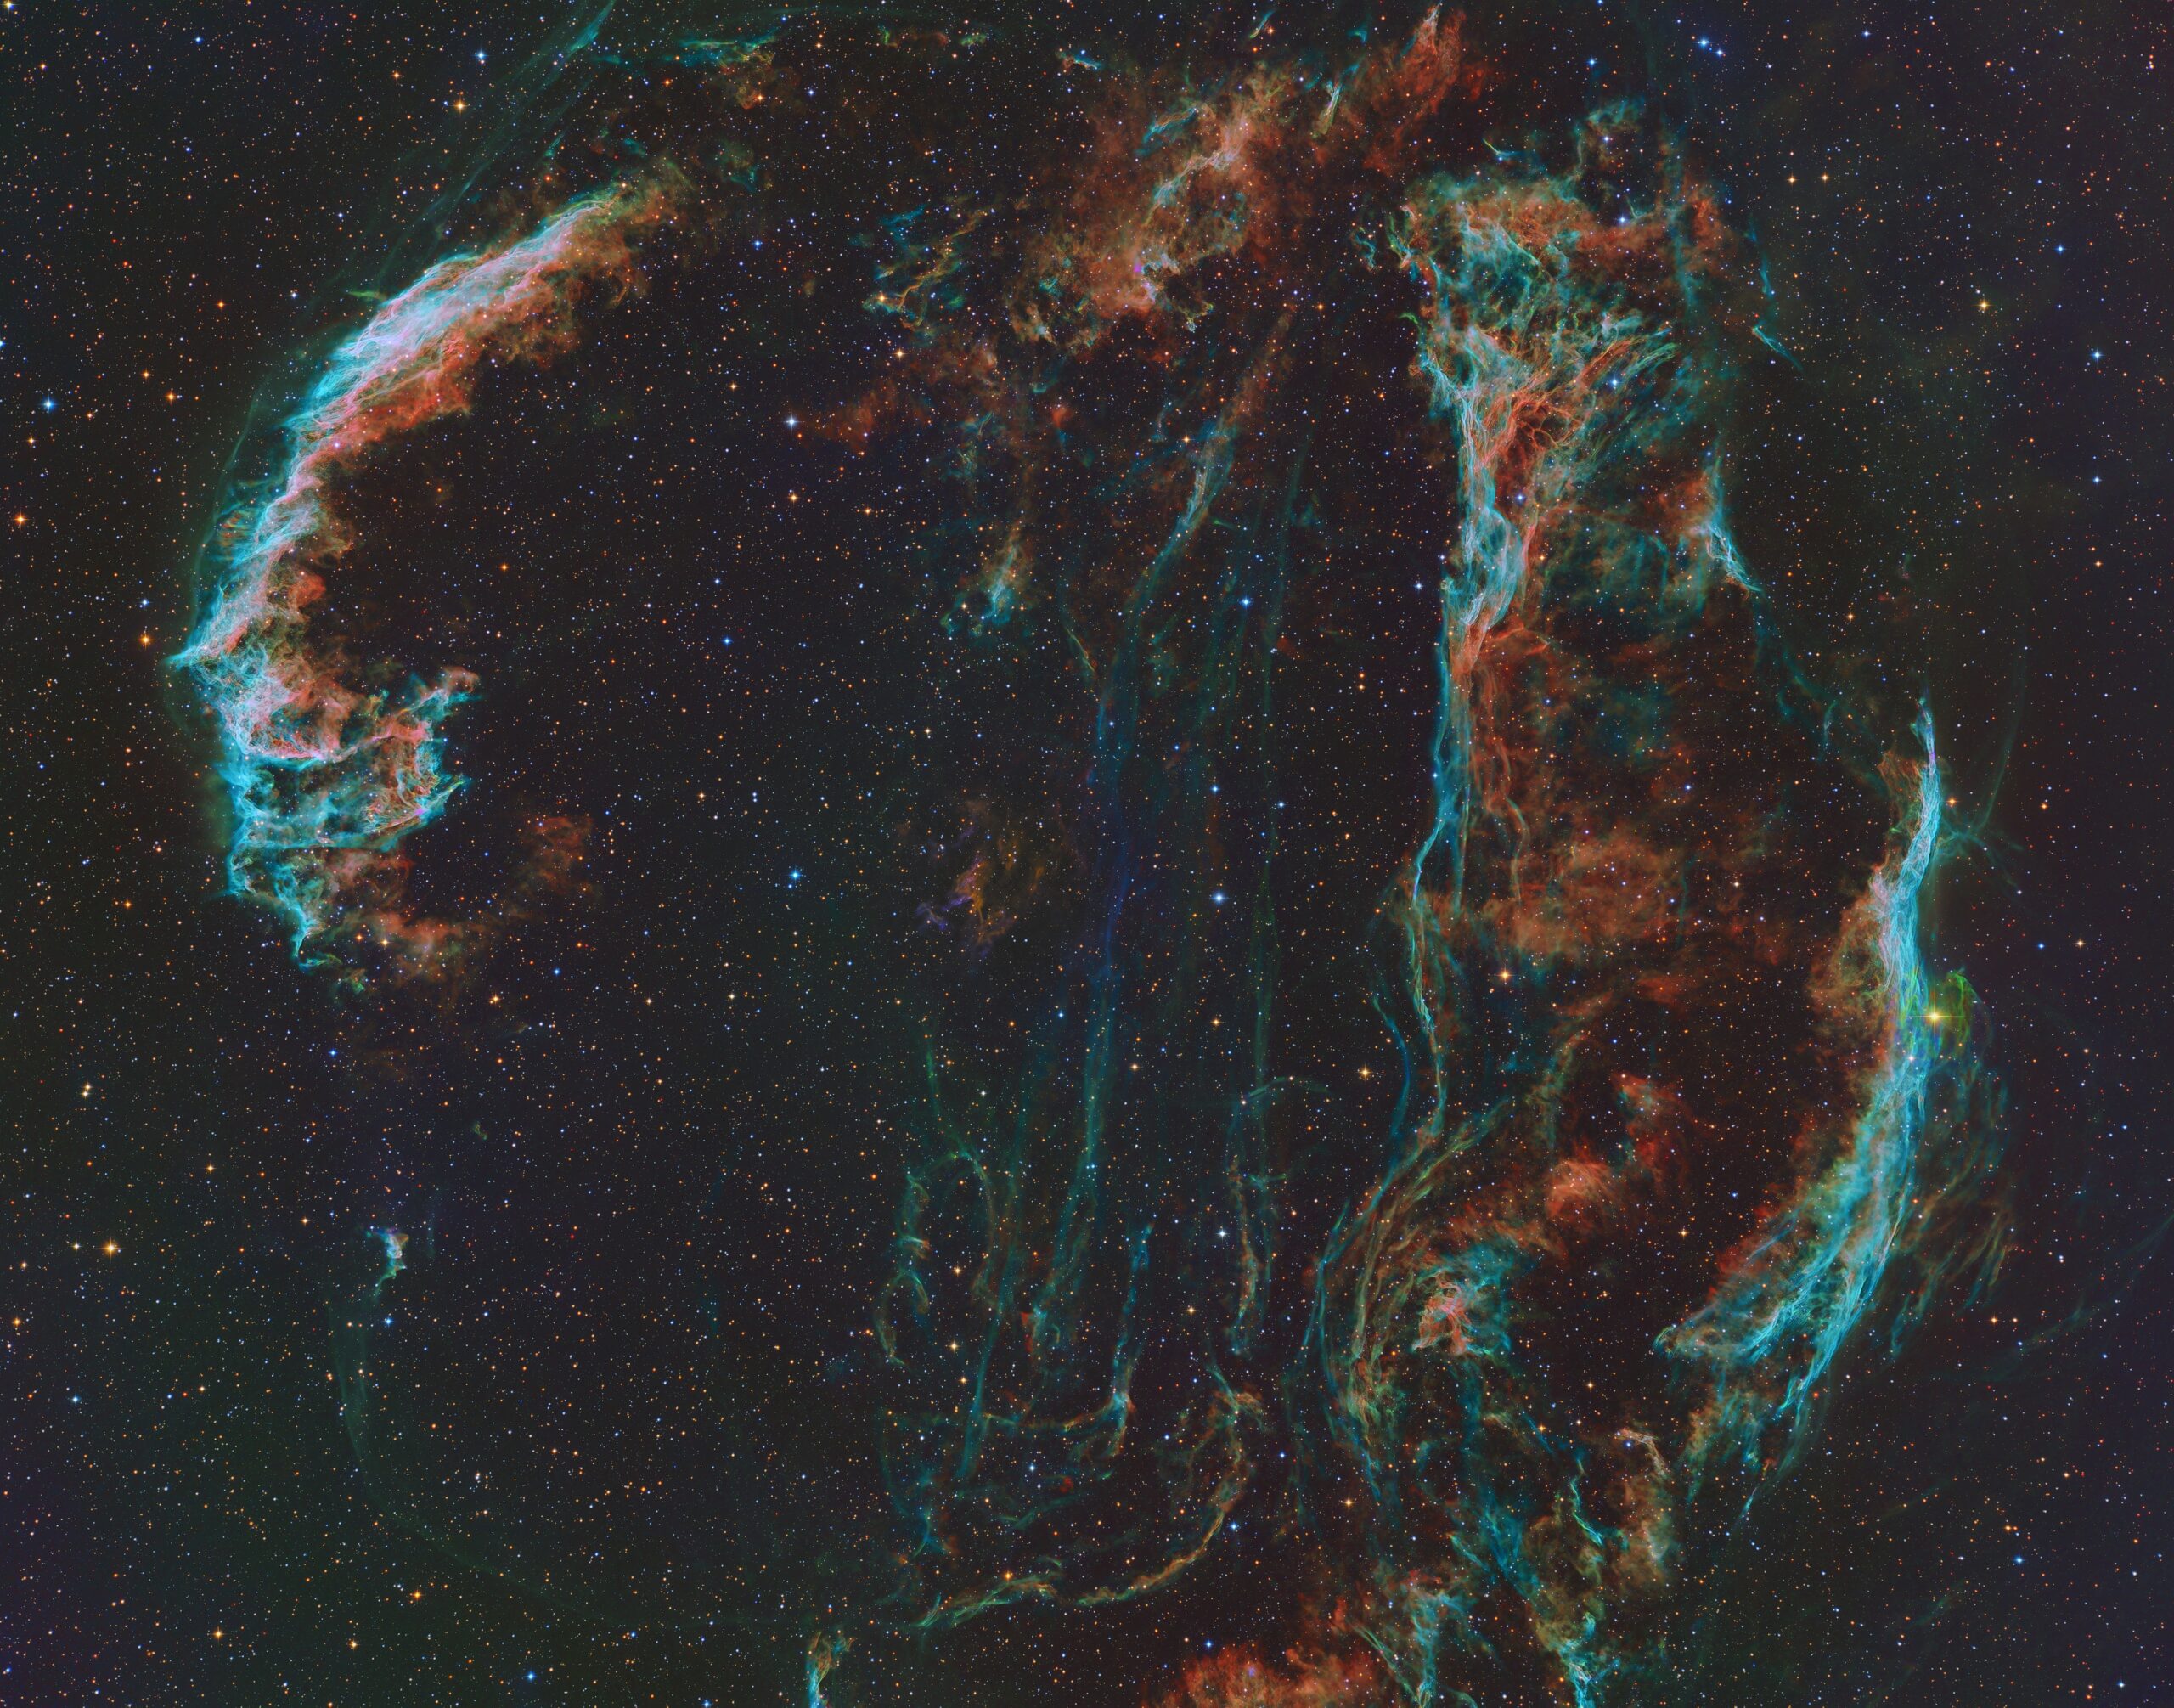
1. Veil Nebula
More details on:
https://www.astrobin.com/hrlduh/
https://www.astrobin.com/full/hrlduh/0/
https://www.astrobin.com/full/hrlduh/0/?mod=&real=
[br]
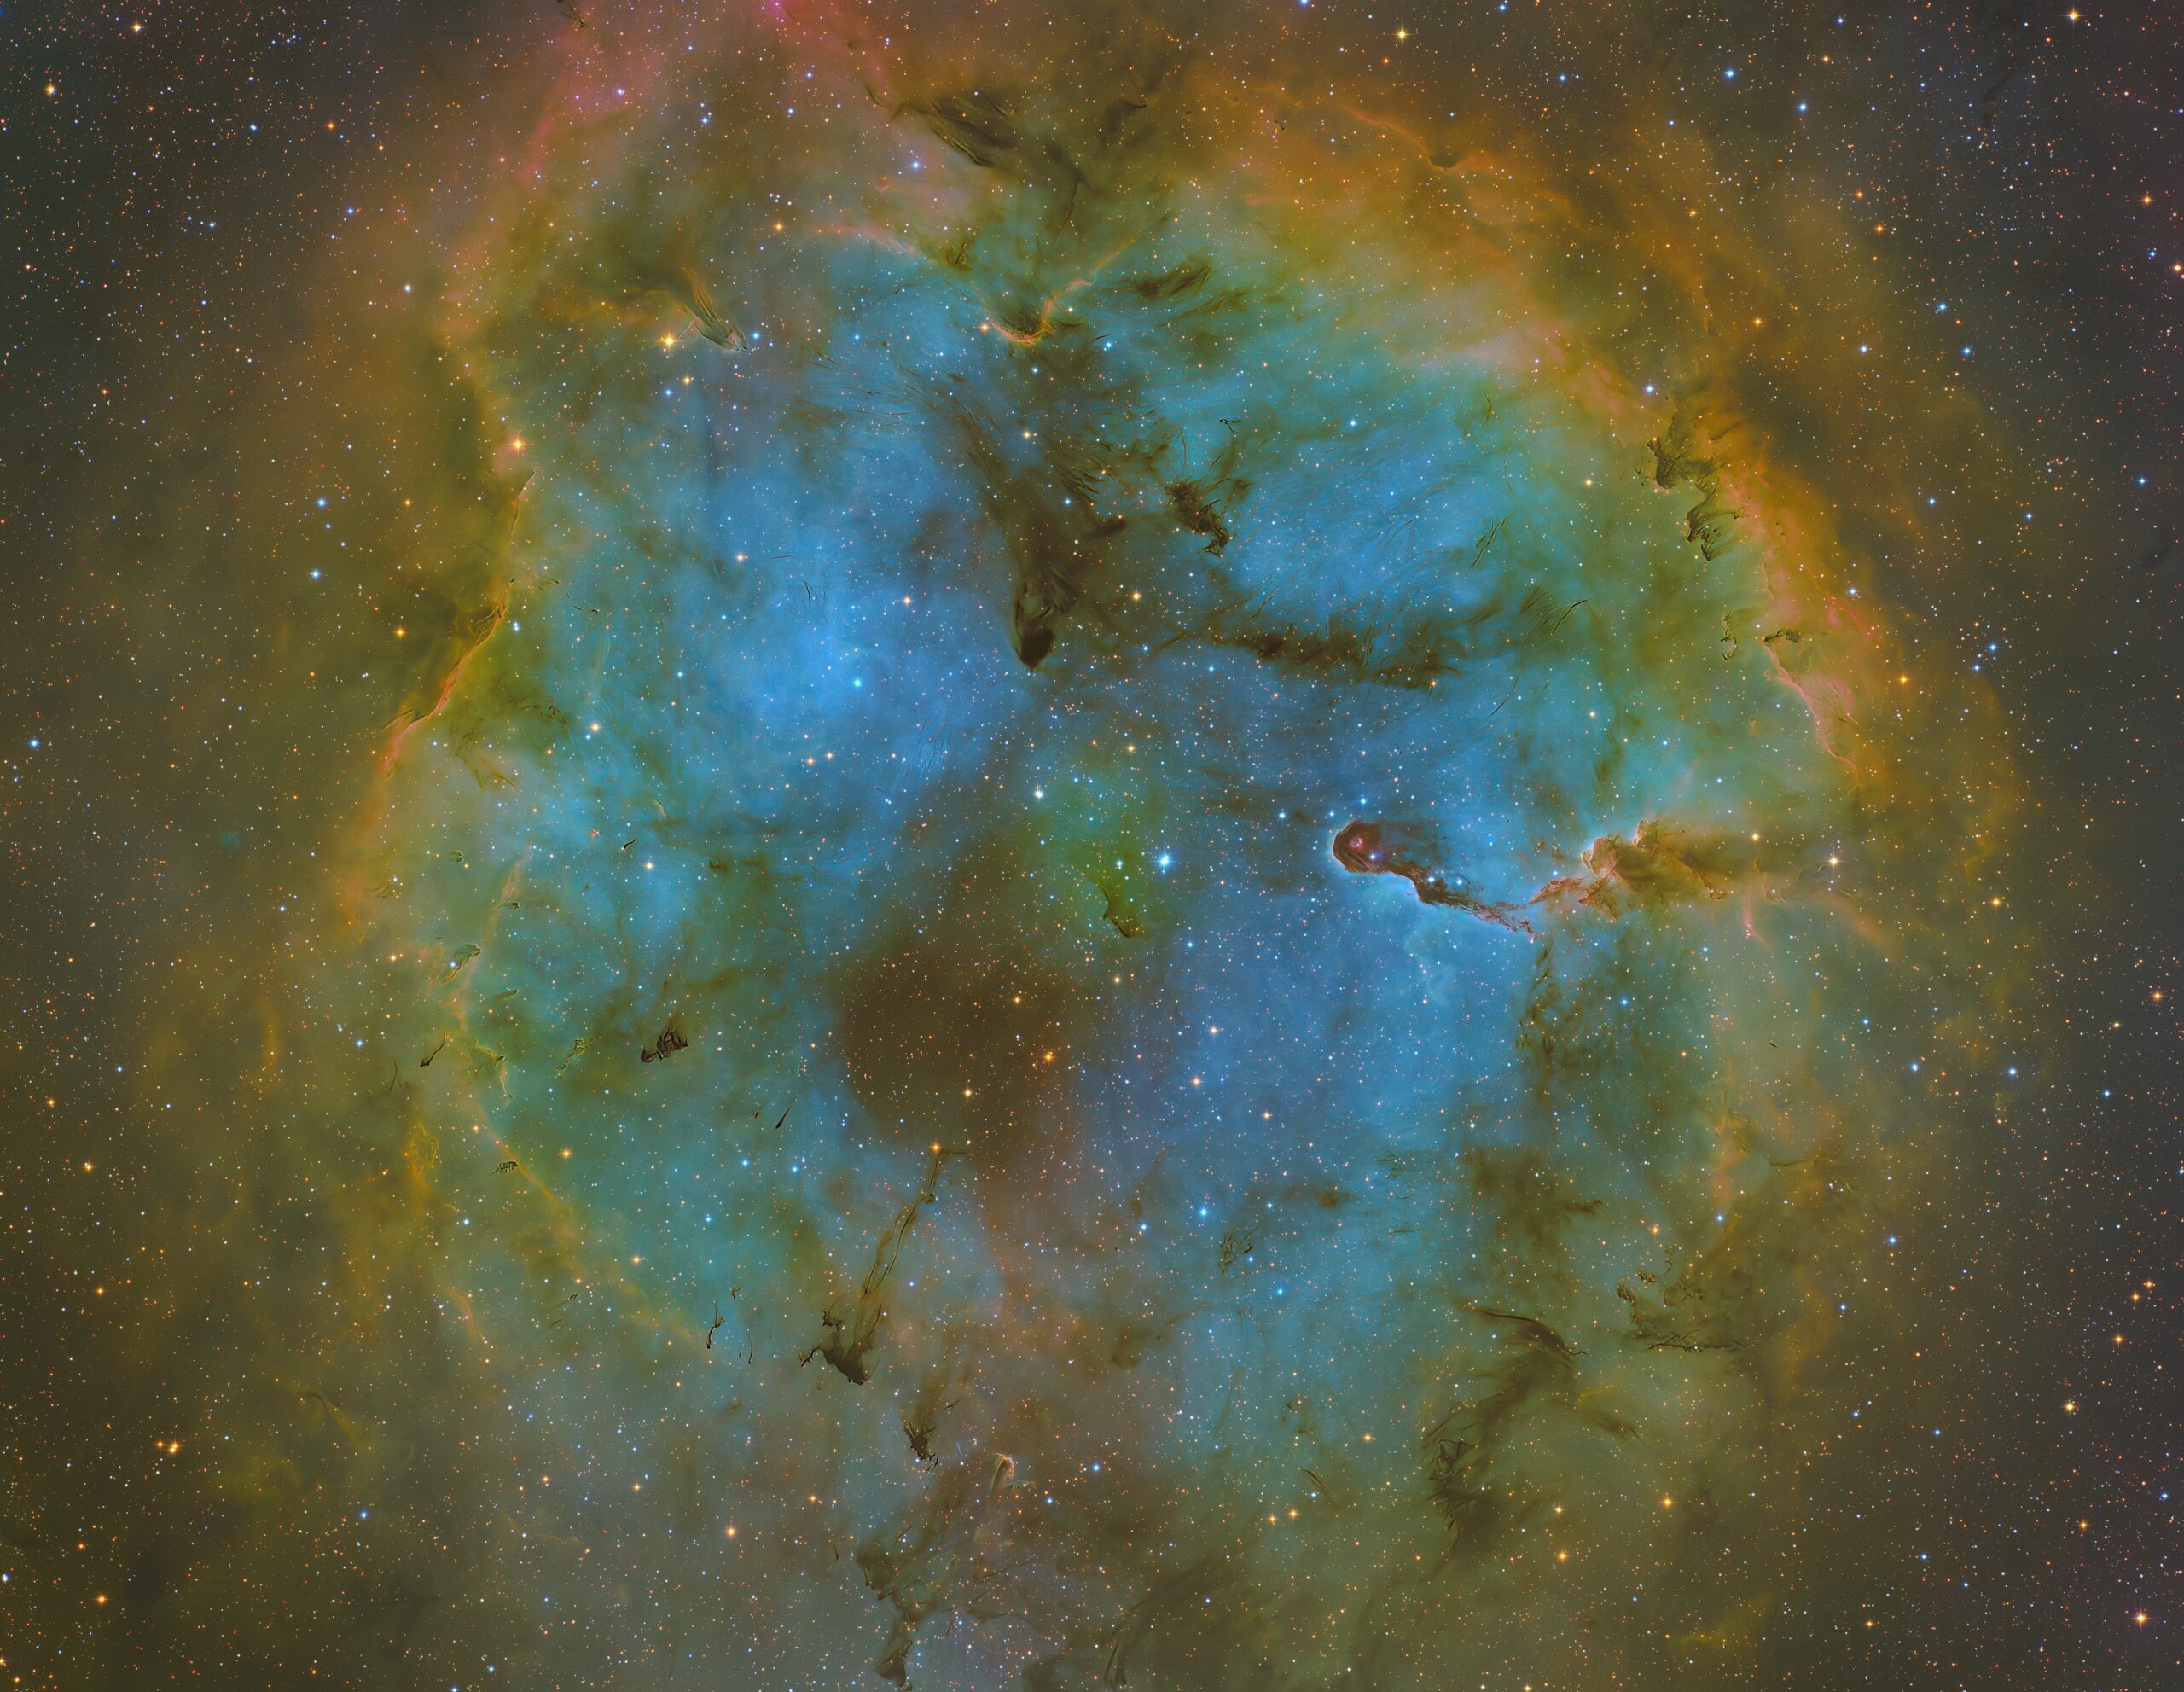
2. Elephant Trunk Nebula in SHaOHb-LRGB
More details on:
https://www.astrobin.com/3uuork/
https://www.astrobin.com/full/3uuork/0/
https://www.astrobin.com/full/3uuork/0/?mod=&real=
[br]
Summary:
The new CMOS-optimized 5.5nm H-beta excites because: When a halo becomes brighter than the actual signal, EBV becomes a matter of luck. The reconstruction of the signal under the halo becomes a subjective assessment.
With the new CMOS-optimized 5.5nm H-beta filter, the halos practically do not interfere any more, and "halo remnants" on very bright stars can easily be removed during EBV.
The contrast has now reached an excellent level. Photographically, the new filter delivers such high-contrast data even at f/1.9 that one could believe it was H-alpha data. Compared to the old H-Beta filter a quantum leap!
Many kind regards, also to the filter people and to the whole Baader team.
Andreas Bringmann
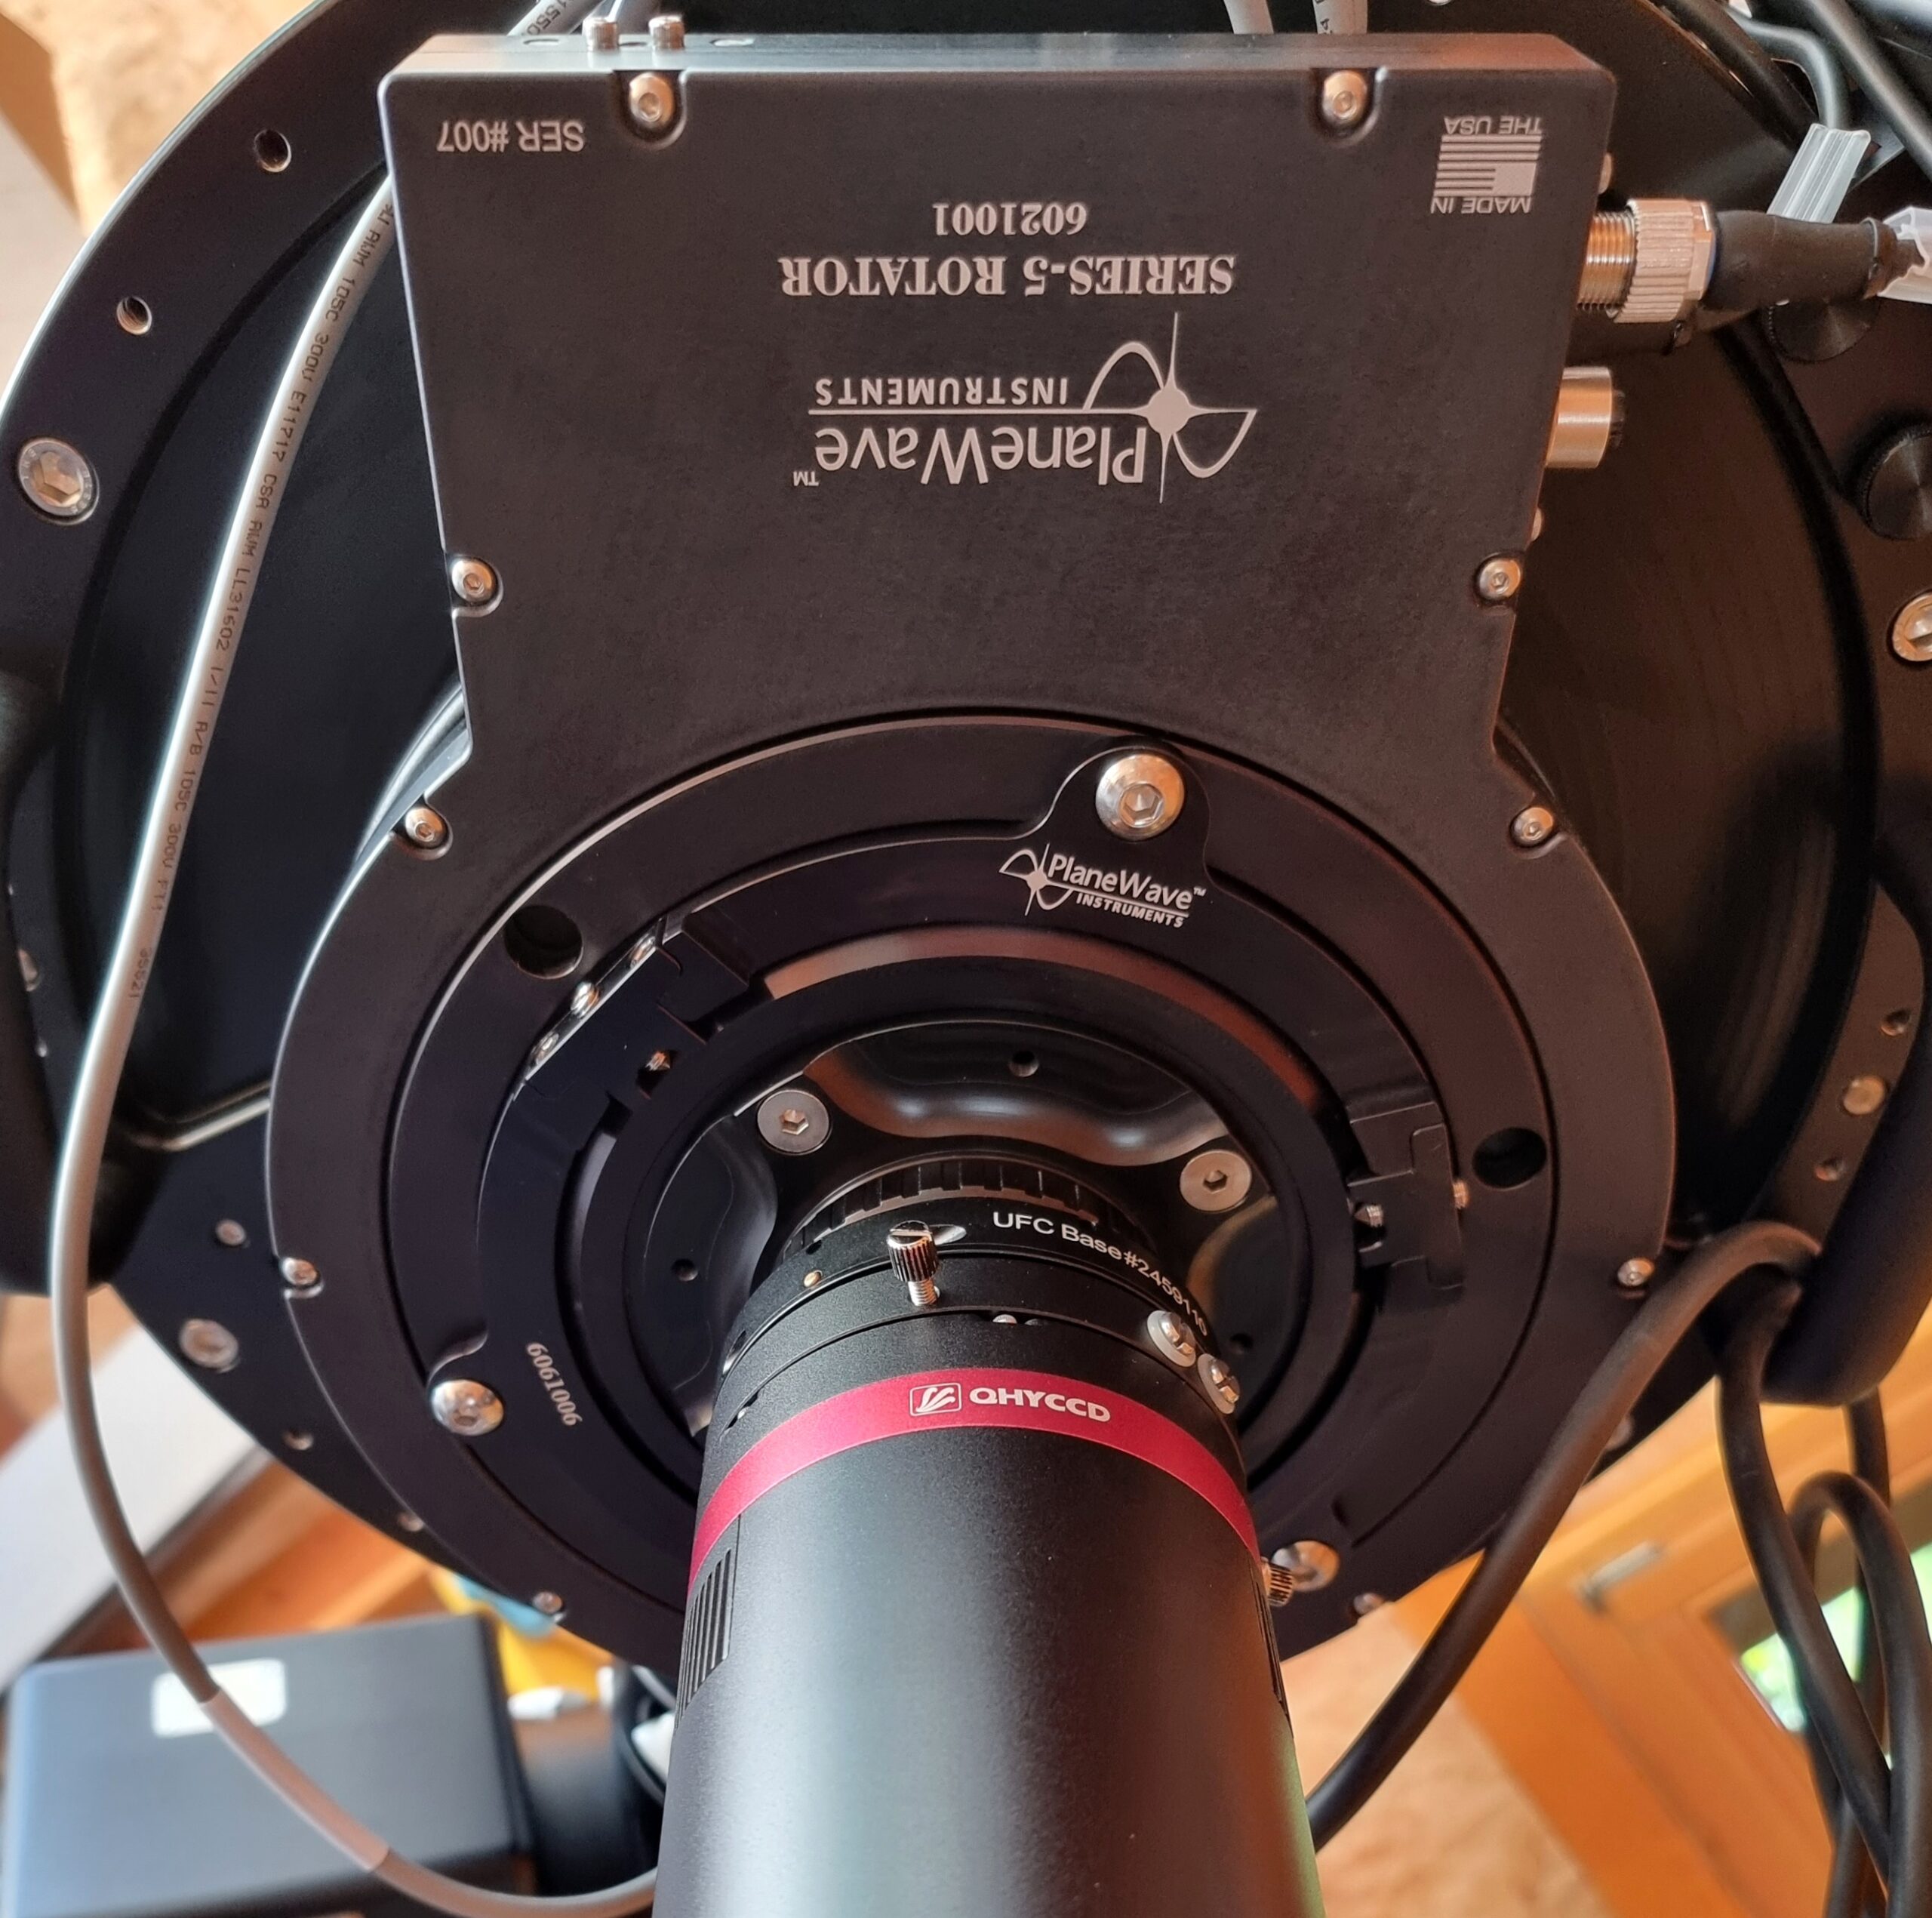

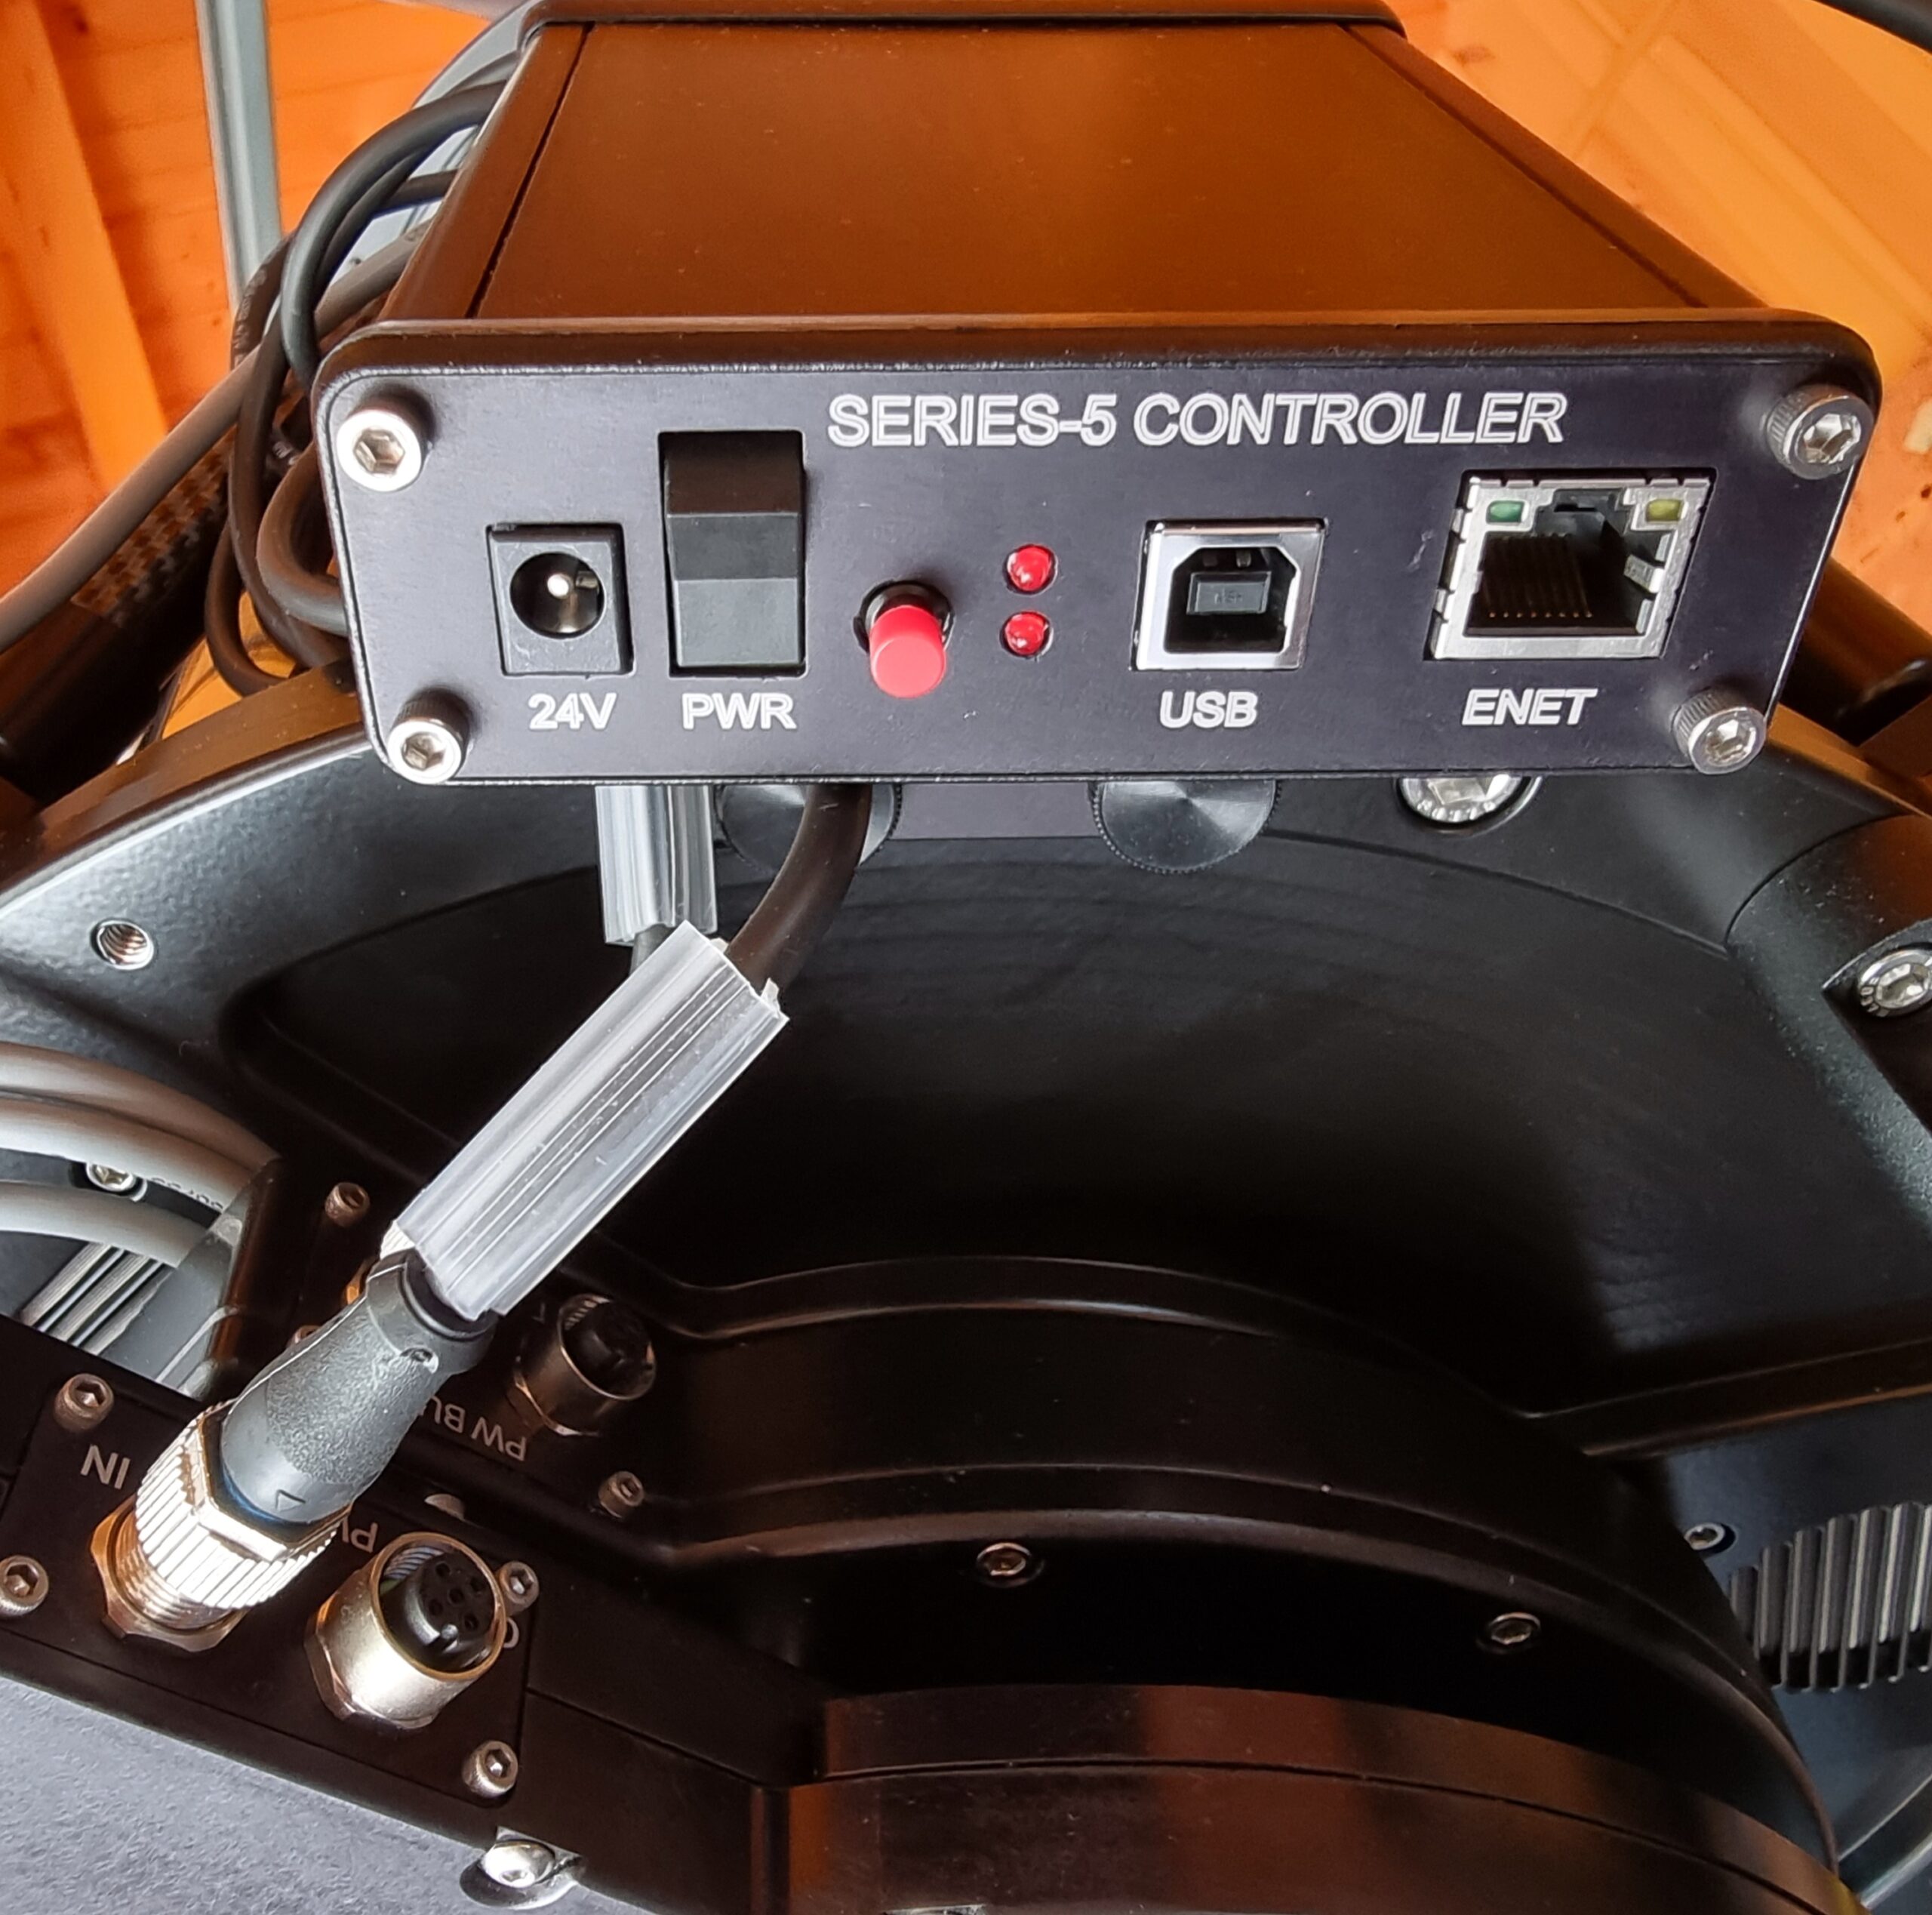 The unit is very well made and in combination with PlaneWave's focuser and de-rotator, it is quite a massive unit and surprisingly heavy. The center of gravity is at the back of the telescope.
 With Maxim DL, I have been able to perform every working routine of focusing and field tilt measurement very well. The results are consistent and extremely important for accurate alignment! After I attached the [product sku="1931162"] with the help of the Baader M68 system, the DR350 was ready for use.
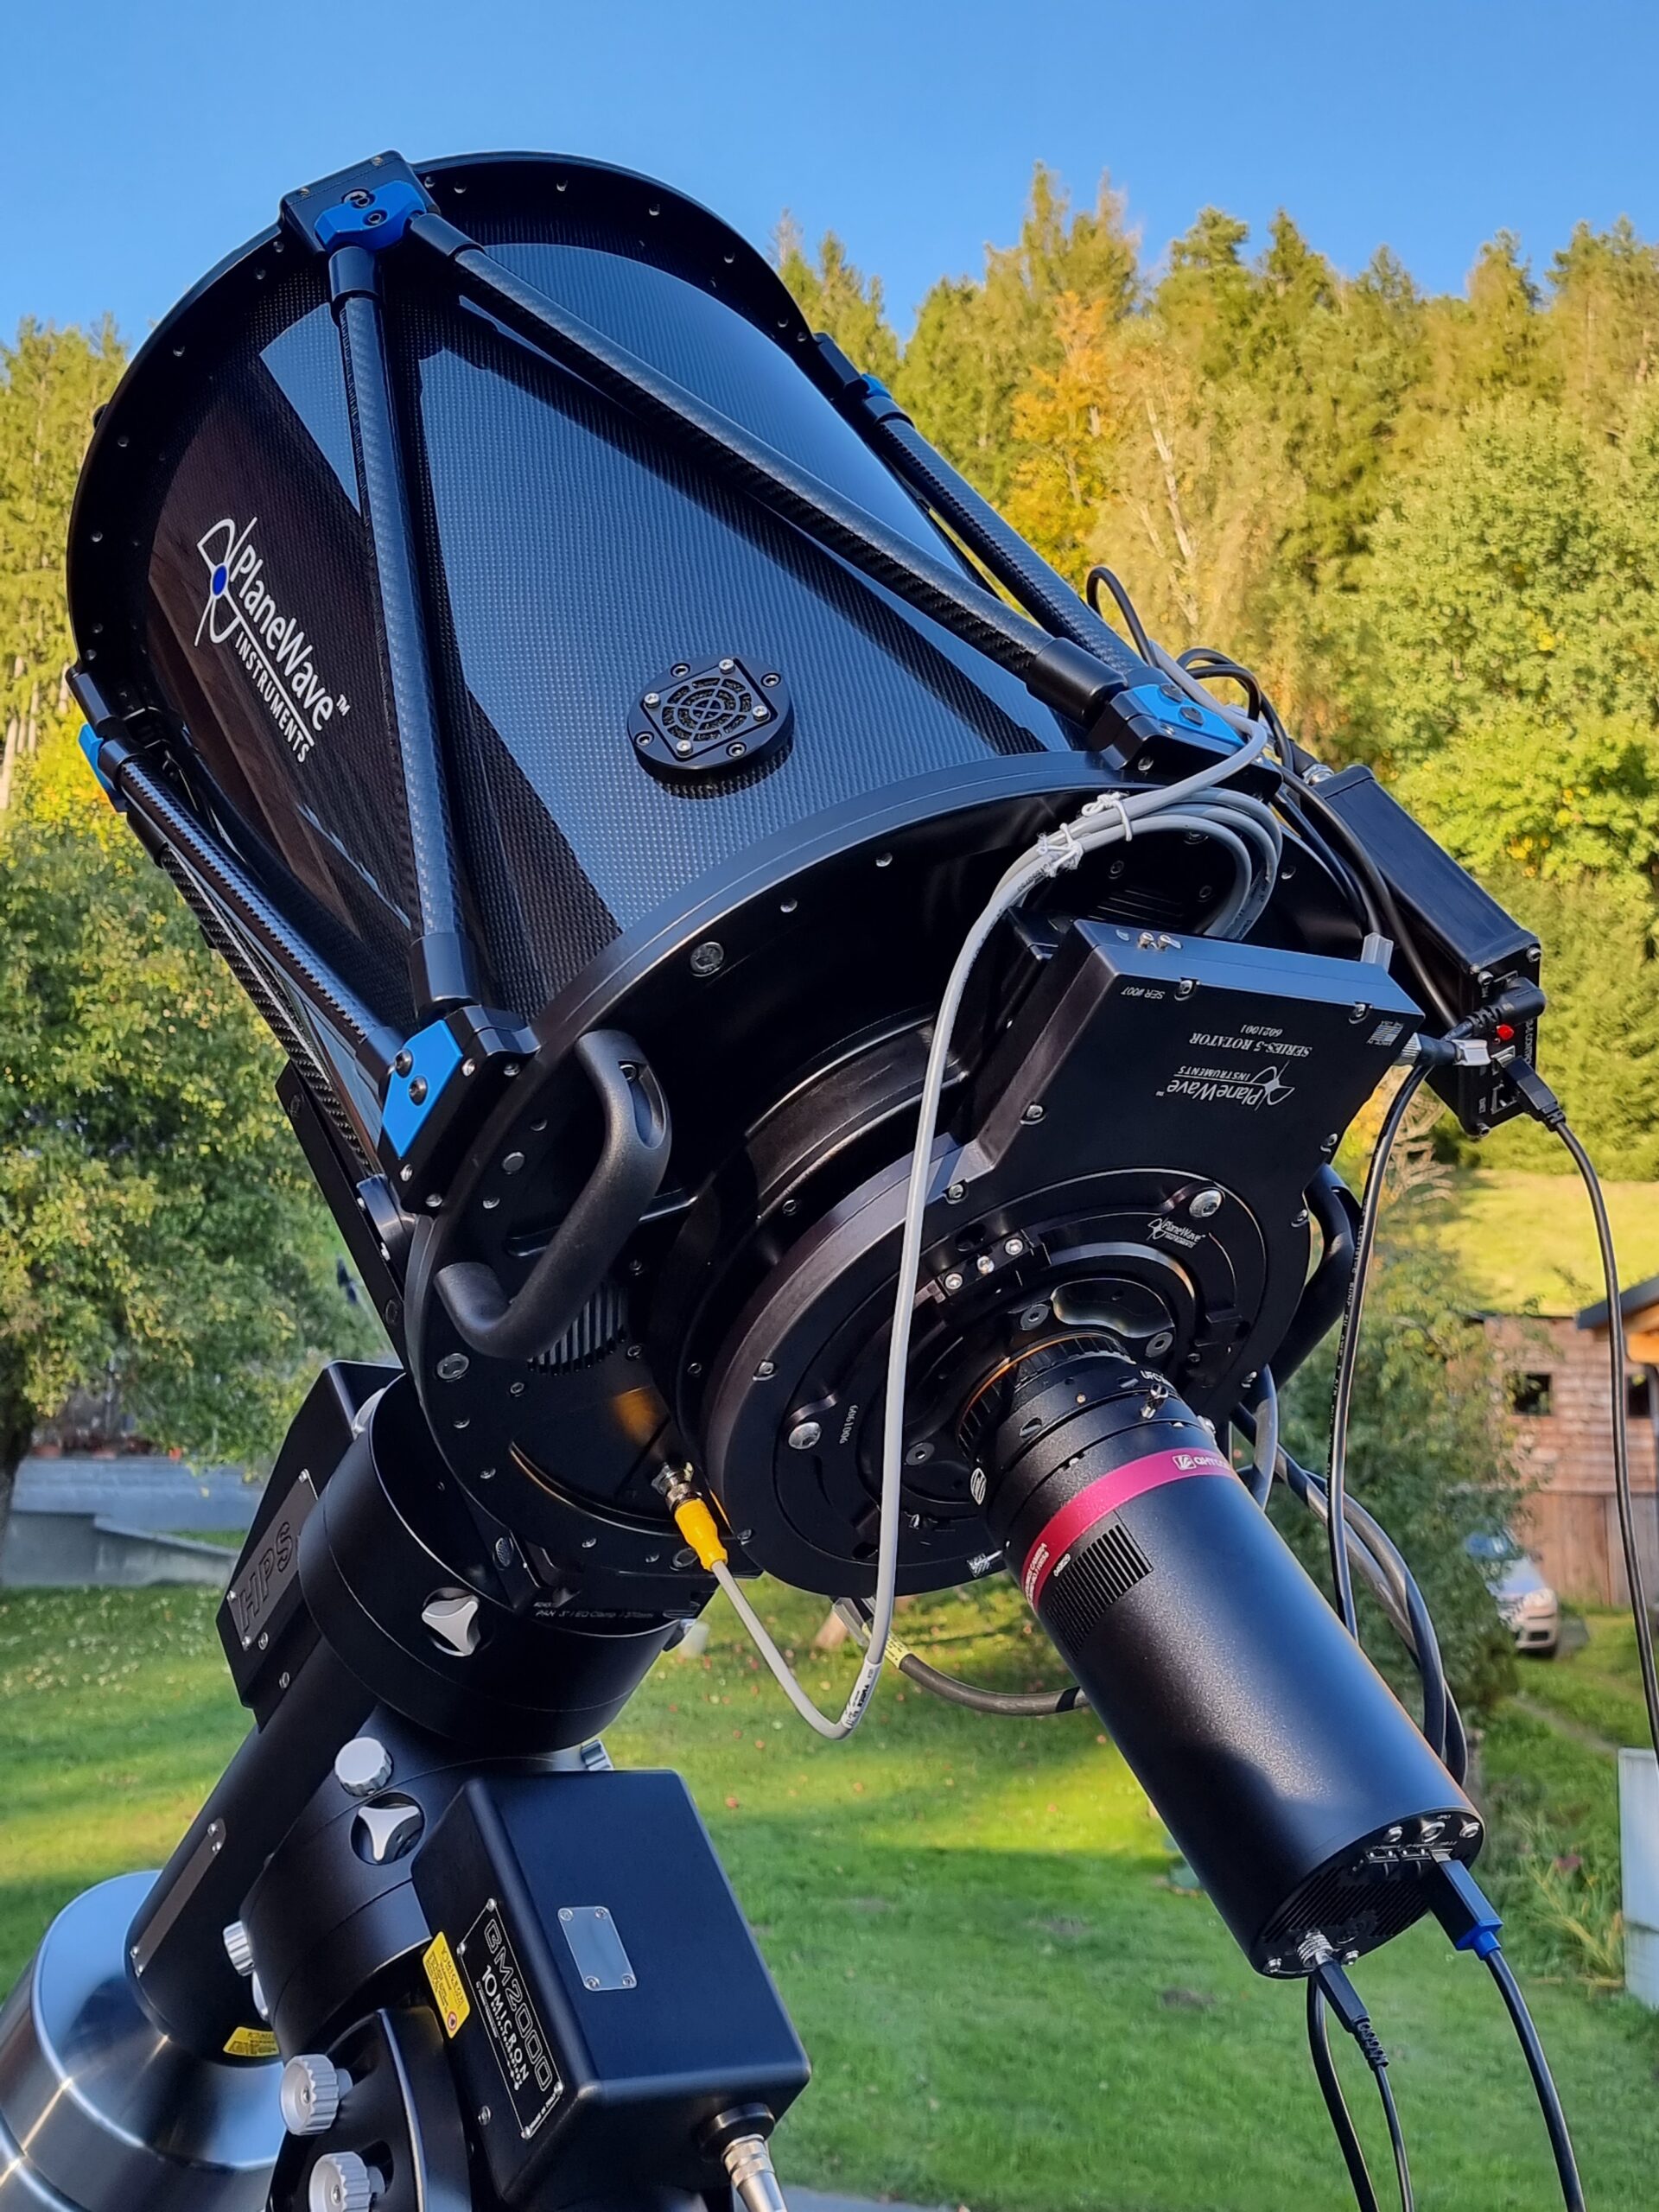
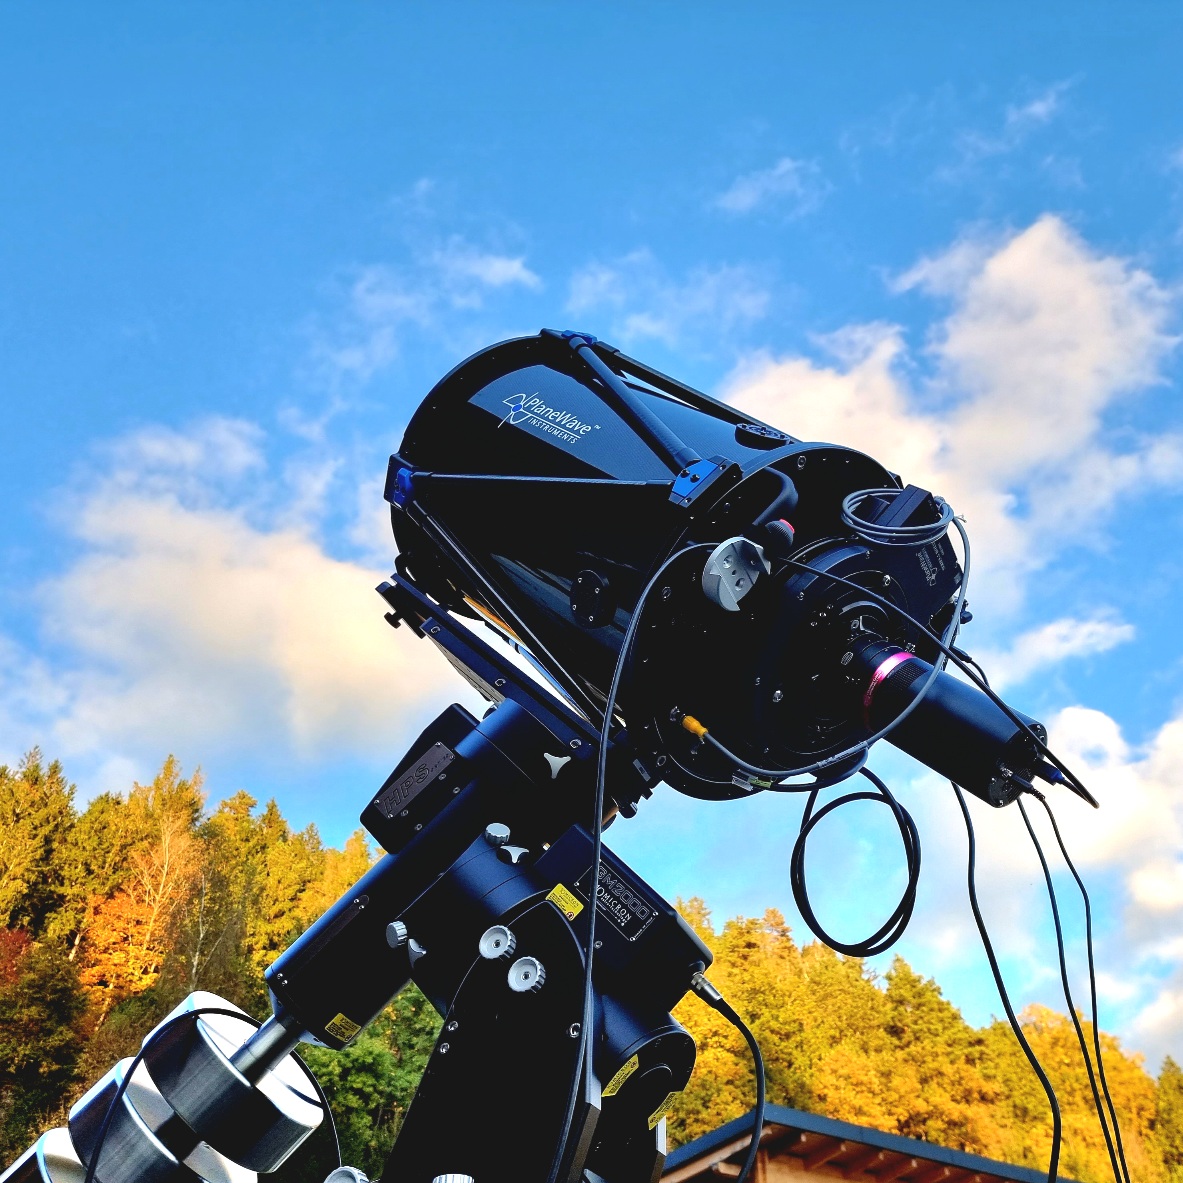 Once I had achieved the values that Planewave specifies, imaging began!
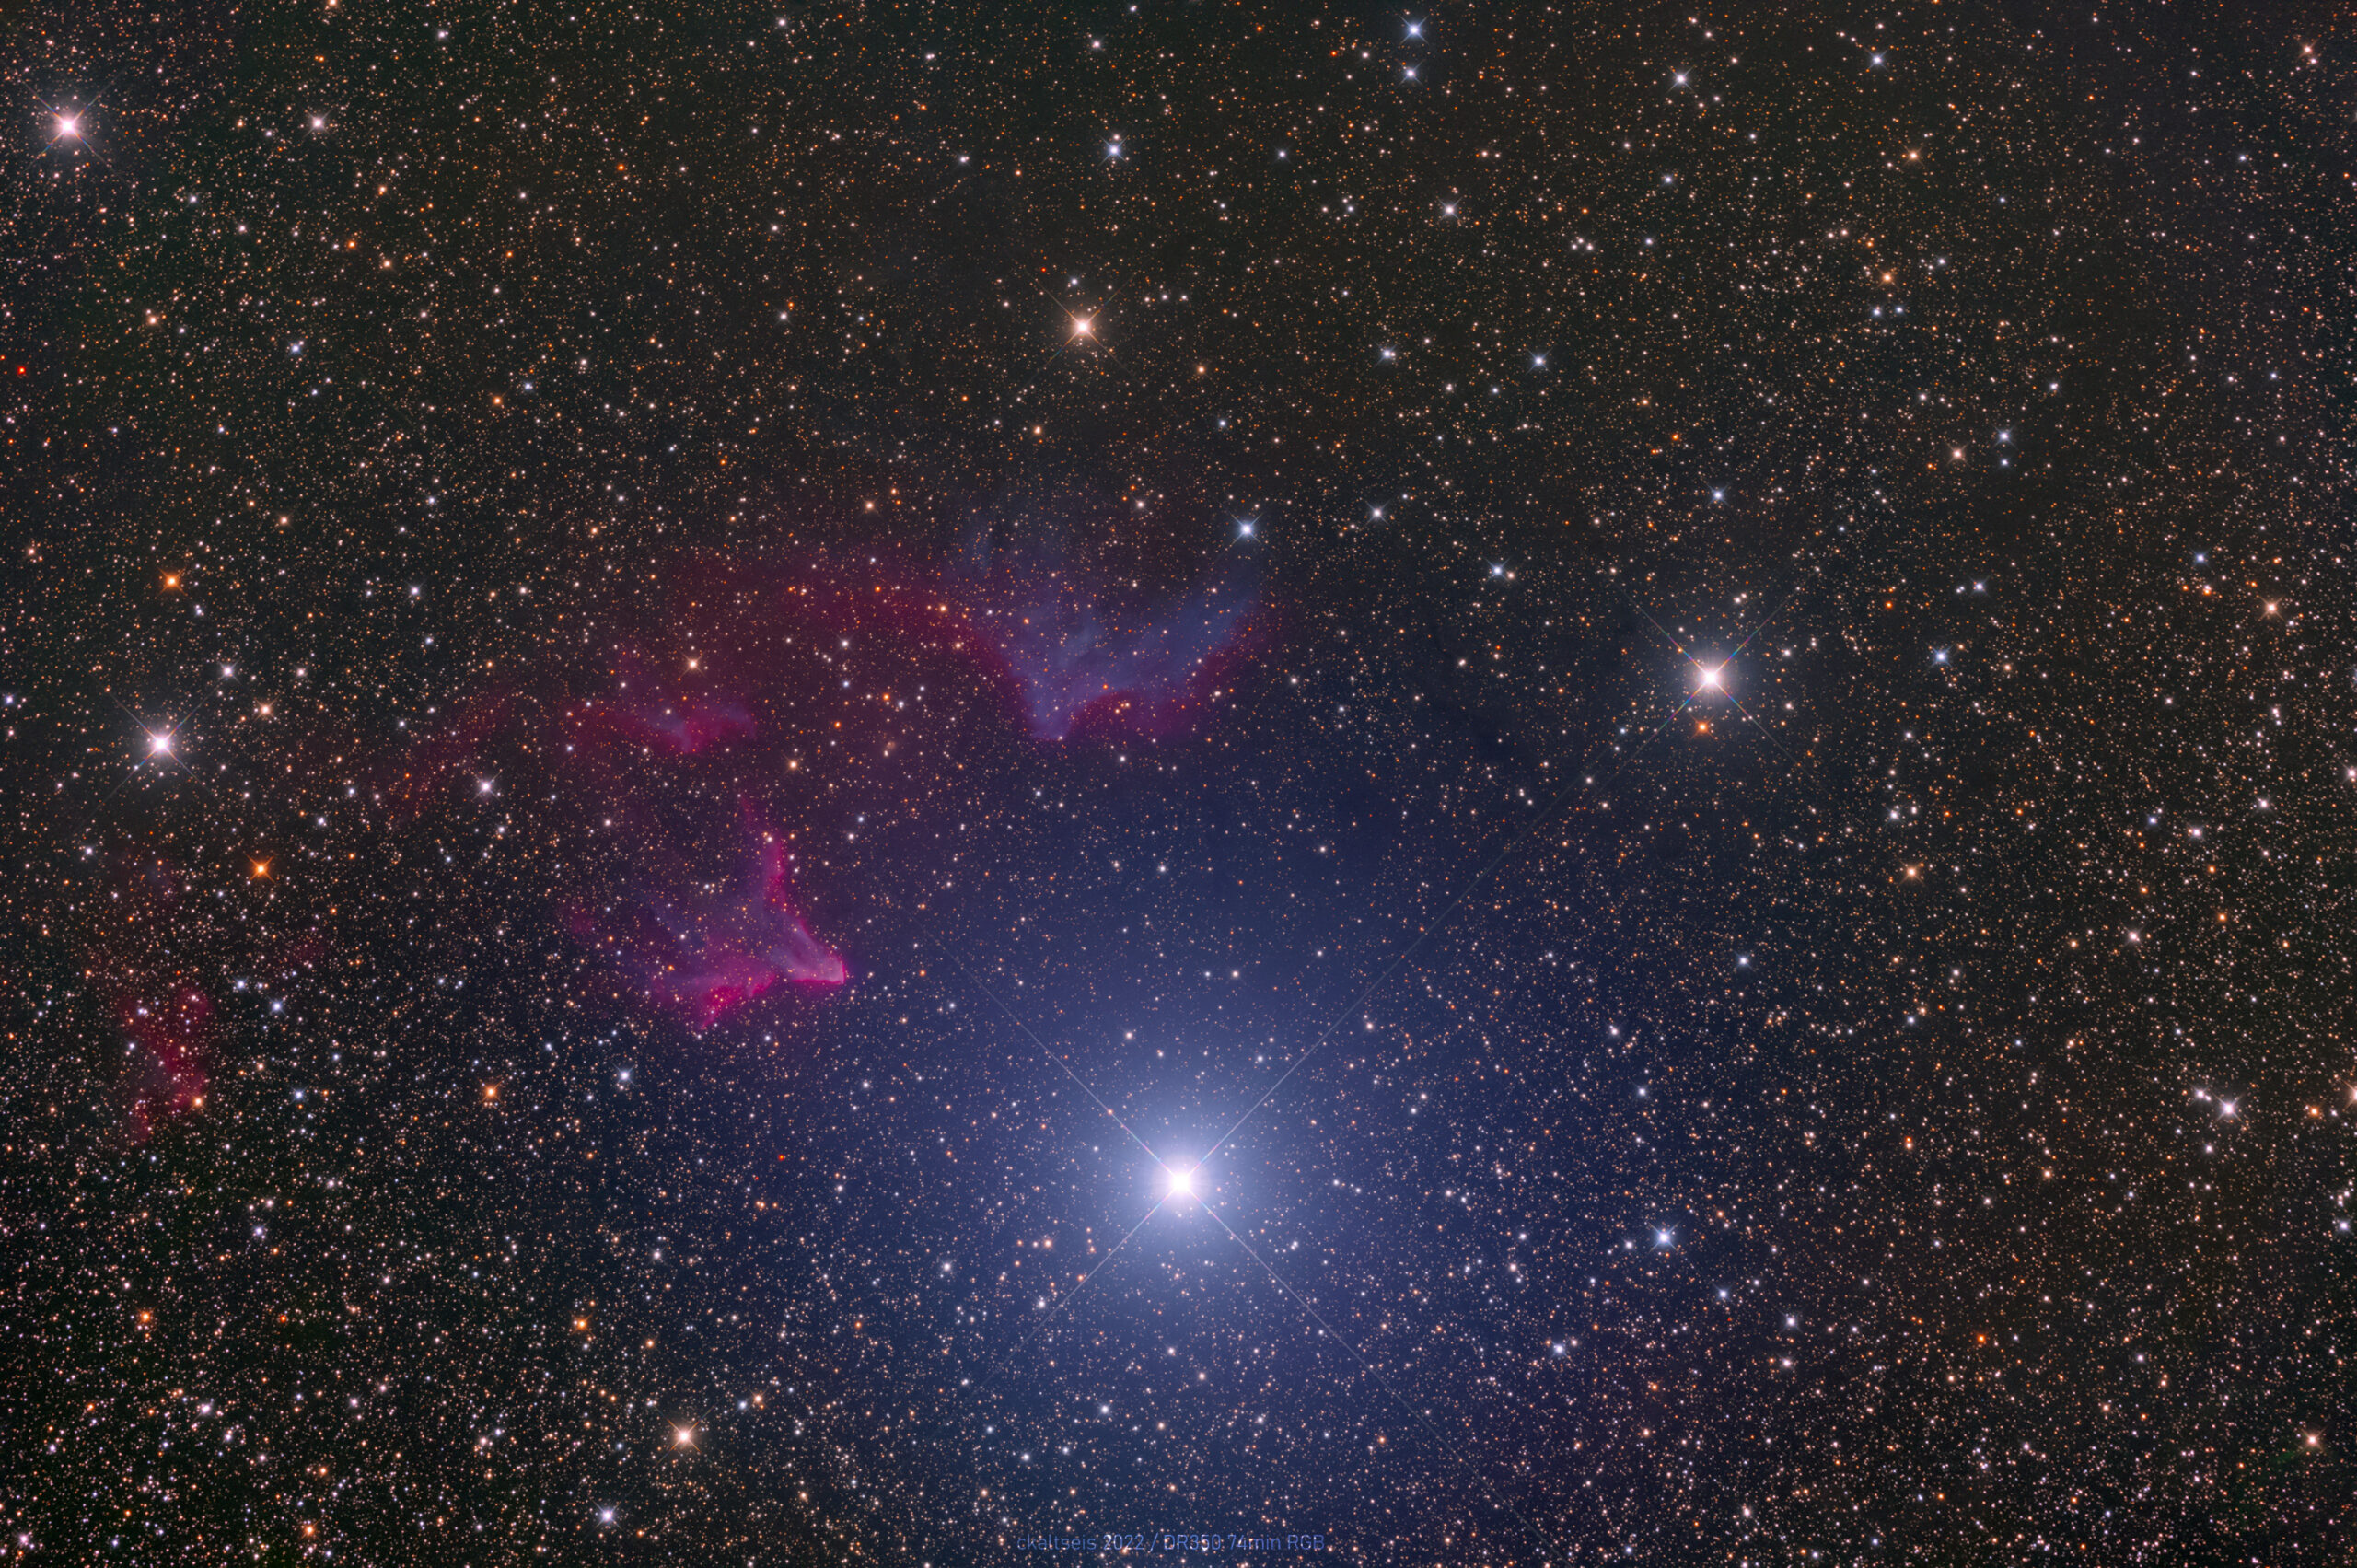


 Baader 7,5nm Solar Continuum – stacked image made of 15 frames with Panasonic G91" width="400" height="295">