Info about using quickchange-frontfilters with the UFC in combination with DSLR-cameras
There are no monochrome DSLR-cameras on the market, so a filter holder (e.g. the Baader-UFC) may seem quite useless for DSLR imaging, but if you take a closer look, there are indeed some interesting use-cases.
Many owners of DSLR-cameras remove the complete UV/IR-blocking filter and use this simple way to improve the sensitivity especially for H-alpha – but because of the costs, they decide not to add a new blocking filter with increased H-alpha-transmission.
But as a result, you have to find another way to block the IR- and UV-parts of the spectrum so that they will not decrease the image quality. You can use the UFC to mount such a UV/IR-cut filter in front of the camera - and to quickly replace it with another filter, without touching the camera.
Narrowband filters are not perfectly suited for a DSLR because of the Bayer-matrix, but especially a 35 nm H-alpha filter will show the emission nebulae better.
Especially in light-polluted areas the UHC-S-filter is very helpful. You can use the Baader-UFC to switch between several filters fast and easy. This way you can see which filter is the best for your conditions.
A Fringekiller or other filters which decrease chromatic aberration can also easily be used with great effects on an achromatic lens telescope with the UFC. Nowadays, you can adjust for slight changes in the colours with the help of the white balance of modern cameras or software.
When a telescope – and the camera with it – faces upwards into the sky, the dust inside the telescope will fall towards the camera sensor. Pure CCD-astro-cameras have got an optical windows which also stops the dust, but inside of a DSLR, the dust will come much closer to the sensor, so that it will be visible as dark spots on the image. A filter held by a UFC is an effective protection against dust falling onto the sensor of your DSLR.
As a conclusion, an UFC filter changer gives you many new options also in combination with a DSLR, and as bonus, it offers additional protection from dust reaching the sensor of the camera.
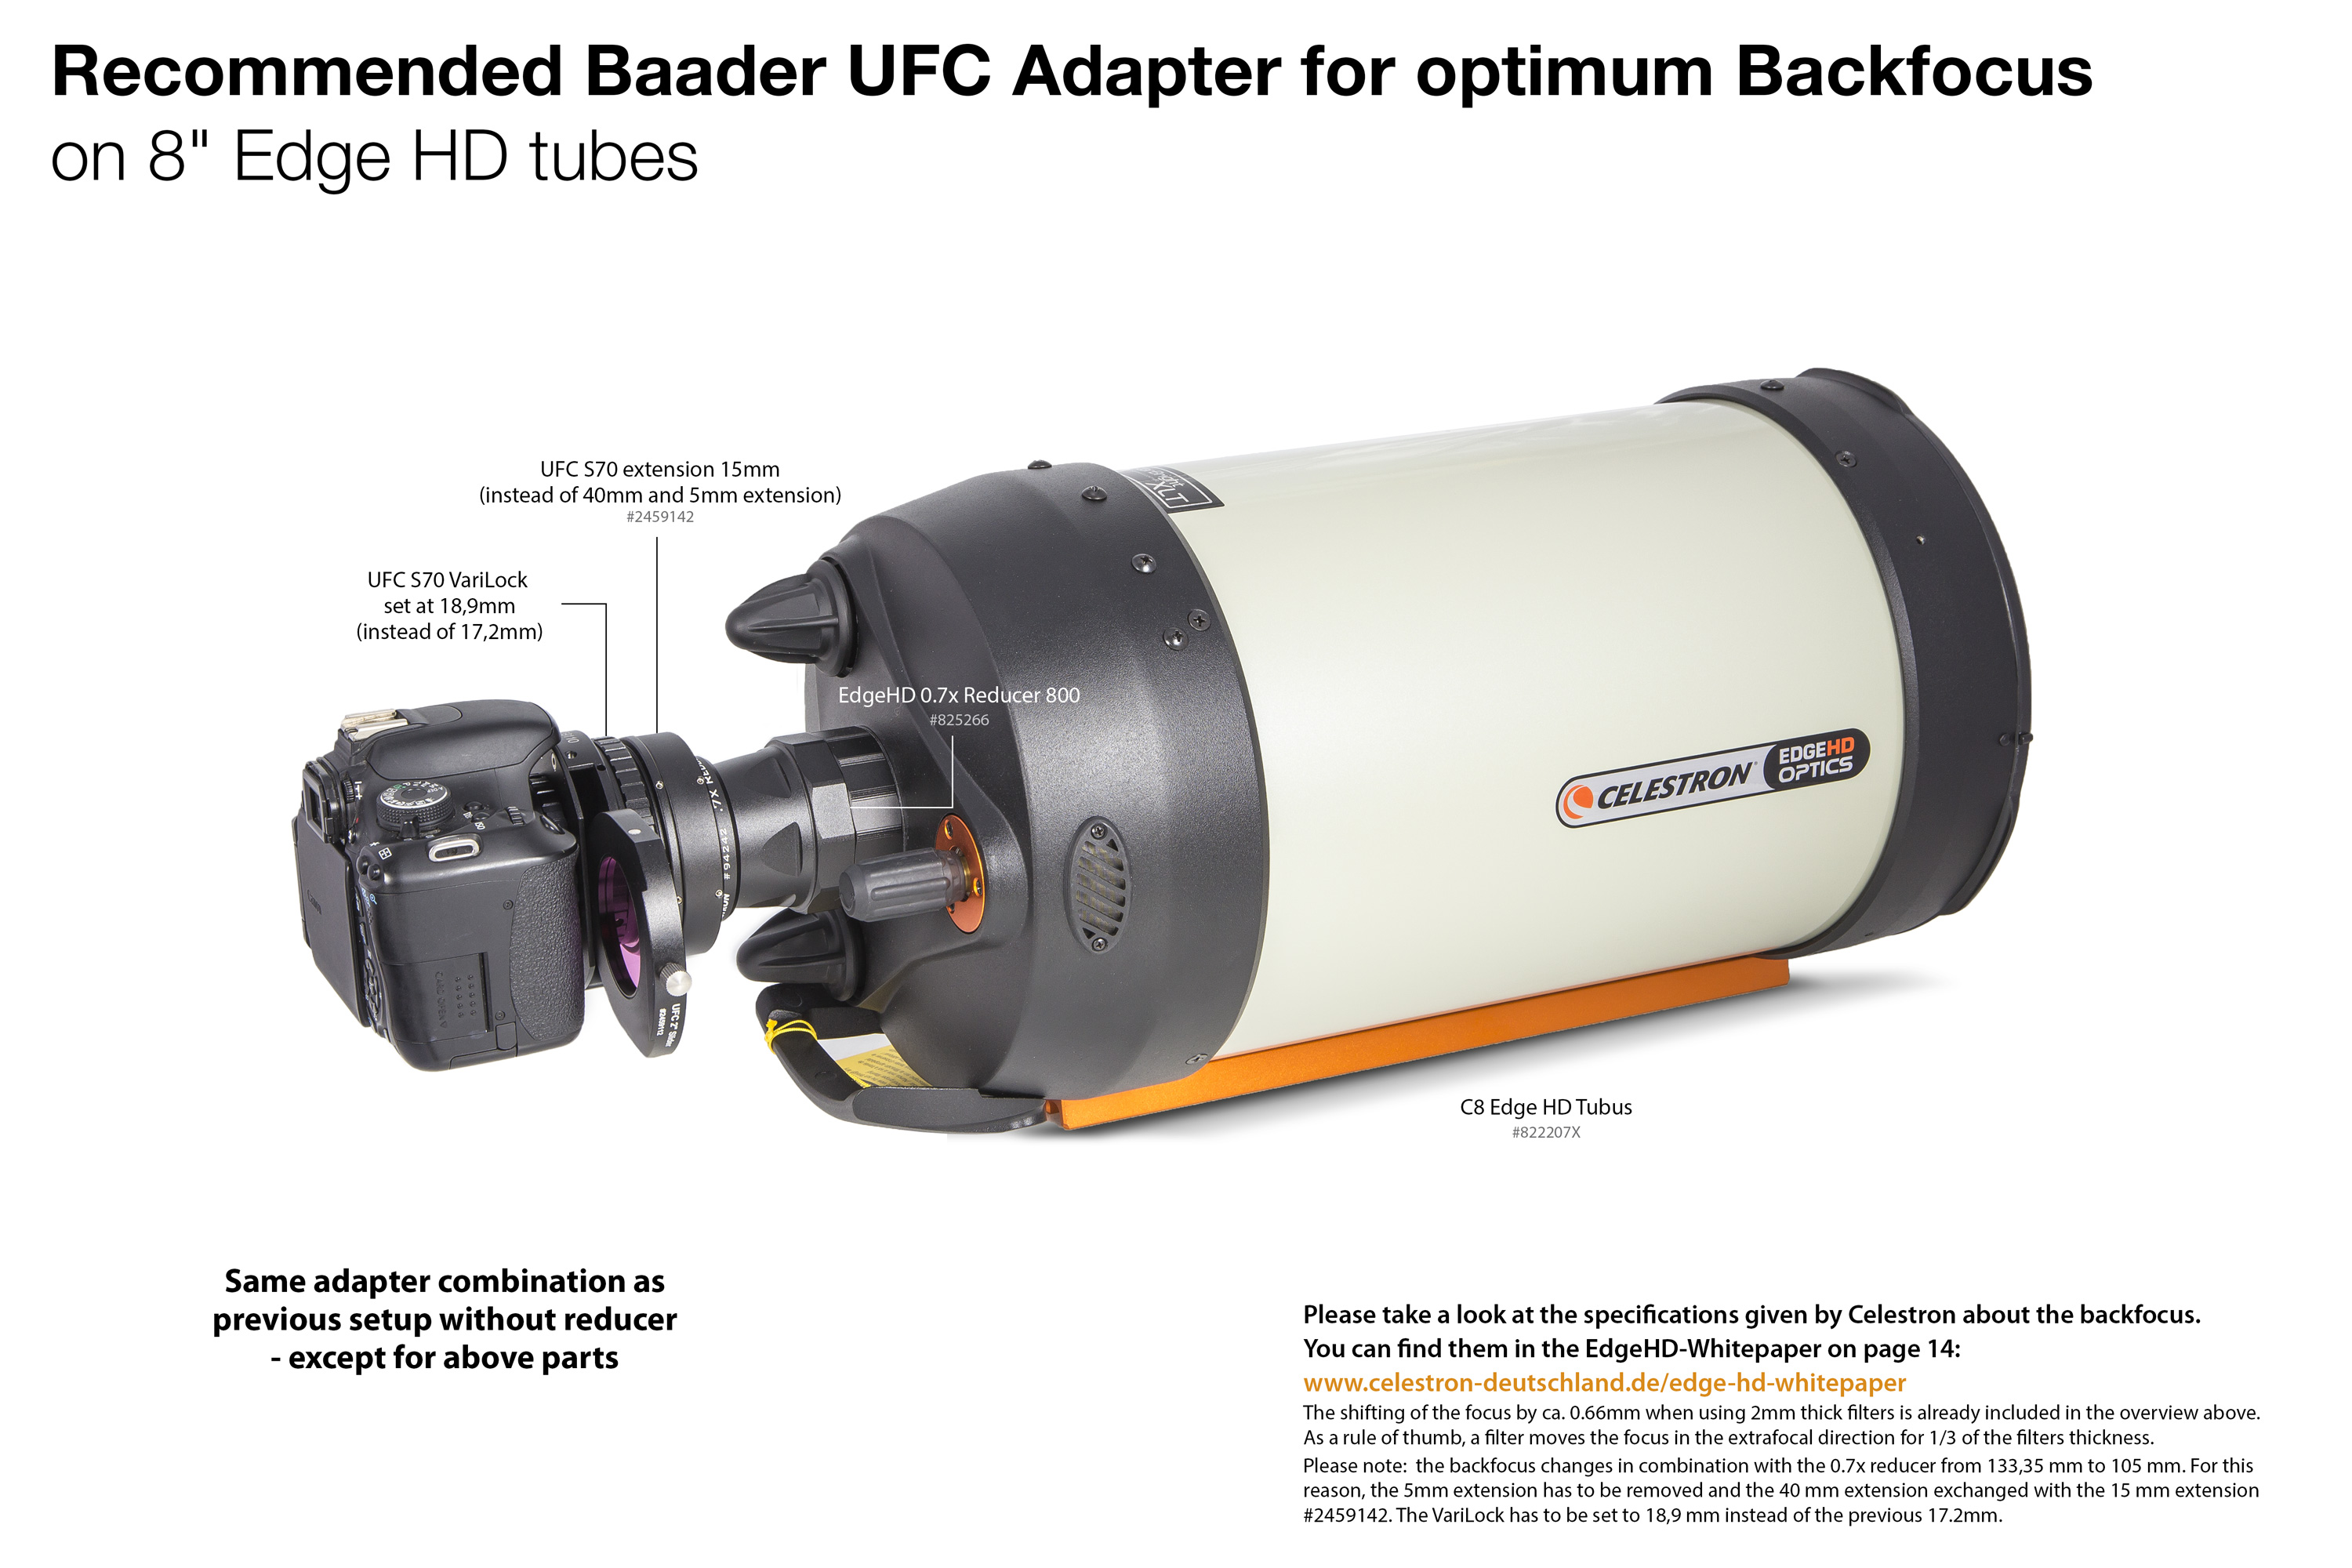
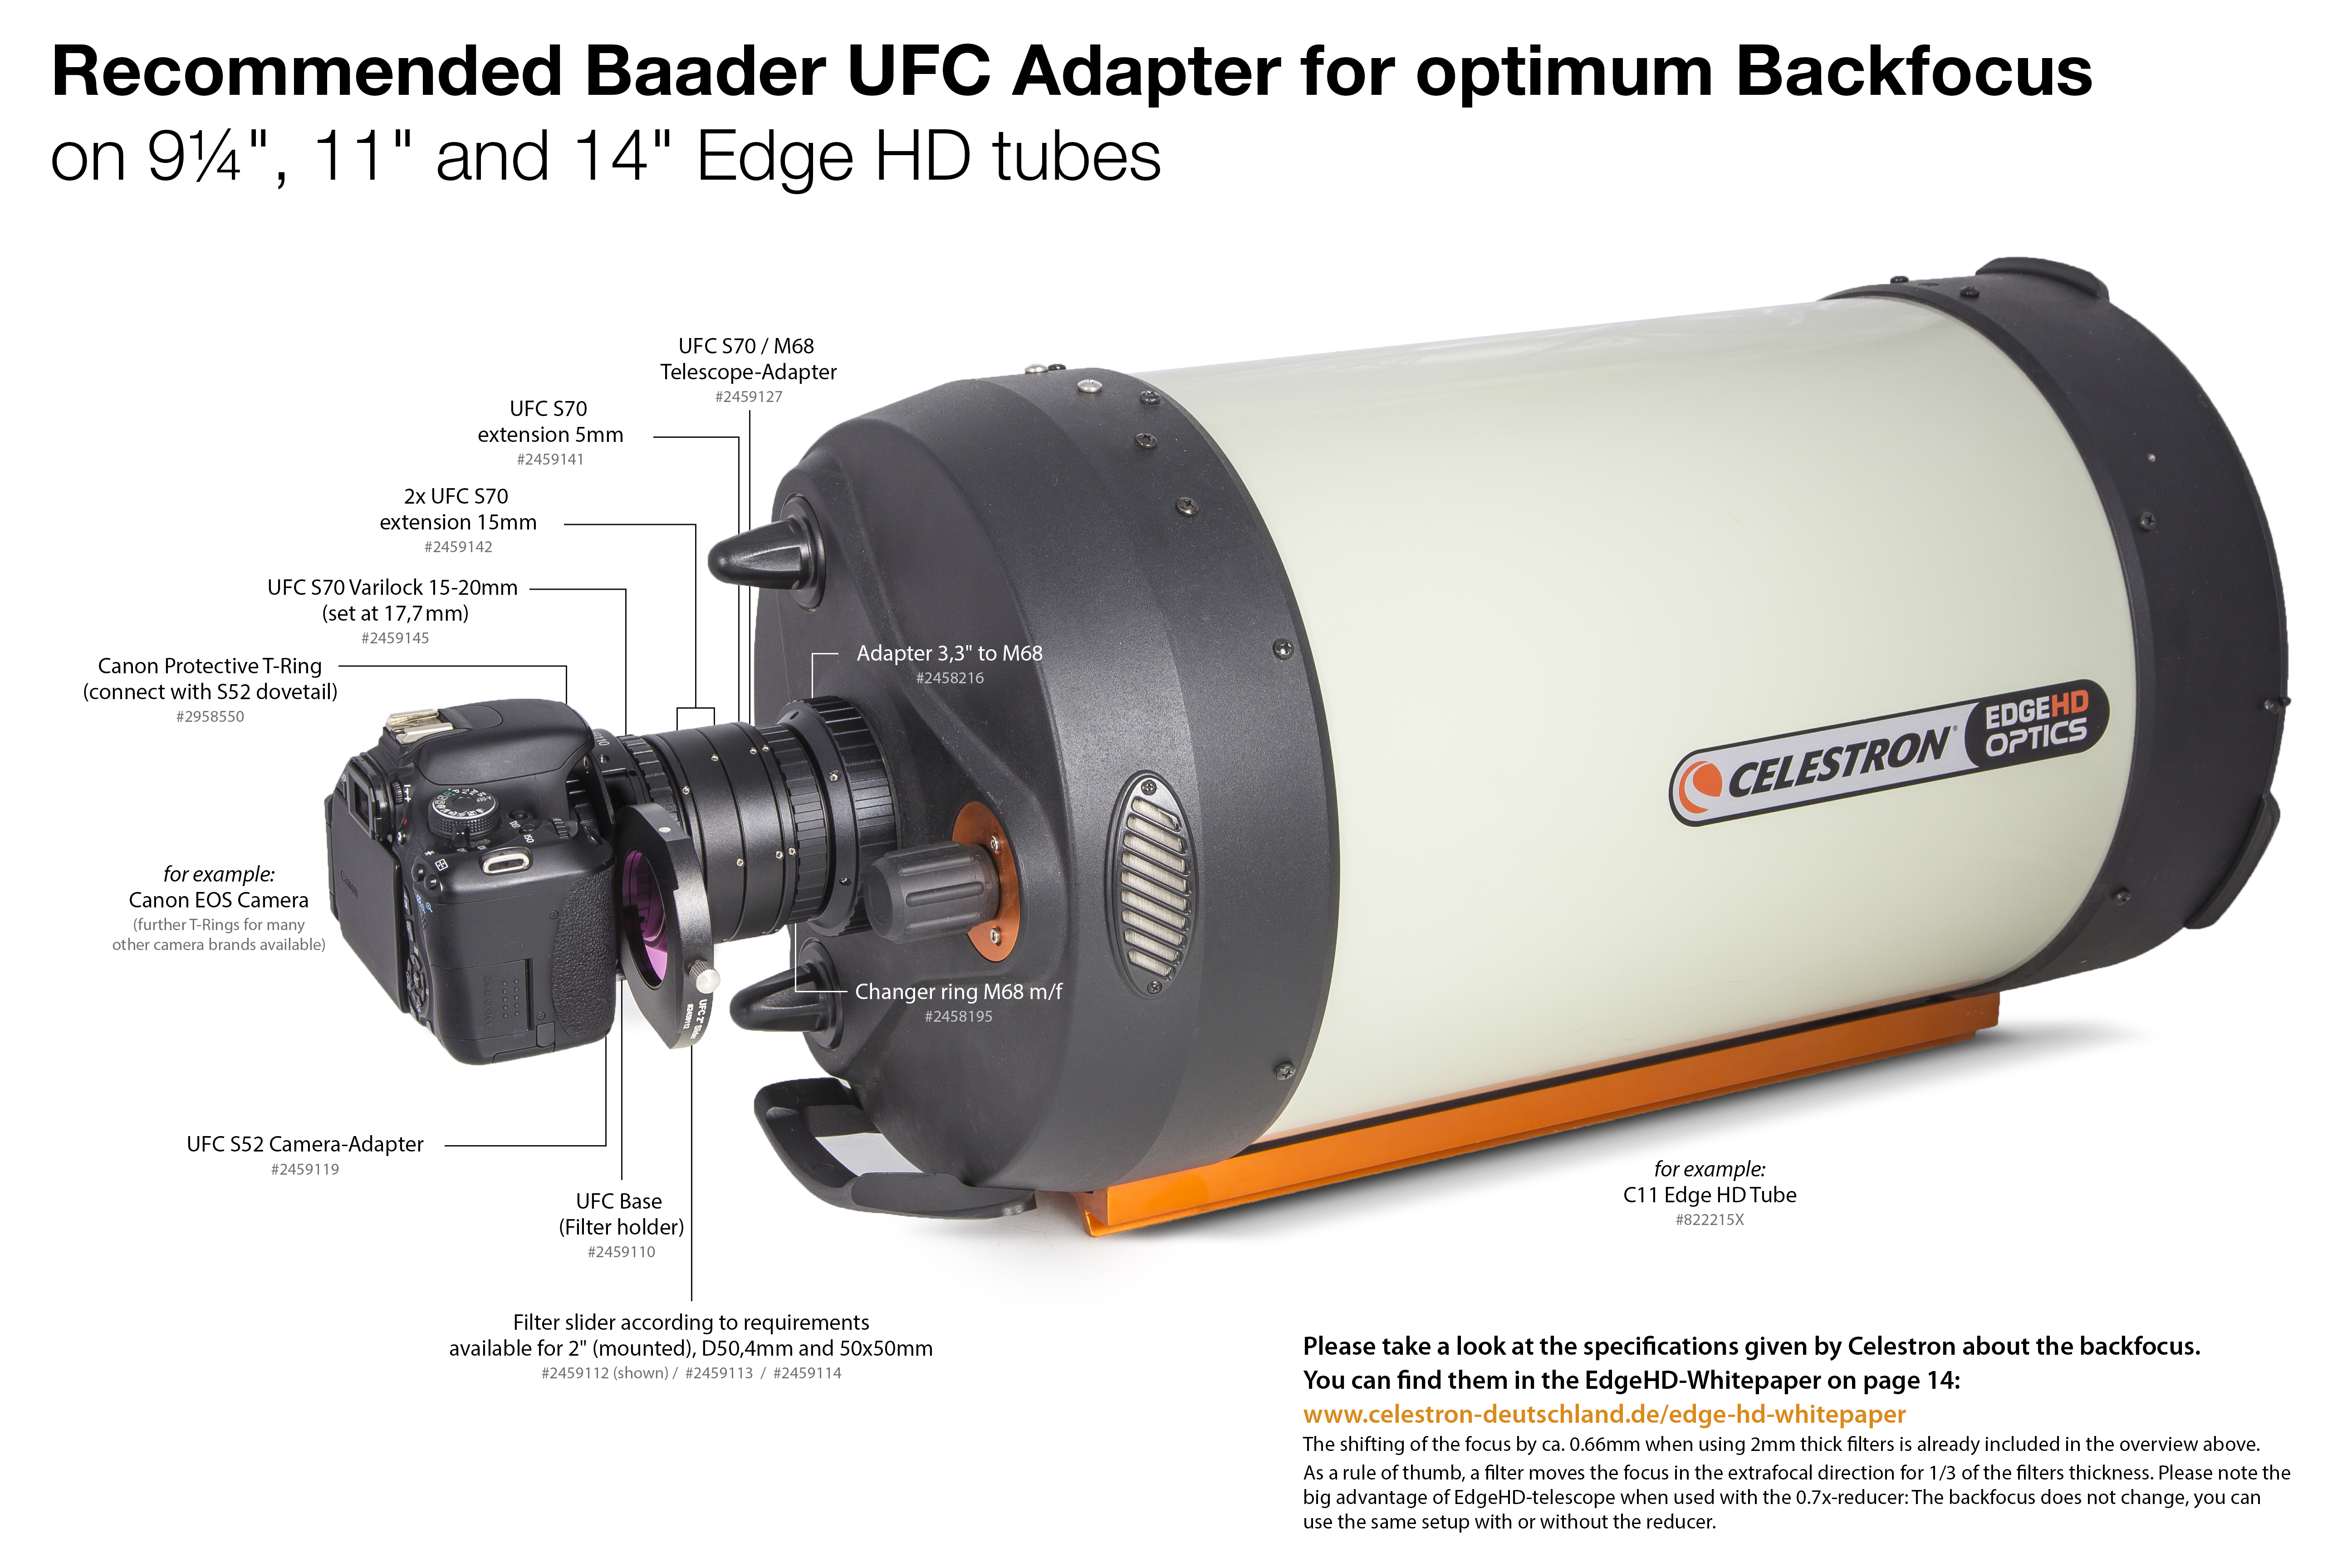
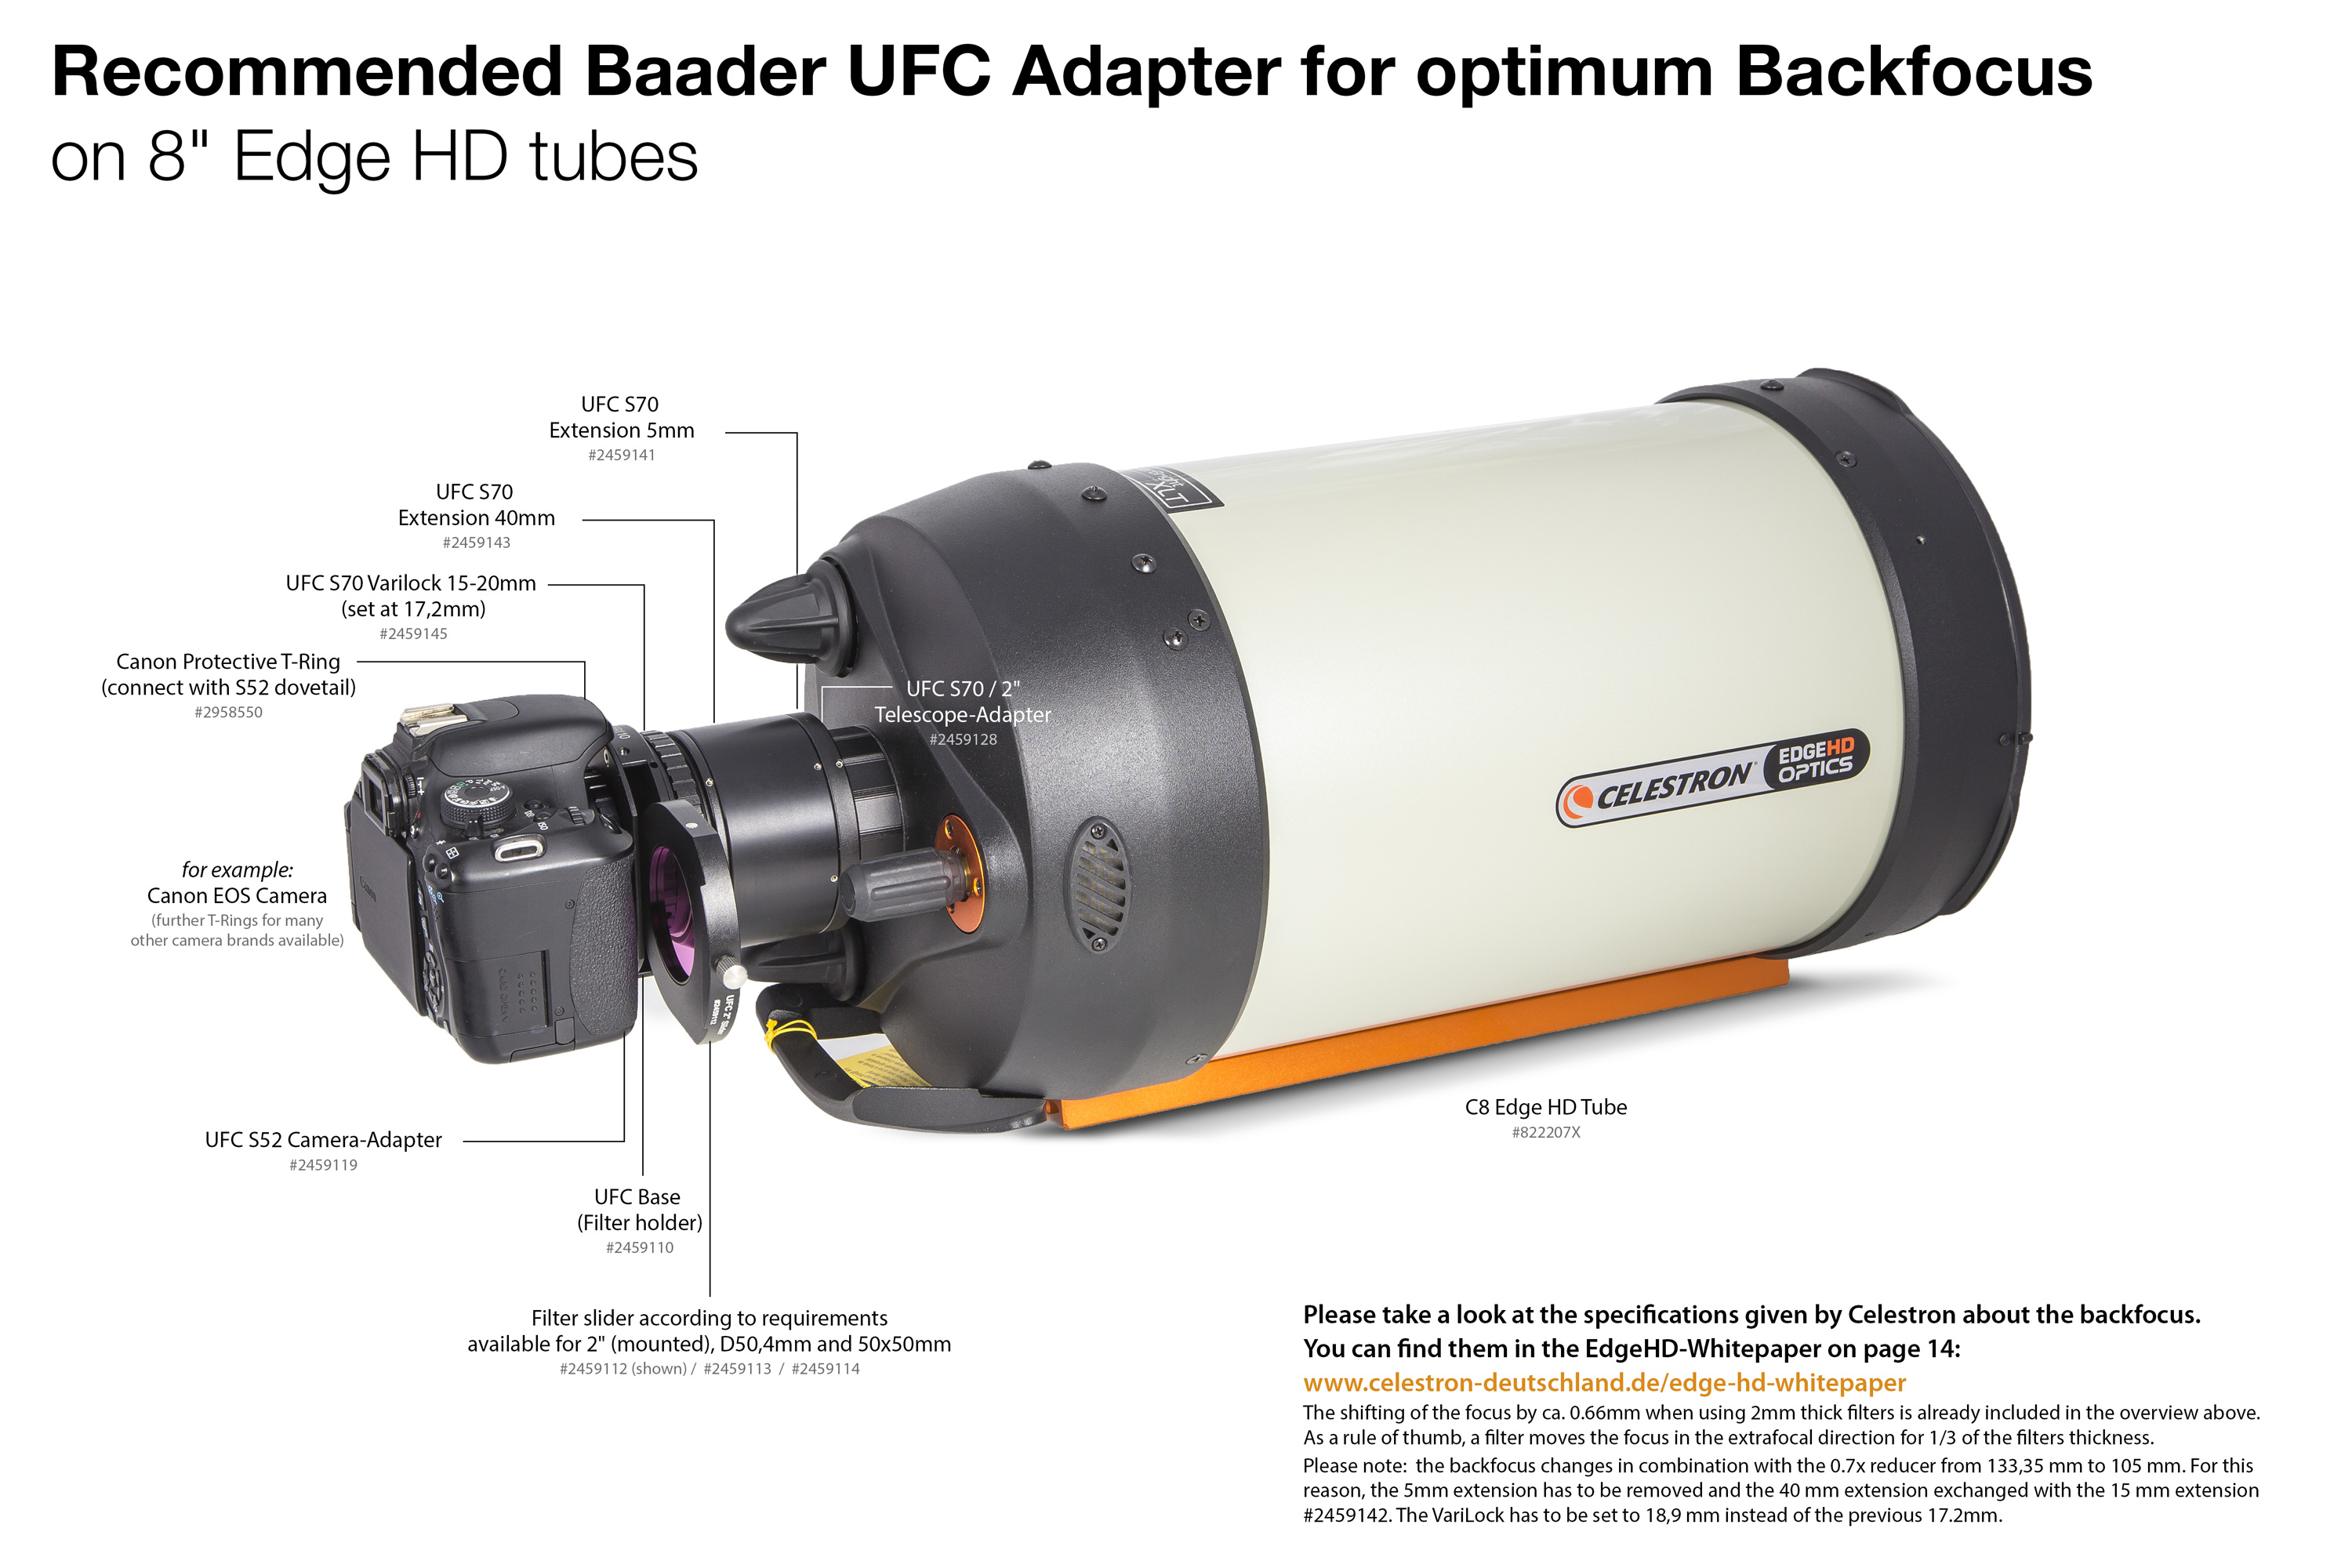
Following are some Backfocus examples of UFC-System with DSLR-cameras on Celestron EdgeHD Tubes
Please take a look at the specifications given by Celestron about the backfocus. You can find them in the EdgeHD-Whitepaper on page 14:
www.celestron-deutschland.de/edge-hd-whitepaper
The shifting of the focus by ca. 0.66mm when using 2mm thick filters is already included in the overview above. As a rule of thumb, a filter moves the focus in the extrafocal direction for 1/3 of the filters thickness.
Please note the big advantage of 11" and 14" EdgeHD-telescopes when used with the 0.7x-reducer: The backfocus does not change, you can use the same setup with or without the reducer.
When using an 8" EdgeHD in combination with the 0,7x Reducer, the Backfocus changes from 133,35mm to 105mm - for this reason the adapters have to be changed as described below as well as visible in the images.
Recommended Adapters for 8" SC/HD
Recommended Adapters for 9¼", 11", 14" SC/HD
[br]
This setup demonstrates the shortest possible connection of one of our 2" diagonals at a Celestron SC/EdgeHD with an UFC. The shorter distance between telescope and eyepieces enables a better illumination, especially for eyepieces with longer focal lengths.
Recently we received the following questions on our 2" Clicklock Diagonal Mirror and wanted to answer including the below illustrations for other customers:
Please note: all of the below information is also valid for our 2" BBHS mirror and prism diagonals (with slight differences in the specifiations such as optical tube lengths – please compare with specs on the product pages).
According to image below
- is the optical path mentioned in technical data (112mm for #2956100 and 109mm for #2956100Z) measured along optical axis from point A to B or point A to C?
- what is the dimension from point B to C?
- Can 2” barrel (at point A) be removed from #2956100 and exchanged with another accessory (is it available?) to change the diagonal to #2956100Z (M68x1 thread)?
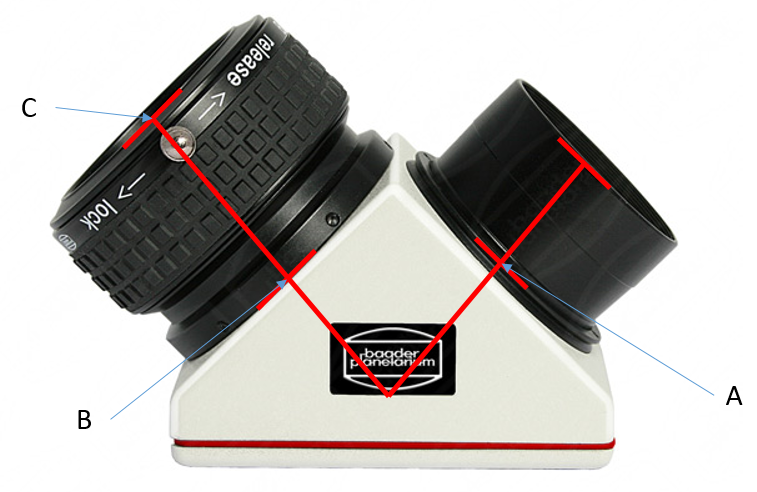
Please note below our answer and adjusted graphic:
- The optical path of 112mm is measured A to C. The lightway from A to B would be ~71,5mm. Please note that the final endpoint of B is 3,5mm outside of the prism body (as illustrated in the below graphic), it looks just like point A in your drawing
- The Dimension from B to C (height of the SC-ClickLock) is 44mm. It is overlapping the 3,5mm outer part of B
- Yes, the 2" Barrel can be removed without problems, revealing a 2" inner thread. This thread however is also an adapter M55/2" (not available as single item) and can only be removed from the Clicklock mirror body with the help of our adjustable pin type face wrench (#2450062). After this adapter has been removed, you can change the diagonal to our #2956100Z Zeiss Clicklock with the help of the M55 / M68 Adapter (#2956110). This adapter is already included in the M68 Clicklock diagonal mirror version (2956100Z). The M68 version offers the largest telescope sided opening aperture on the market - with 51mm
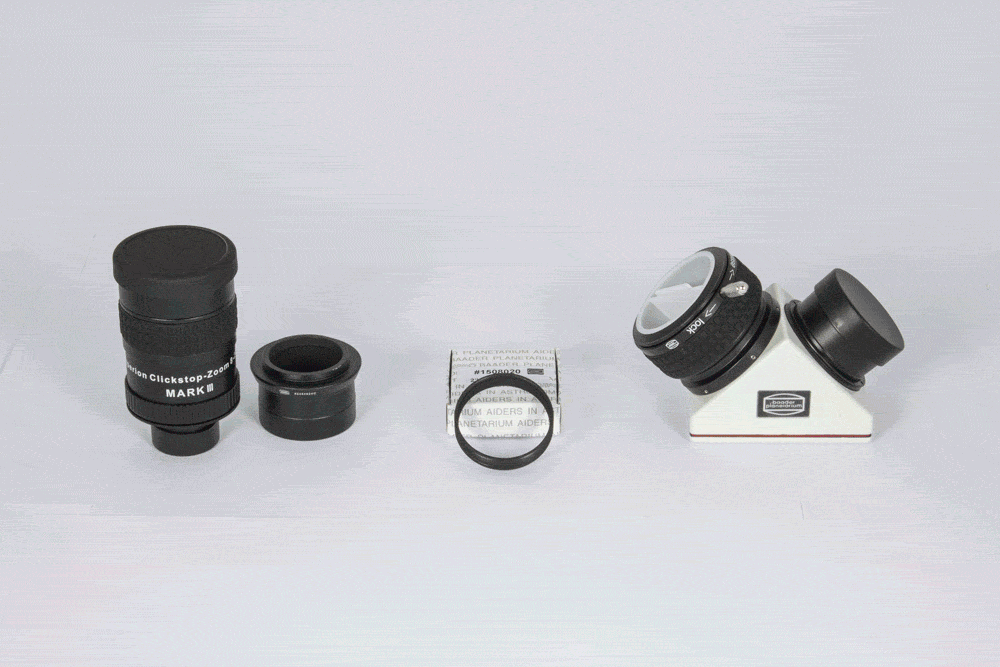
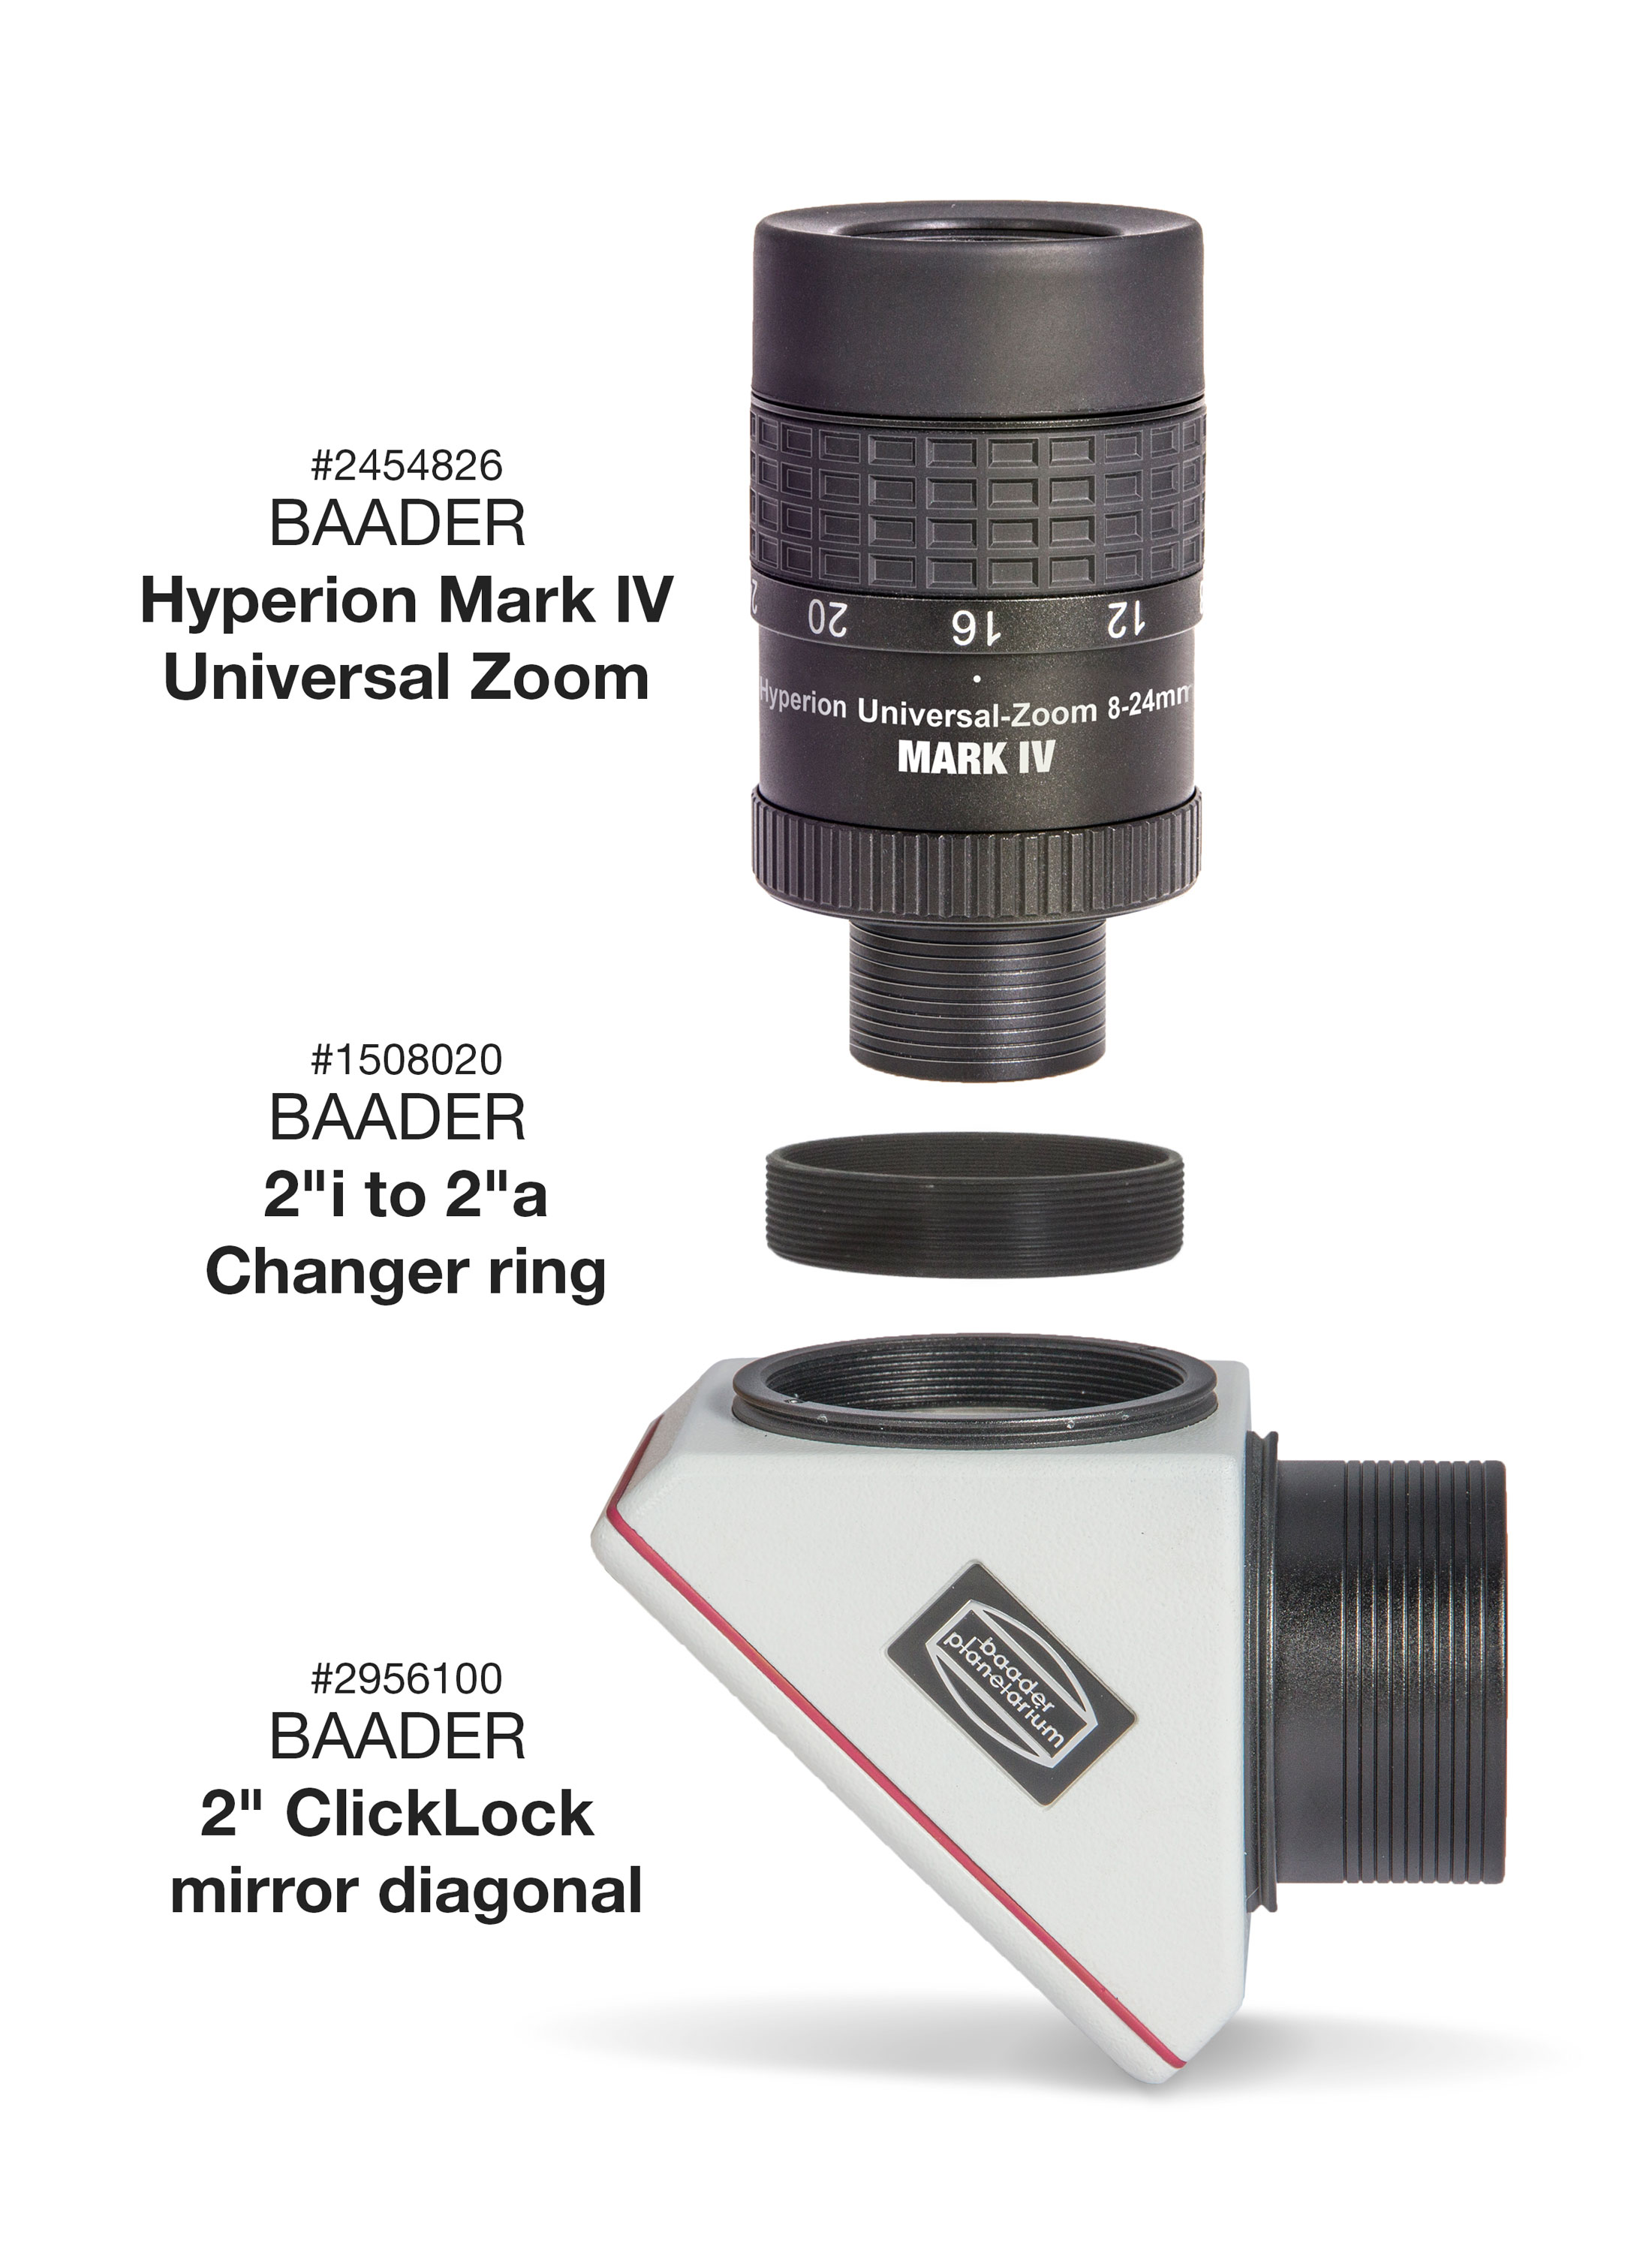
Please also note that by removing the Clicklock clamp on the eyepiece side (revealing the M55/2" Ring just like on side A), you can attach our 2"/T-2 Ring (#1508035) which allows for example mounting of our 1.25" focusing eyepiece clamp (#2458125). Alternatively you can add our 2" changer ring (#1508020) to directly attach for example our Hyperion Zoom eyepiece as shown on the left on the example of our former Hyperion Zoom MK III. The picture to the right shows the same usage with our current Hyperion Universal Zoom MK IV eyepiece.
We received the following question and found it important to write an extensive answer for other customers.
QUESTION: I purchased the Hyperion Zoom and the MPCC Mark III. Can you tell me how to adapt the eyepiece to the coma corrector?
I also want to use other eyepieces. How do I know the right distance between fieldstop position and the MPCC?
ANSWER:
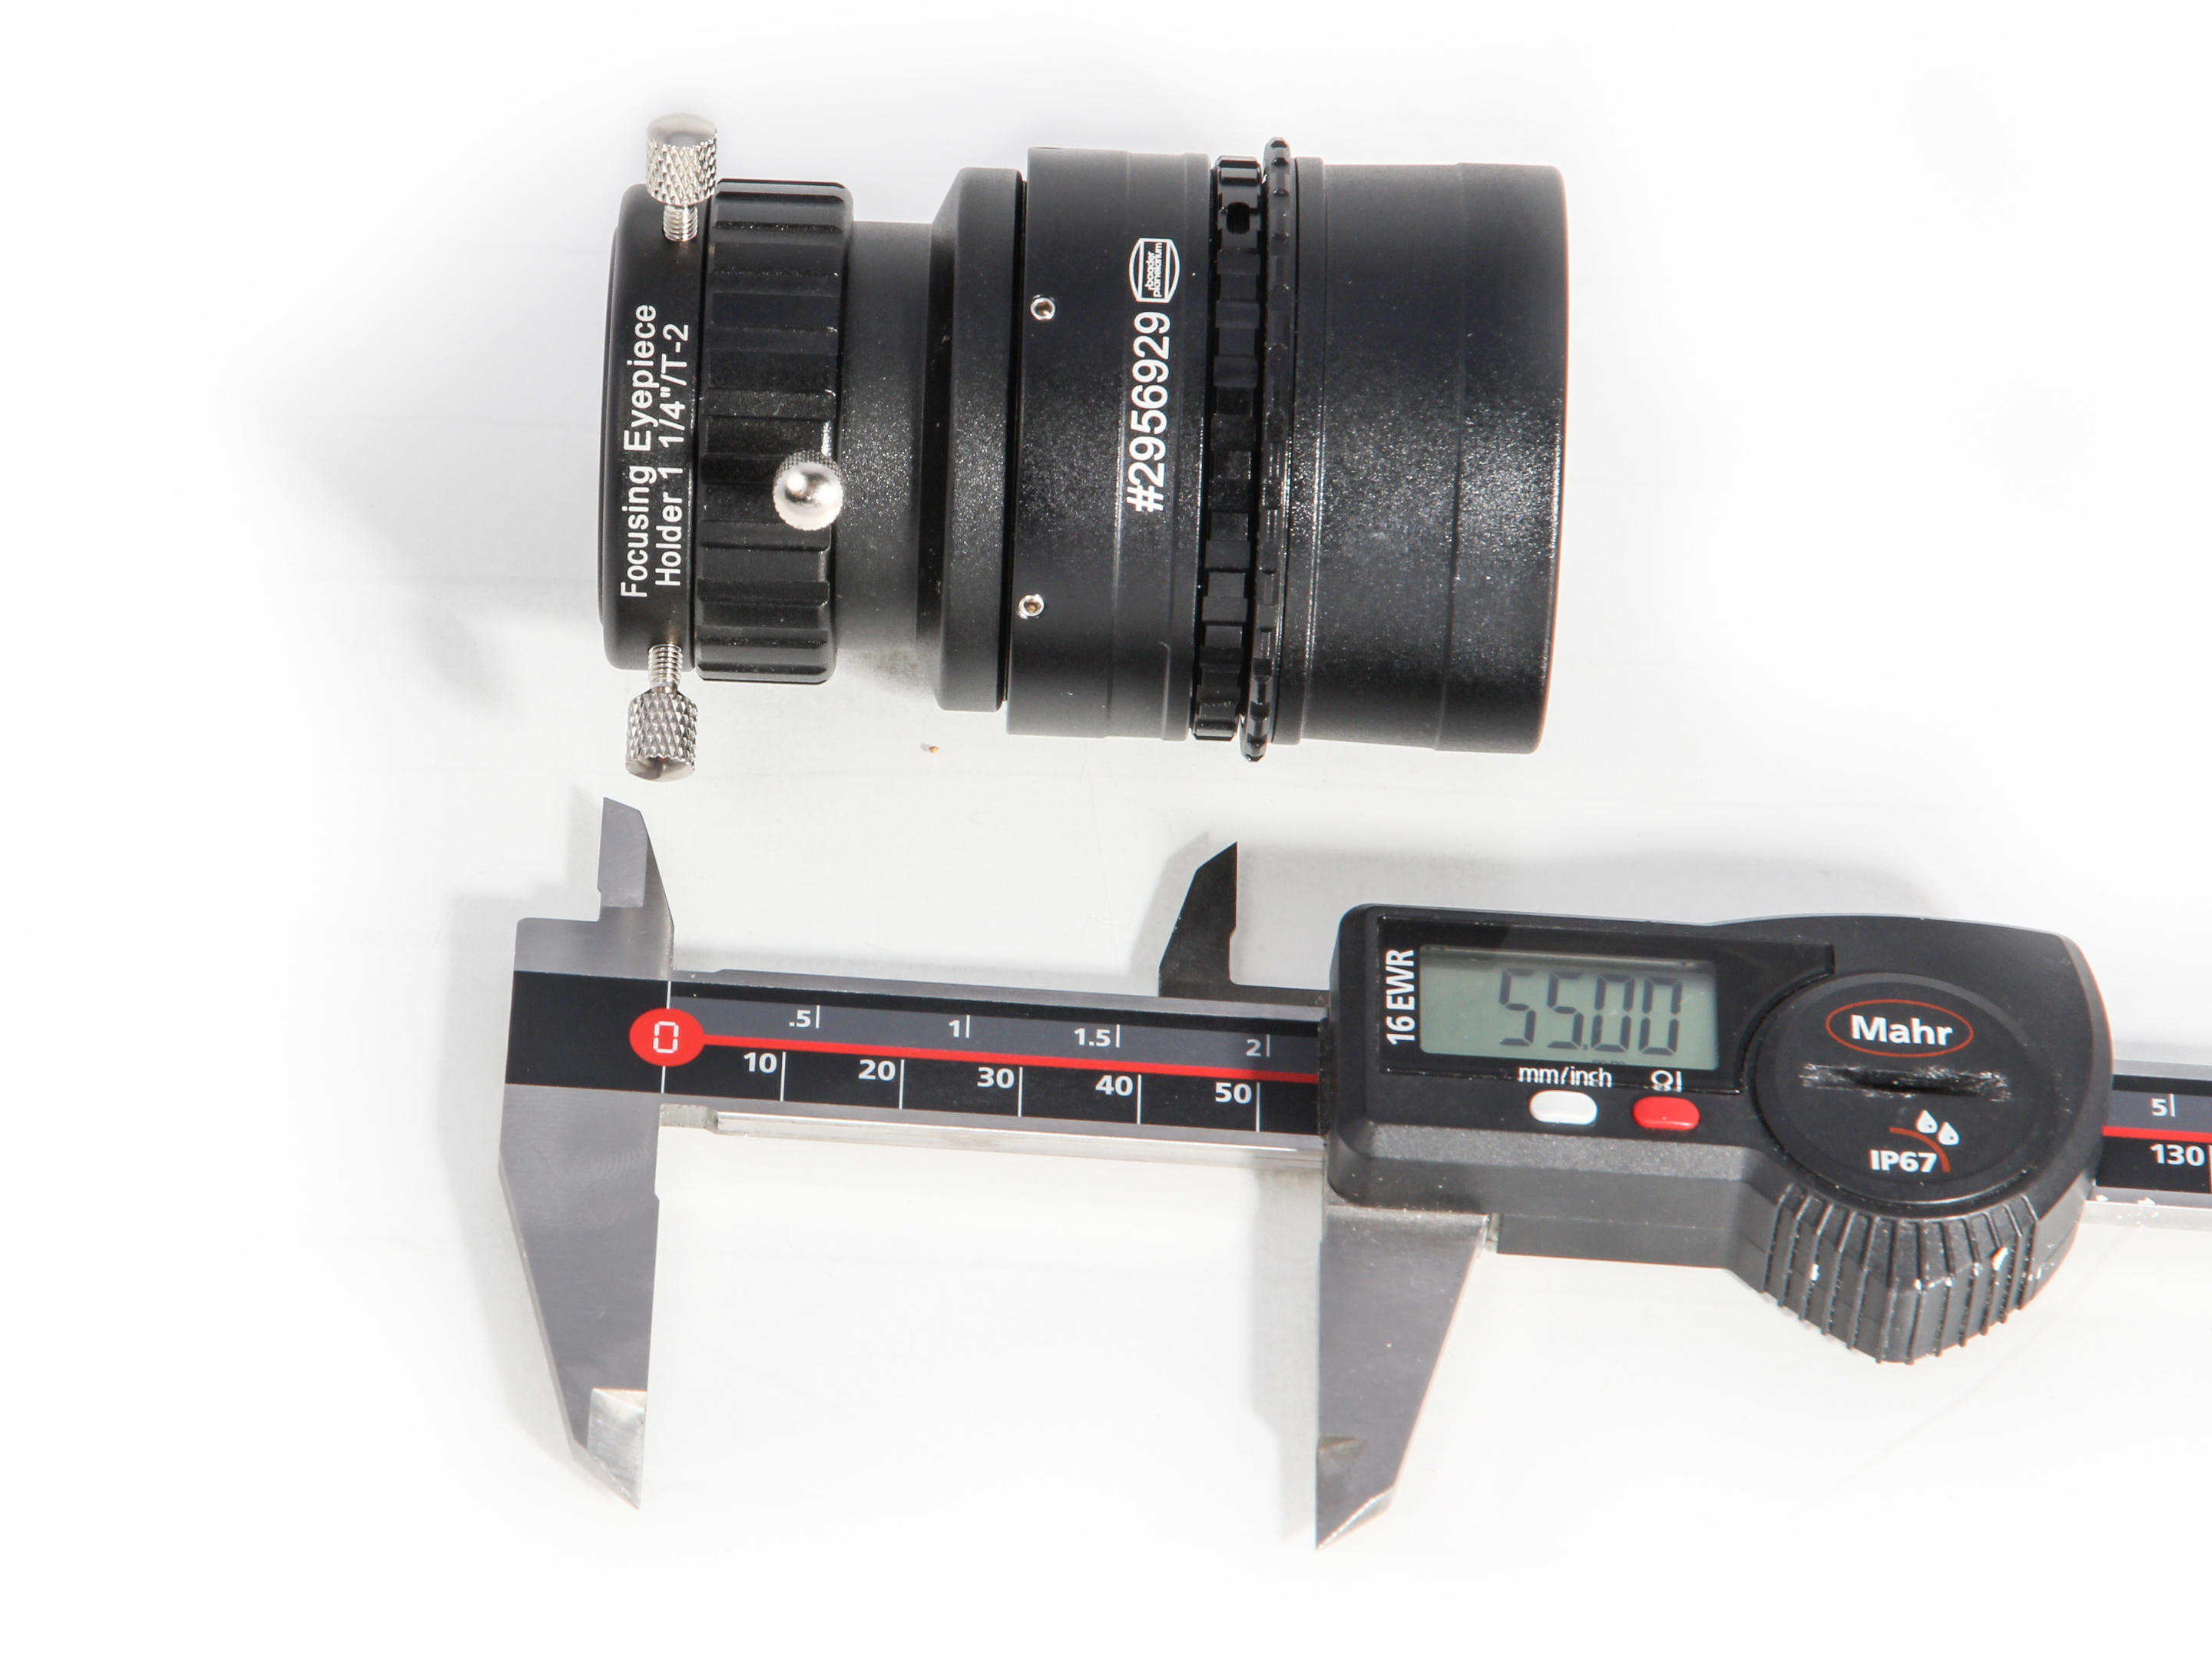
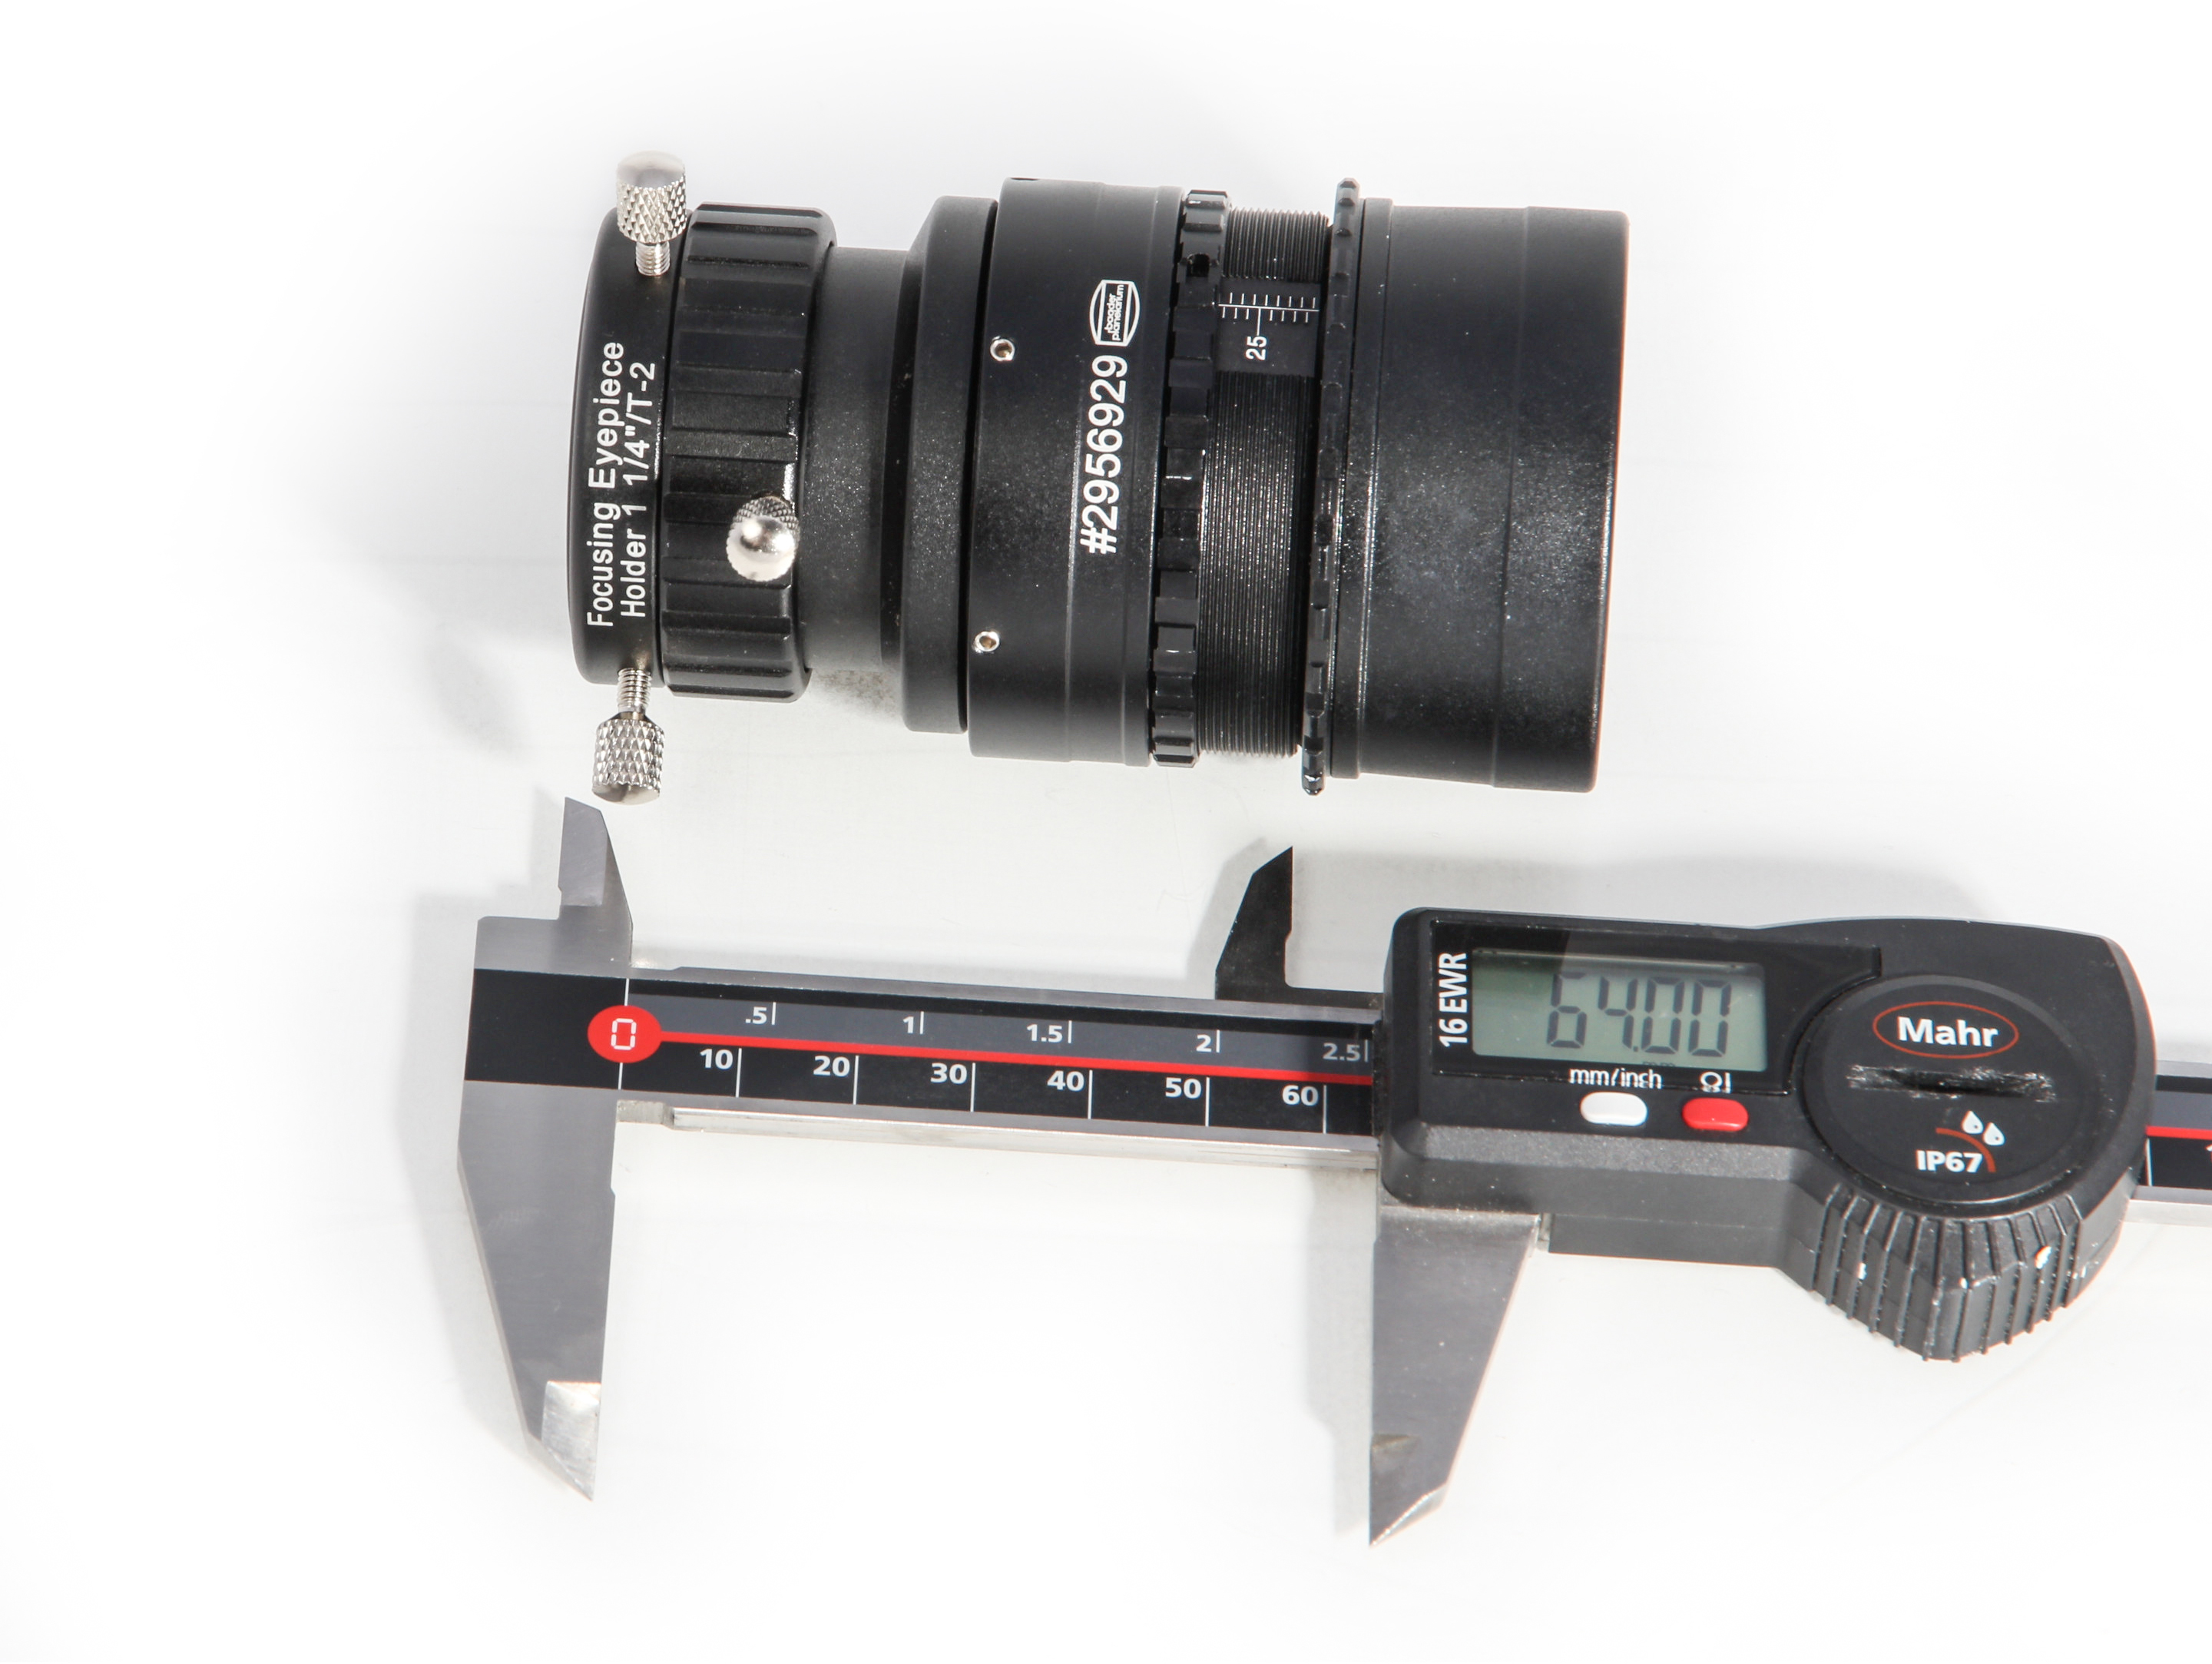
It is easy to produce an adjustable 1¼" eyepiece adapter for the Baader-MPCC coma corrector, offering a variable optical length from 49 to 64 mm, by using the following two parts:
- Baader focusing eyepiece clamp 1¼"/T-2 (item no. 2458125 / # 8a)
- Baader VariLock 20-29 mm T-2/T-2 adapter (item no. 2956929 / # 25Y)
Combining these parts on top of the MPCC T-2-thread and rotating both adapters into the shortest optical length will provide an optical distance of 49 mm for an fully inserted eyepiece with 1¼" barrel. The MPCC is designer for a distance of 55mm to camera sensor or fieldstop.
That means, the fieldstop inside an eyepiece could be placed up to 6 mm above the (upper) end of the 1¼" eyepiece barrel, in order to adjust for the 55 mm optical distance of the MPCC, which is necessary for a coma free image.
Our Eudiascopic 35 mm eyepiece (having a field stop diameter larger than the 1¼" barrel diameter would allow) will exactly require these 6 mm inward travel, in order to position the eyepiece field stop at the 55 mm spacing required by the MPCC.
If the field stop of an eyepiece is exactly at the intersection between the 1¼" barrel and the eyepiece body, you only need to rotate the locking eyepiece clamp (#8a) all the way up to its upper end and use the locking screw to tighten the eyepiece clamp in that position. Now this mechanical combo would provide the required optical distance of 55 mm between the MPCC body and the start of the eyepiece body - this is the position were most eyepiece designers put their focus position / the field stop (= the image plane).
Our Hyperion Zoom MARK III has it´s field stop (image plane) also at the intersection were the 1¼" barrel ends and were the eyepiece body itself starts.
Part #8a is very convenient, primarily because it offers 6 mm of upward travel to adjust for another distance of the image plane very easily when changing eyepieces.
The VariLock-T-2/T-2 adapter offers another 9 mm of upward travel, with the ability to lock it down very strongly (with a steel locking tool supplied with the product). So in case an eyepiece has its image plane further down, inside the 1¼" barrel (as for instance our BCO / Baader Classic Ortho eyepieces with an 2 mm inward field stop, which are designed for Spotting scopes), then the VariLock can be expanded into a slightly longer extension, so that all 1¼" eyepieces of an existing collection could be brought to focus within the 6 mm travel range of the focusing eyepiece clamp #25Y. This will allow to precisely adjust all your 1¼" eyepieces to reach the necessary 55 mm MPCC-spacing, just by rotating the #8a focusing eyepiece holder.
Thanks to the locking provisions on both of these adapters, they can hold even the heaviest of 1¼" eyepiece designs. Note: the eyepiece will fit only if an eventual 2" eyepiece-barrel can be removed from the eyepiece!
If you need to find out the field stop position of competing brand eyepieces, we are sorry that we don't have all these data of such eyepieces (the market is all too big). Our competitors should have all such technical information on the web - just as everyone can find our technical info about our eyepieces (see here for Hyperion Zoom, Morpheus, Hyperion 68, Hyperion Aspheric and BCOs).
However – we are confident that the two Baader products explained above (# 2458125 and # 2956929) will provide enough flexibility for adapting most any 1¼" eyepiece onto the MPCC Mark III.
 Dear Stargazer,
Thank you for your interest in our [product sku="clicklockclamps"]. We are very pleased that you consider this clamp connection to be a worthwhile purchase for your telescope.
We may not yet offer ClickLock clamps for your telescope system. However, we will try to produce more adapters in the future - but we always need the following information below.
Thank you if you fill in the form below and send it to us. This will make it much easier for us to decide on the most popular adapter solutions. Unfortunately, we cannot yet make any concrete commitments regarding availability, but you can be sure that we would like to use our clamping device on as many telescopes as possible.
Again, thanks for your interest.
Baader Planetarium Design-Team
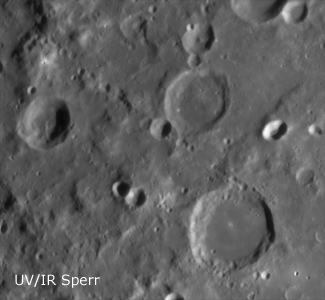
Shooting the moon through a normal Baader UV/IR Cut Filter in comparison with the
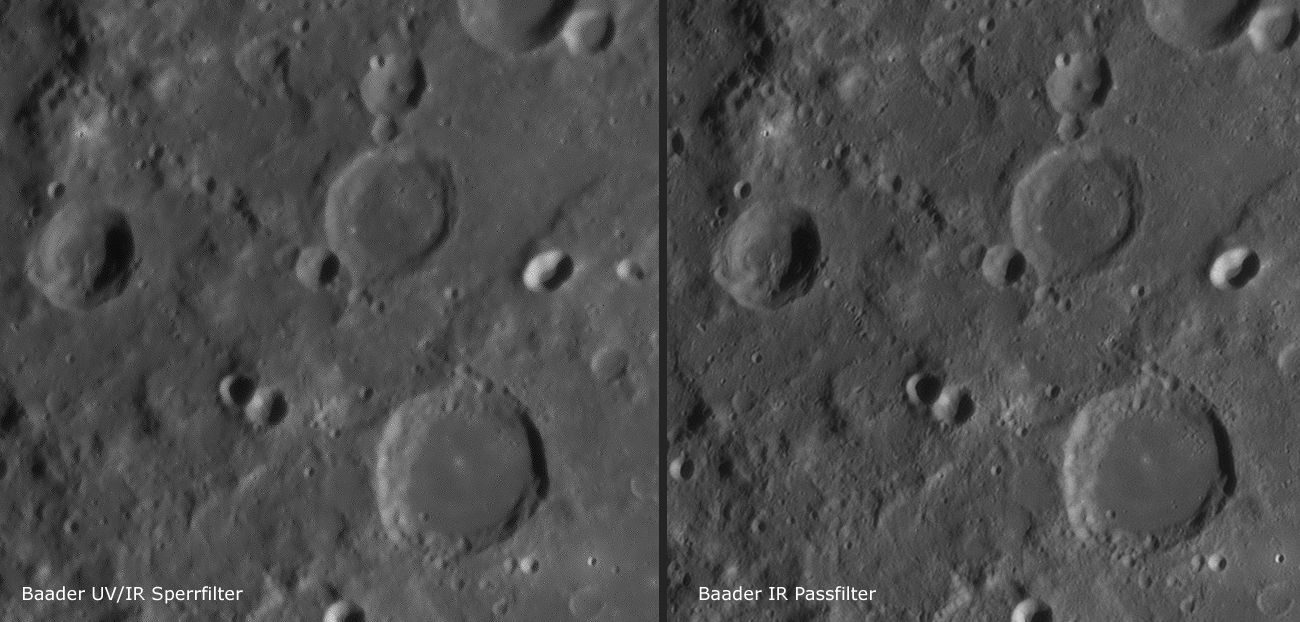
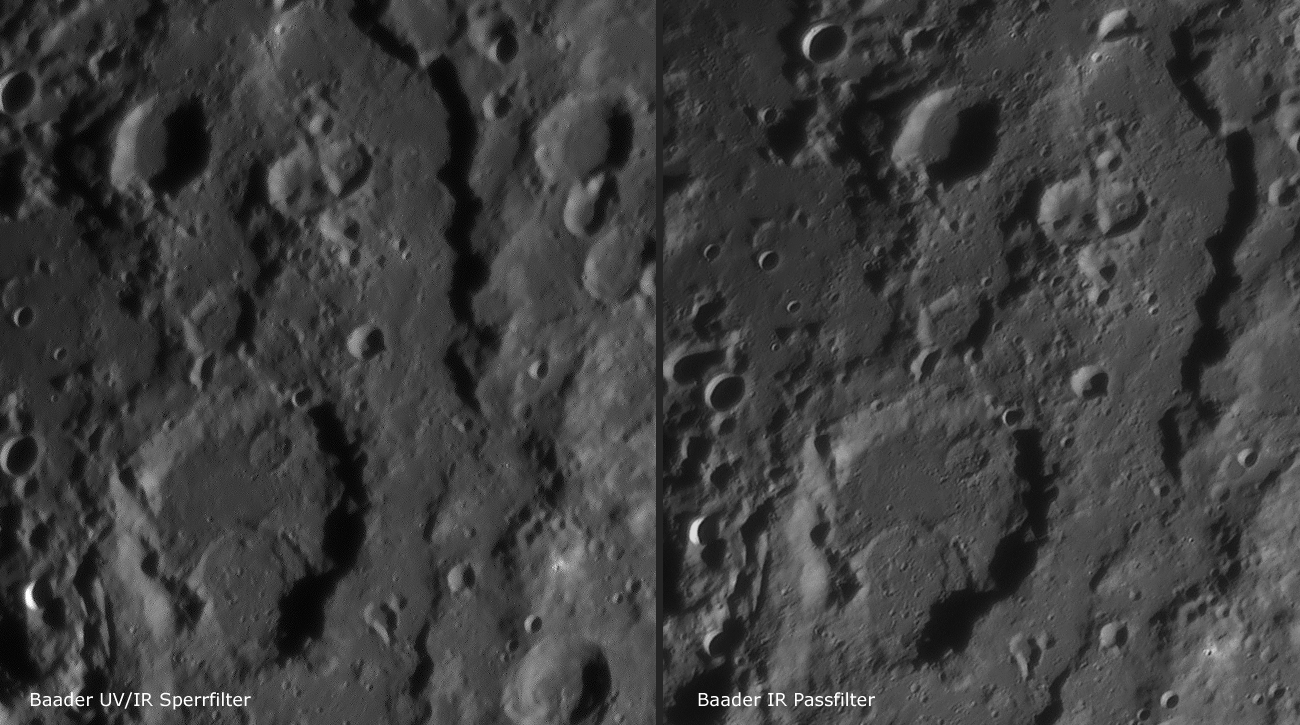
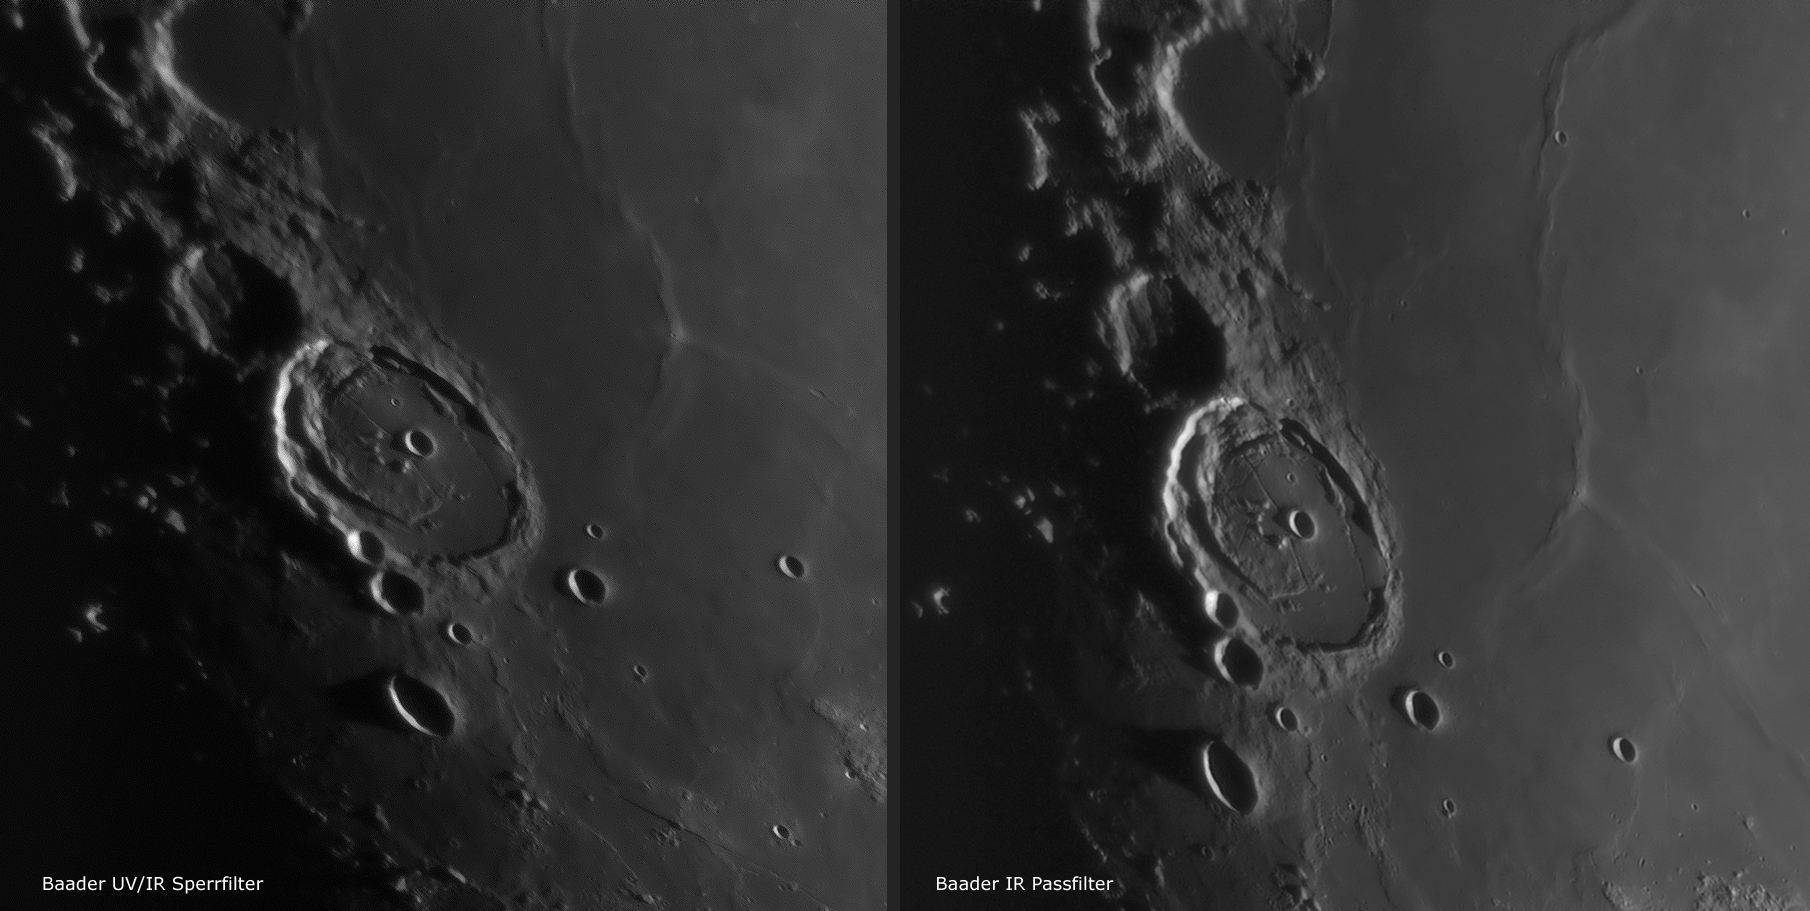
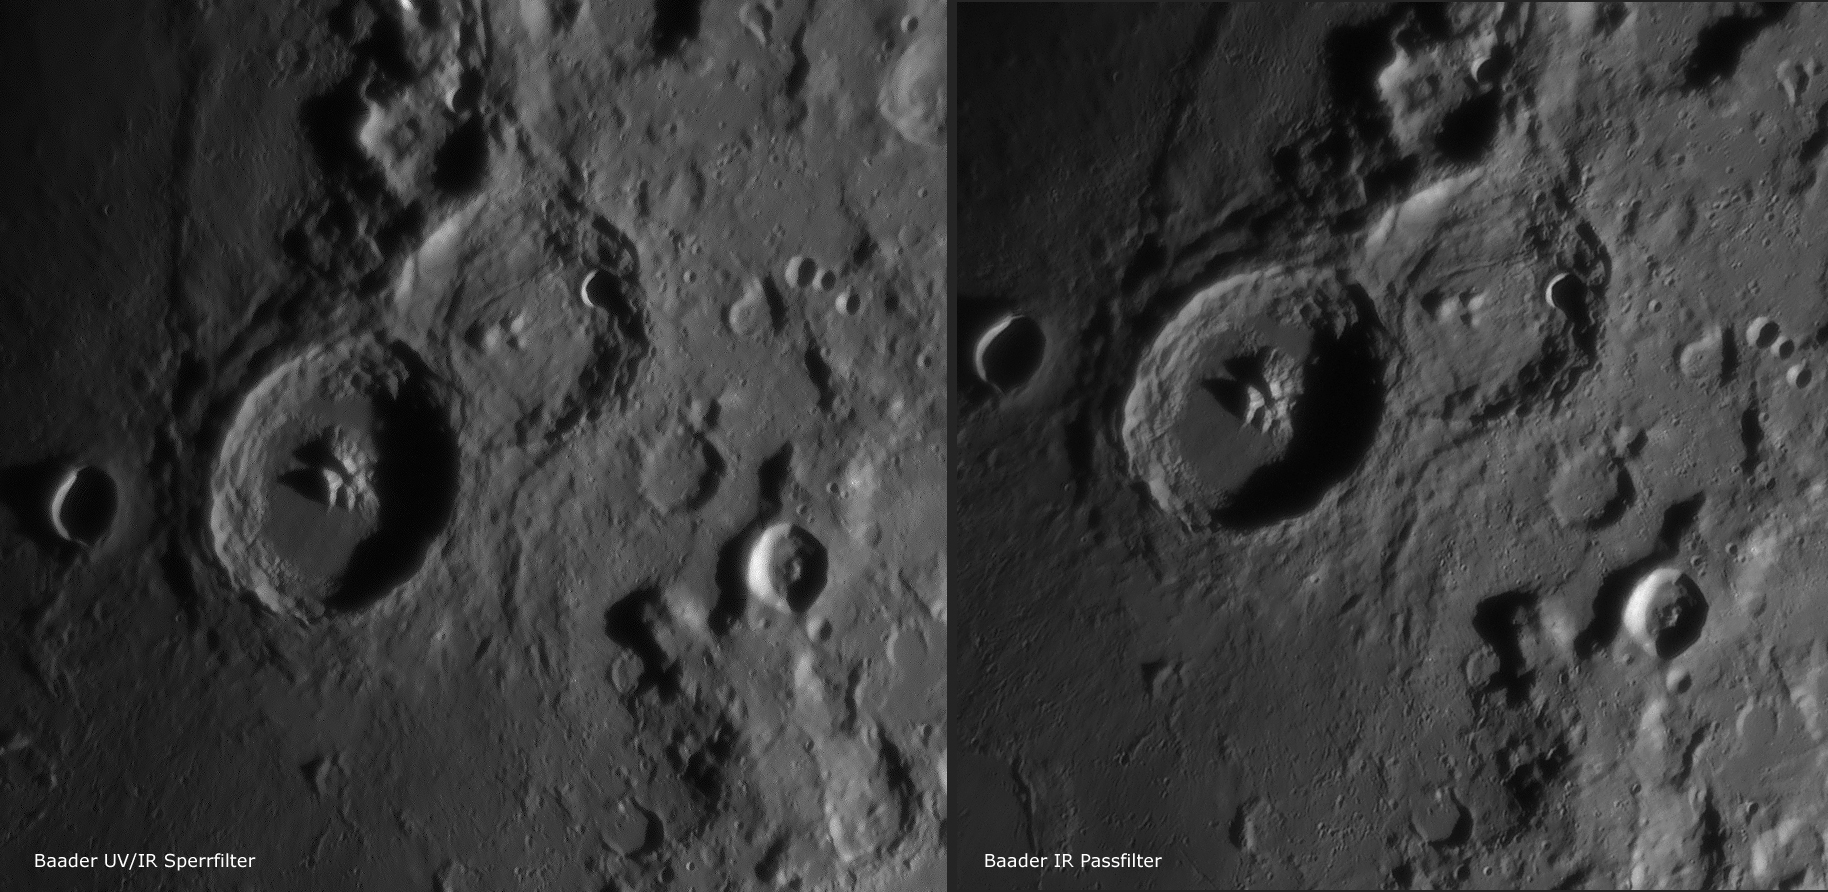
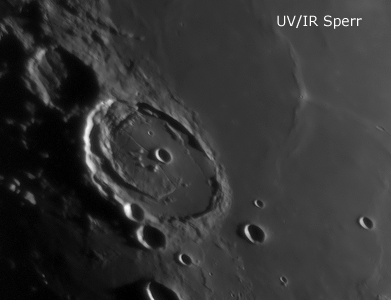
In the near infrared spectral range atmospheric disturbances (seeing conditions) are much more less than in the visible spectral range. Images taken in the near infrared light are often sharper than images taken in shorter wavelength. Special the moon (and the sun also) are nice targets shooting images with the IR Passfilter due to their brightness.
All the following images was taken in the same night within a time interval of only 45 minutes (decreasing moon). The seeing was during the whole imaging session moderate.
Image details: standard Celestron C14 in prime focus with a Celestron SkyRis camera 445 mono. Telescope location: Onjala Lodge/Namibia. Stacking each 144/1.200 frames and Waveletfiltering with AviStack 1.8, final imaging processing with Photoshop CS 2. All image processing was made absolutely identical.
The animation left shows the crater chain Catena Abulfeda in a direct comparison between the UV/IR and the IR PAssfilter.
Catena Abulfeda
Left: UV/IR Cut, 21.03.14 - 01:07:25 UT
Right: IR Passfilter, 21.03.14 - 01:26:10 UT |
Catharina
Left: UV/IR Cut, 21.03.14 - 01:10:54 UT
Right: IR Passfilter, 21.03.14 - 01:24:59 UT |
Posidonius
Left: UV/IR Cut, 21.03.14 - 00:46:09 UT
Right: IR Passfilter, 21.03.14 - 01:18:33 UT |
Theophilus
Left: UV/IR Cut, 21.03.14 - 01:09:55 UT
Right: IR Passfilter, 21.03.14 - 01:24:00 UT |
The examples above show clearly the improvement of the images taken through the Baader IR Passfilter.
But the Baader IR Pass Filter can do more in imaging the moon.
Beside seeing enhancement, observers are able to shoot images of the moon at bright daylight with sun in high altitude. Sky background turns to black and high contrast of moon details seems to be smoother than at night. So one is able to take moon images at illumination setting not availeble at night time.
The idea came upon me quite spontaneously to test the cleaning results of the SC-plate. On a crisp and clear morning, contrast at the lunar surface is still so very good that the resulting images constitute a real reference, to demonstrate what an optical tube can do with proper IR-filtering, when it is completely free of haze caused by the usual assortment of dust or pollen - plus improper cleaning attempts.
Shooting the moon in bright daylight
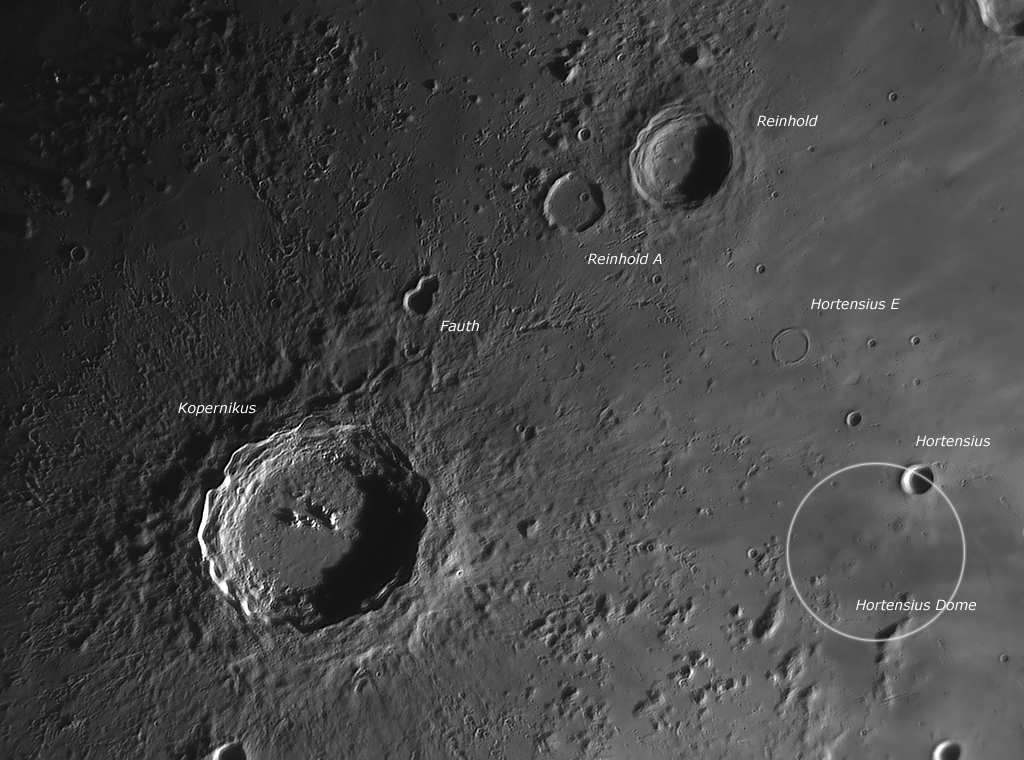
The instrument used is a Celestron C14 SCT at the Onjala Lodge/Namibia. The Camera was a SKYRIS 445Mono. The Raw-AVI-files (1200 frames) were taken on April 23rd 2014 from 8:30 to 9:30 UT with the Sun ~45 degree above the horizon. The first image (left) shows volcanic domes near the crater Hortensius which are quite difficult to observe owing to their moderate height.
The image shows the large crater Copernicus and the volcanic Hortensius-domes H1 to H6. Their diameters range from 7.6 up to 12.5 km. Crater summits measure about 1 to 2 km in diameter but only 190 to 390 m in height.
Having these fine structures become visible so strikingly in bright daylight requires a good optics and especially an effective IR-pass-filter. The Baader IR-pass really proved helpful here. With even the slightest amount of haze or straylight - or with any residue from the cleaning fluid left on the corrector, these results would have remained unobtainable.
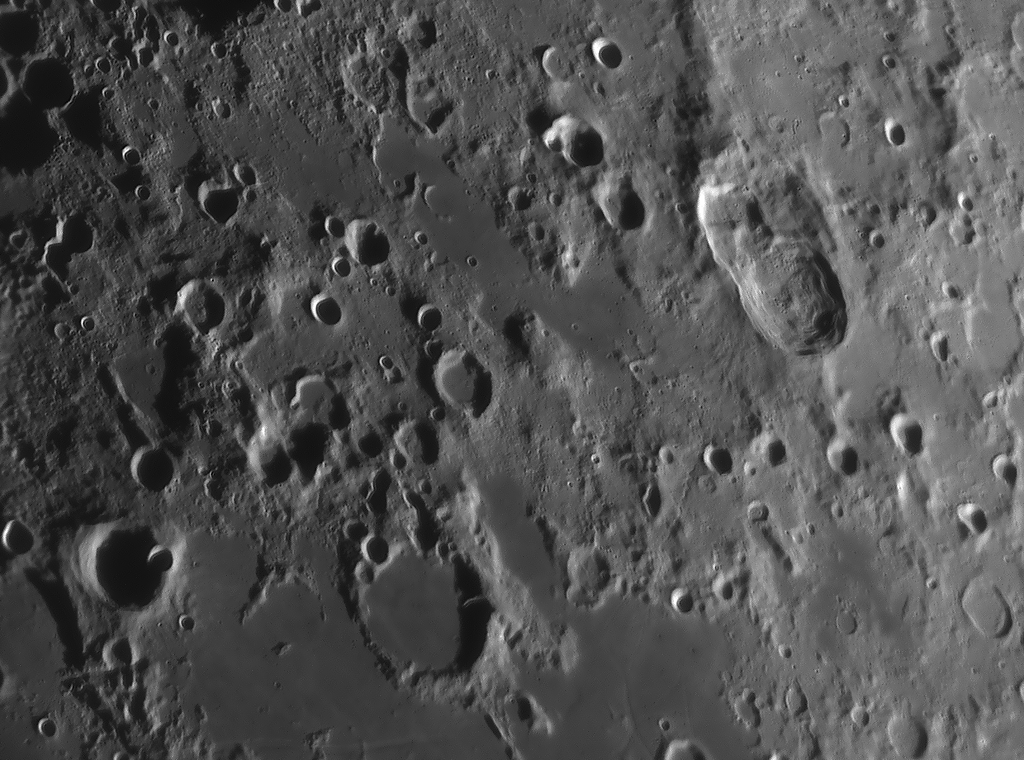
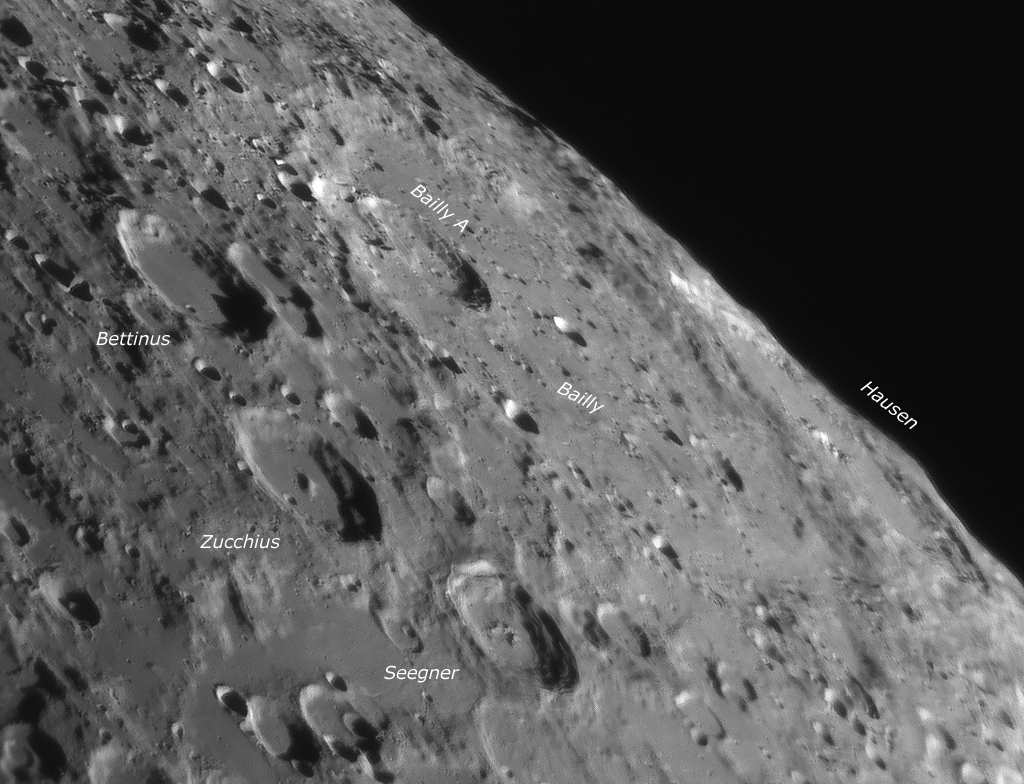
The following images show more examples in bright daylight at the same day. From left to right: Kepler and Encke, Bullialdus, Lacus Tomoris and Hainzel. Right outside - due to perfect libration conditions - two difficult to observe large craters: Bailly and at the lunar limb Hausen
Image details: Celestron SkyRis Camera 445 M, Standard C14 in prime focus with Baader IRPassfilter. Stacking each 144/1.200 frames with AviStack 1.8. Final image processed with Photoshop CS2. All Images © 2014 by W.Paech.
Modell V (EQ) – Celestron, Skywatcher
Mounting accessories connect telescope and mount - be it for a permanent setup or to make quick changes from one instrument to the next possible. We can offer several bars and plates, so that you can adapt almost every telescope:
- Modell V (EQ) bars and clamps - for Vixen / Celestron / Sky-Watcher / Synta and many more. (Base width of the bar's prism: 44 mm. Bar width of the side facing the telescope: 70 mm)
- Modell Z bars and clamps - for Zeiss / Astro Physics (Base width of the bar's prism: 40 mm. Bar width of the side facing the telescope: 70 mm)
- Modell 3" bars and clamps - for Losmandy / Astro Physics (large) / Celestron (large) (Base width of the bar's prism: 76 mm, equals 3". Bar width of the side facing the telescope: 105 mm)
- Special lengths up to 6.000 mm long V, Z and 3" bars
Modell 3" – Losmandy, Celestron CGE, Astro Physics
All of our dovetail bars do have integrated, deepened marking lines over the whole length of the bar. They mark the exact center line of the bar, as well as the seperation of the screw holes of Celestron telescopes and Astro-Physics mounting rings, so that you can easily drill the matching holes. The V and Z bars do have integrated offsets for the bases of most chinese mounting rings, so that they match the bars perfectly. Nevertheless, the bearing surface is hyperbolic on the telescope side, so that the bar will fit tightly for all telescope diameters between 120 and 450 mm.
Modell Z – Zeiss, Astro Physics
The 3" bars provide three of these offsets, so that they match the base widths of the most common mounting rings. Nevertheless, the bearing surface is hyperbolic on the telescope side, so that the bar will fit tightly for all telescope diameters between 160 and 600mm.
All three bars have got a central, 10.5mm wide pit on the upper and lower side. Here a screw head with up to 10mm wide fits into it, so that the head's surface is not visible above or below the bar (Only exception: The 3" bar is flatter on the upper side, so that a screw's head would poke out of the central pit. This was done to keep the bar's profile as flat as possible, for a short distance between telescope and mount.
Special lengths up to 6000mm length
We offer all of our V, Z and 3" bars also in custom lengths of up to 6000mm, optionally also with black anodizing. At an additional cost, we can also provide up to four additional, simple boreholes, as long as our workshop has got the time to do it and the holes are placed outside of the central pit. To do so, we need a precise drawing including the desired diameters of the holes (better too large than too small), or a contact print. For this, you simply press a piece of thick packaging paper against the telescope's tube and trace the holes through the paper.
Cutaways of our dovetail systems with the adaptable tube diameters
For all Zeiss and smaller AstroPhysics telescopes, suitable Giro II glamp Model Z (Zeiss)
for all Vixen GP, GP-DX, Celestron C8, C9¼ and C11 as well as Synta, Skywatcher and all "Klone". with prism clamp Giro II, Model V (Vixen)
For Losmandy, Celestron CI 700 (C14) and all bigger Astro Physics Telescopes, Modell 3".
Exclusively available on Baader Sitall Ceramic Mirrors and on selected Baader prism Star Diagonals:
BBHS® reflection coatings predominantly are being utilised on our highest quality grade 2" BBHS® Sitall Stardiagonals (#2456115 – incl. black housing and 2" ClickLock clamp) as well as on the BBHS® T-2 Sitall Stardiagonal (#2456103) - where the housing features a male and female T-2 thread - for shortening the optical path with bino use, and to offer the utmost in adaptation variability as well as much more light throughput than with any conventional 1 1/4" star diagonal.
BBHS® stands for Broad Band Hard Silver. When applied onto our Sitall (zero expansion glass-ceramics) substrates, these multiple deposited layers of hard silver are being sealed by a set of dielectric layers to achieve long term durability. With this advance in coating technology our BBHS® coating lifetime equals that of a high quality AlSiO2 coating, matching the durability of standard aluminium coated diagonals (and telescope mirrors) which have been in wide use for many years. The BBHS® spectral bandpass is much wider though, when comparing with our 50 layer all dielectric coatings utilized on the 2" ClickLock Star Diagonals. The all dielectric coating system on the 2" ClickLocks is designed to transport 98 to 99 percent of a spectral window ranging from 400 to ~700 nm - at an angle of exactly 90°. By design, the Baader all dielectric coating system perfectly blocks UV and IR and works as added protective measure when observing the Sun in white light or with H-alpha filters - since only visual wavelengths from 400 to 700 nm will reach focus. BBHS® silver in contrast likewise has 98 to 99% reflective property but delivers a much wider spectral window, ranging from 390 out to 2000 nm - while not being restricted to exactly a 90 ° angle - and with the silver producing absolutely zero scattered light.
With the Baader BBHS® coating a well trained eye absolutely does distinguish more and richer colour on planets such as Jupiter, Mars and even on the moon - especially in conjunction with APO refractors. Predominantly during observation of planetary objects or bright nebulae, even at very high magnification, the BBHS® recipe does intensify colour, especially in the red end of the spectrum. It is quite amazing for many people to learn how very sensitive the human eye really is far out into the UV and NIR - far beyond conventional belief (respectively conventional experience). This experience is not to be had with any sole dielectric or multilayer aluminium reflective coatings and - most noticeable - there is not any trace of haze or stray light as with many other coating systems. The brilliance of the BBHS silver when observing with outstanding optics is simply breathtaking.
The Baader BBHS® coating system is solely applied onto zero-expansion glass (Sitall) and (see below) onto the Baader-T-2 36mm and 2" 50 mm 90° prisms, as well as the T-2 and 2" (Astro quality grade erecting) Amici-prisms. In conjunction with the magnesium body of the 2" star diagonal, the Sitall-based BBHS® coating does perform unparalleled, in remaining at thermal equilibrium under all circumstances and in supplying a sharp stable and calm image of previously unknown brilliance.
The BBHS® technology on prism star diagonals – proven for more than 20 years
The Baader 2" prism star diagonal with BBHS® coating (#2456117) as well as the T-2 prism diagonal (#2456095) - and lastly both erecting T-2 (#2456130) and 2" (#2456120) Amici(roof)-prisms - since more than 20 years feature the same BBHS® silver coating, but here it is applied onto the hypotenuse face of the prism which is then copper sealed and black anticorrosion-painted. This is an extremely elaborate process and we did not talk about it for almost 20 years. Actually we trusted that just the observing quality of this VERY complicated coating system would go around by word of mouth - which it did magnificently. Over the years, this "unknown BBHS® coating" has made all our prism star diagonals quite famous.
Many people would question the usefulness of any kind of reflective coating on any prism and they are right - in the first year. The problem is with aging. Over time, a total reflection prism surface will get stained from mould and moisture. Many of the zero-cost Chinese and Japanese prism diagonals have their hypotenuse face separated from the housing with nothing more but a black cardboard - directly touching the prism face. Over time the cardboard gradually makes ever more contact with the glass. If you want to know, take your prism body apart and see what´s inside. A ten year old prism theoretically should be as bright as on day one owing to total reflection properties. In fact, the prism reflective face will age and gradually loose brilliance - with the observer being in total acclimatization with the slowly degrading prism. Much to the contrary, the Baader-BBHS® coating as applied onto prism surfaces is sealed for life. Even after 20 years have passed, our customers of T-2 and 2" prism diagonals cannot distinguish any lack of brilliance - not to say lack of brightness - on their prism faces. "No news is good news".
The question of "mirror or prism" for a telescope is accompanying our product development since ages. We have gained some intricate knowledge about the preferences of certain optical configurations for either prisms or mirrors over the years - ask us. Many of these insights we regard as proprietary. Hence we do leave it to the findings - and taste - of gifted astronomers, to let these experienced observers decide on their own what they prefer to use. Check out the various test reports published about our stuff on forums such as CN and SGL - for instance those done by William Paolini.
A Note on Star Diagonal Optical Quality:
We deliberately refrain from trying to gain trust by shelling out numbers and participating in any kind of "number competition". In recent years it has become a common practice for OEM traders with little knowledge about optics daring to tag products with the highest number claim. Talking about 1/20 wave or better on a star diagonal is ridiculous because this "may be" a theoretical result under lab conditions (if were true at all). In order to retain such values in the field, the housing - and a horde of other parameters must be kept under tight mechanical and temperature control. We do our optical and mechanical design based on knowledge attained during our 50 years experience. All mirrors and prisms inside our housings are carefully mounted and insulated to keep the excellent optical properties at any temperature range (hence we use Sitall as mirror substrate) - and there are many more side considerations to our designs not obviously visible. We stand behind each of our products and do the utmost to make it right.
(BBHS® is a registered trademark ® of Baader Planetarium GmbH)

A brief introduction to the function of narrowband filters.
Narrowband filters have revolutionized CCD photography and now more and more image acquisition with CMOS cameras for the “amateur astronomer” in the past two decades in incredible ways. It was now possible for small telescopes, even in light polluted city areas, to photograph faint nebula – and generally the universe surrounding us in the incredible variety of coloured “gaseous areas” – without restriction of exposure times, and by combining the exposure of each colour of the various emission lines – even the faintest nebula were suddenly registered despite strong light-polluted skies.
Suddenly, the smallest backyard telescope can collect the real light of gaseous nebula to produce image results there were otherwise only reserved for telescopes with several meters of light-collecting surface without any time limit.
The narrow emission area and spectral half width of these filters ensures that only the light emitted or reflected from the gaseous nebula literally “punches” through, even from light polluted city and bright sky background. The stars, which would otherwise outshine the light of the nebula completely, remain tiny. The final image now succeeds colour composites (consisting indeed only from the many hours of collected photons) and is much better, you can even conclude with an unfiltered image (by use of so-called L-filter) to add the real starry sky back into the image.
Also false colour and artefacts of the stars are greatly reduced by the Baader line-filters, even the brightest of stars do not generate extremely disturbing reflections and halos. However, this freedom from reflections is only possible with a very complex structure of many layers of coating, from which such a line filter must be to reflect back all unwanted light and pass only the very narrow, desired spectral range. Such a filter layer structure is extremely complex and there are very large differences in quality – which depends especially on quality and purity, and the rarity of the coating materials used in so-called “rare earth”.
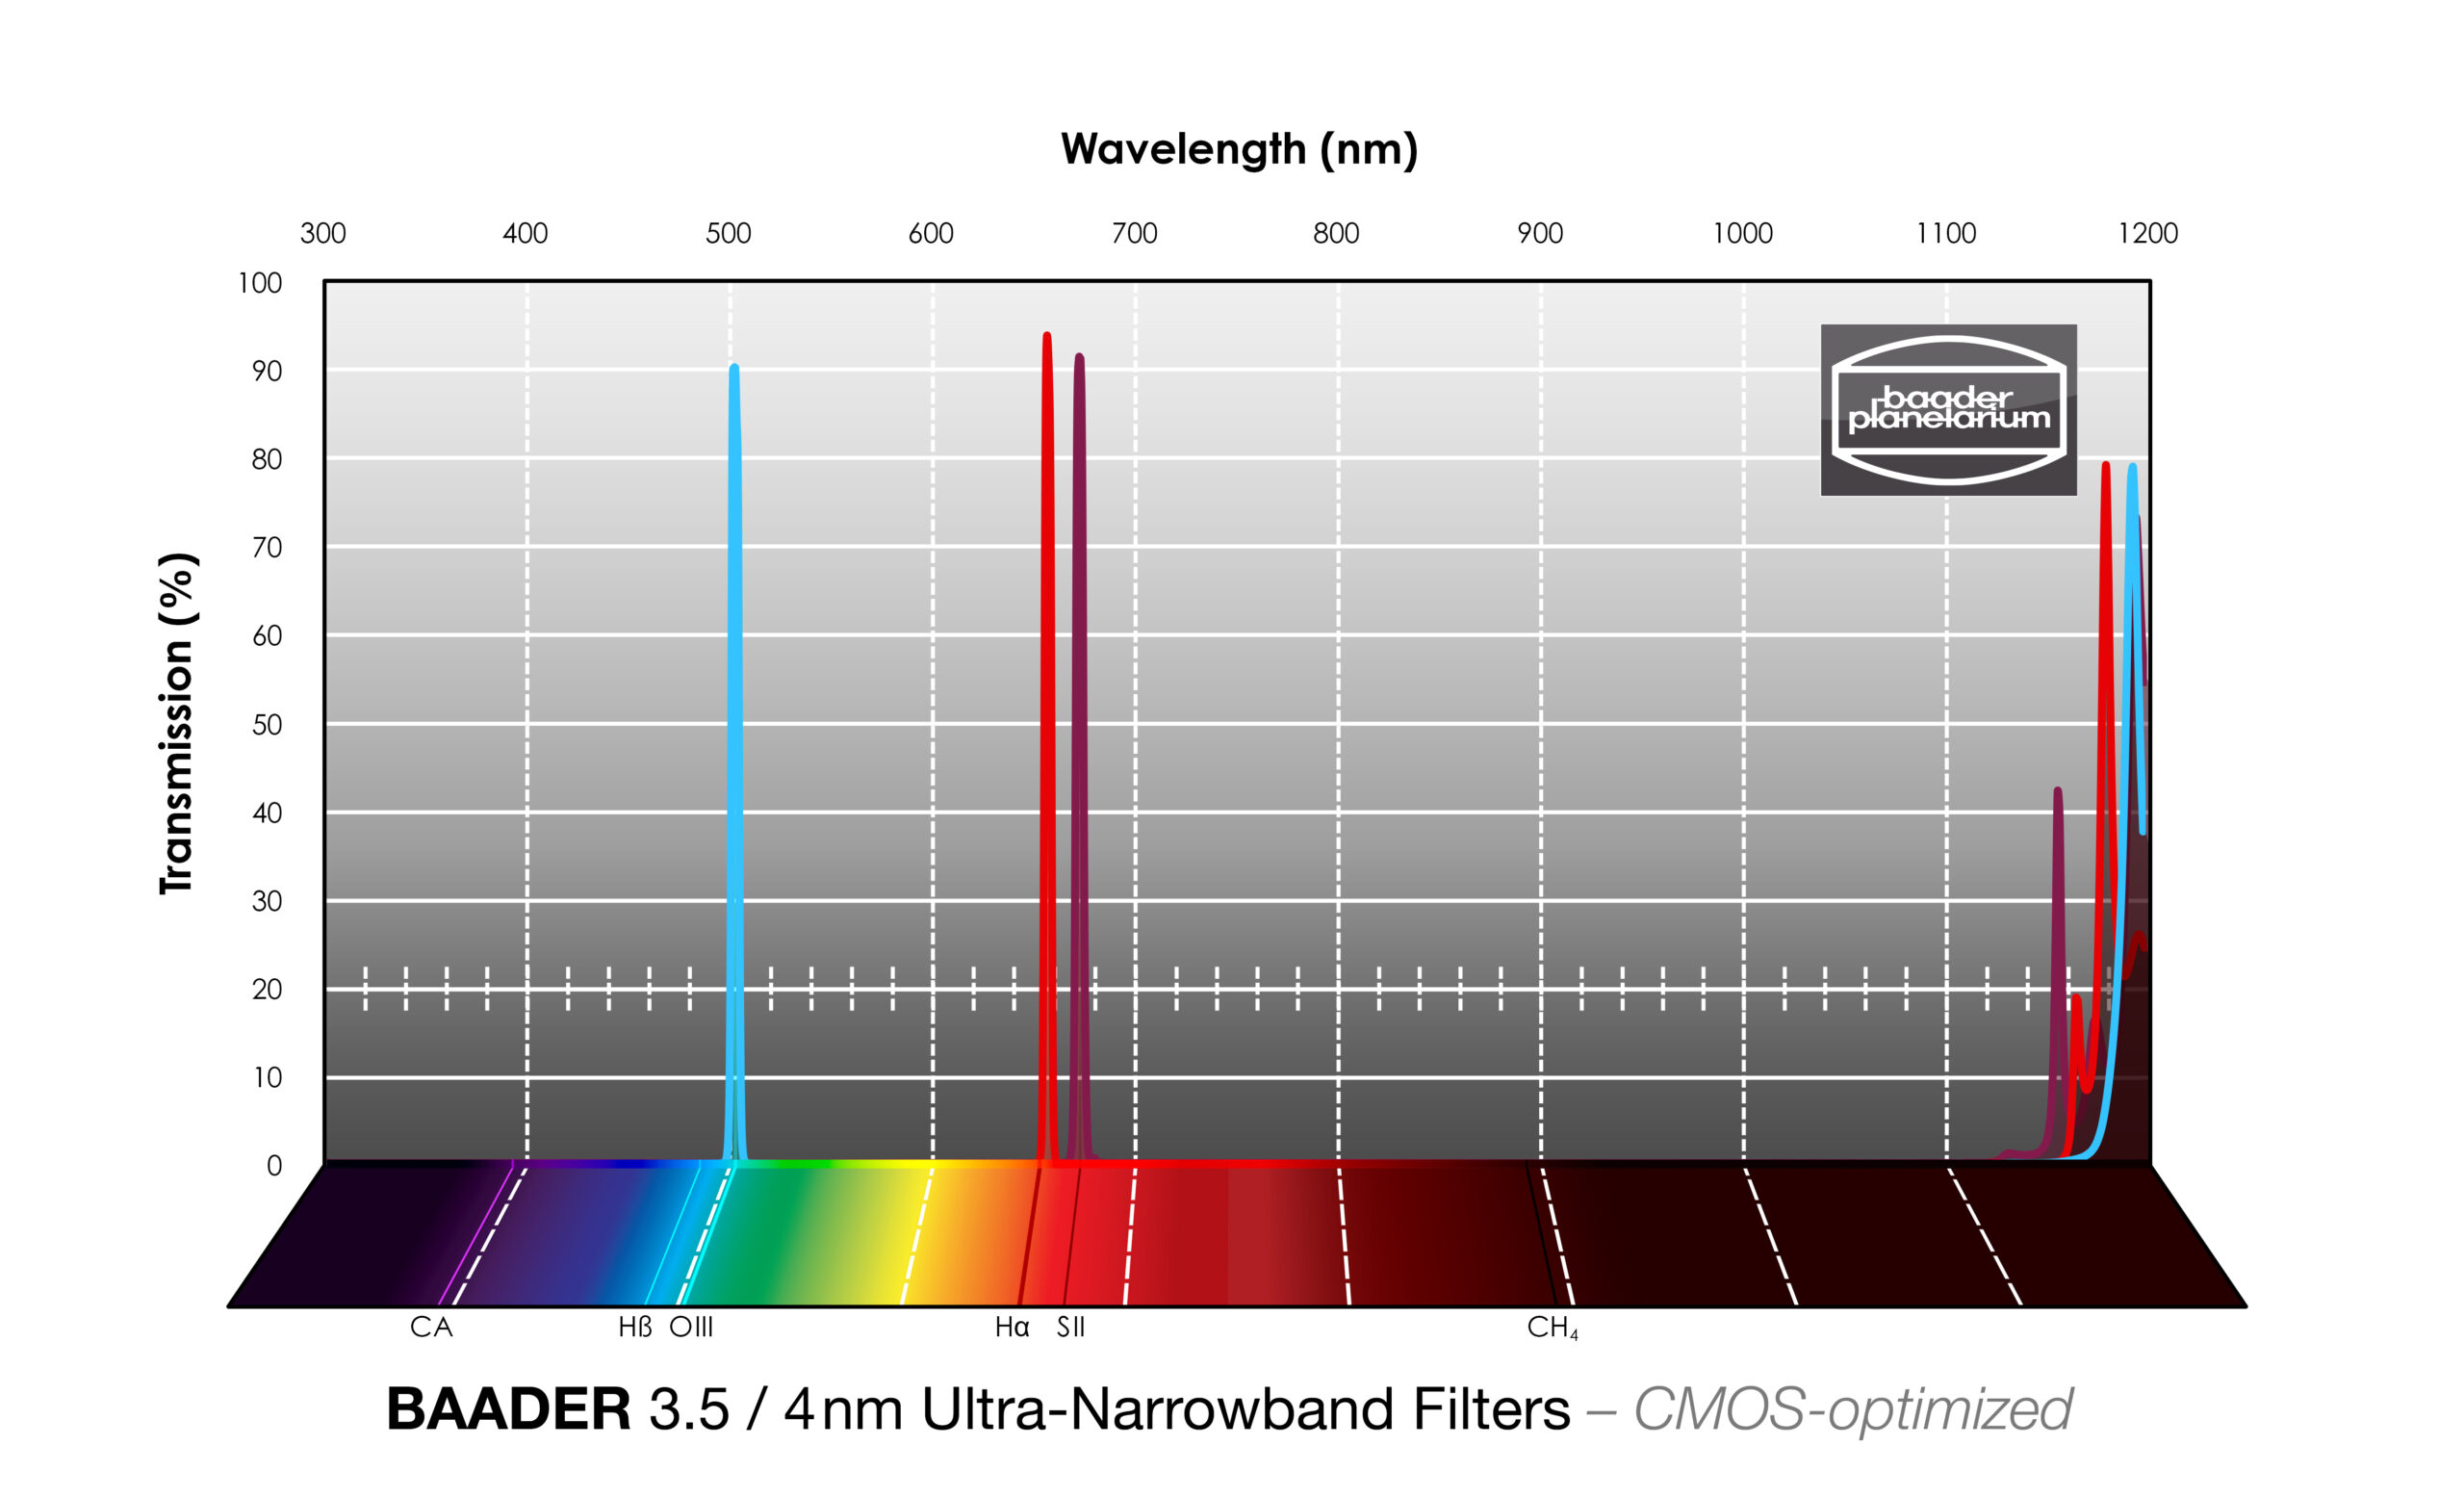
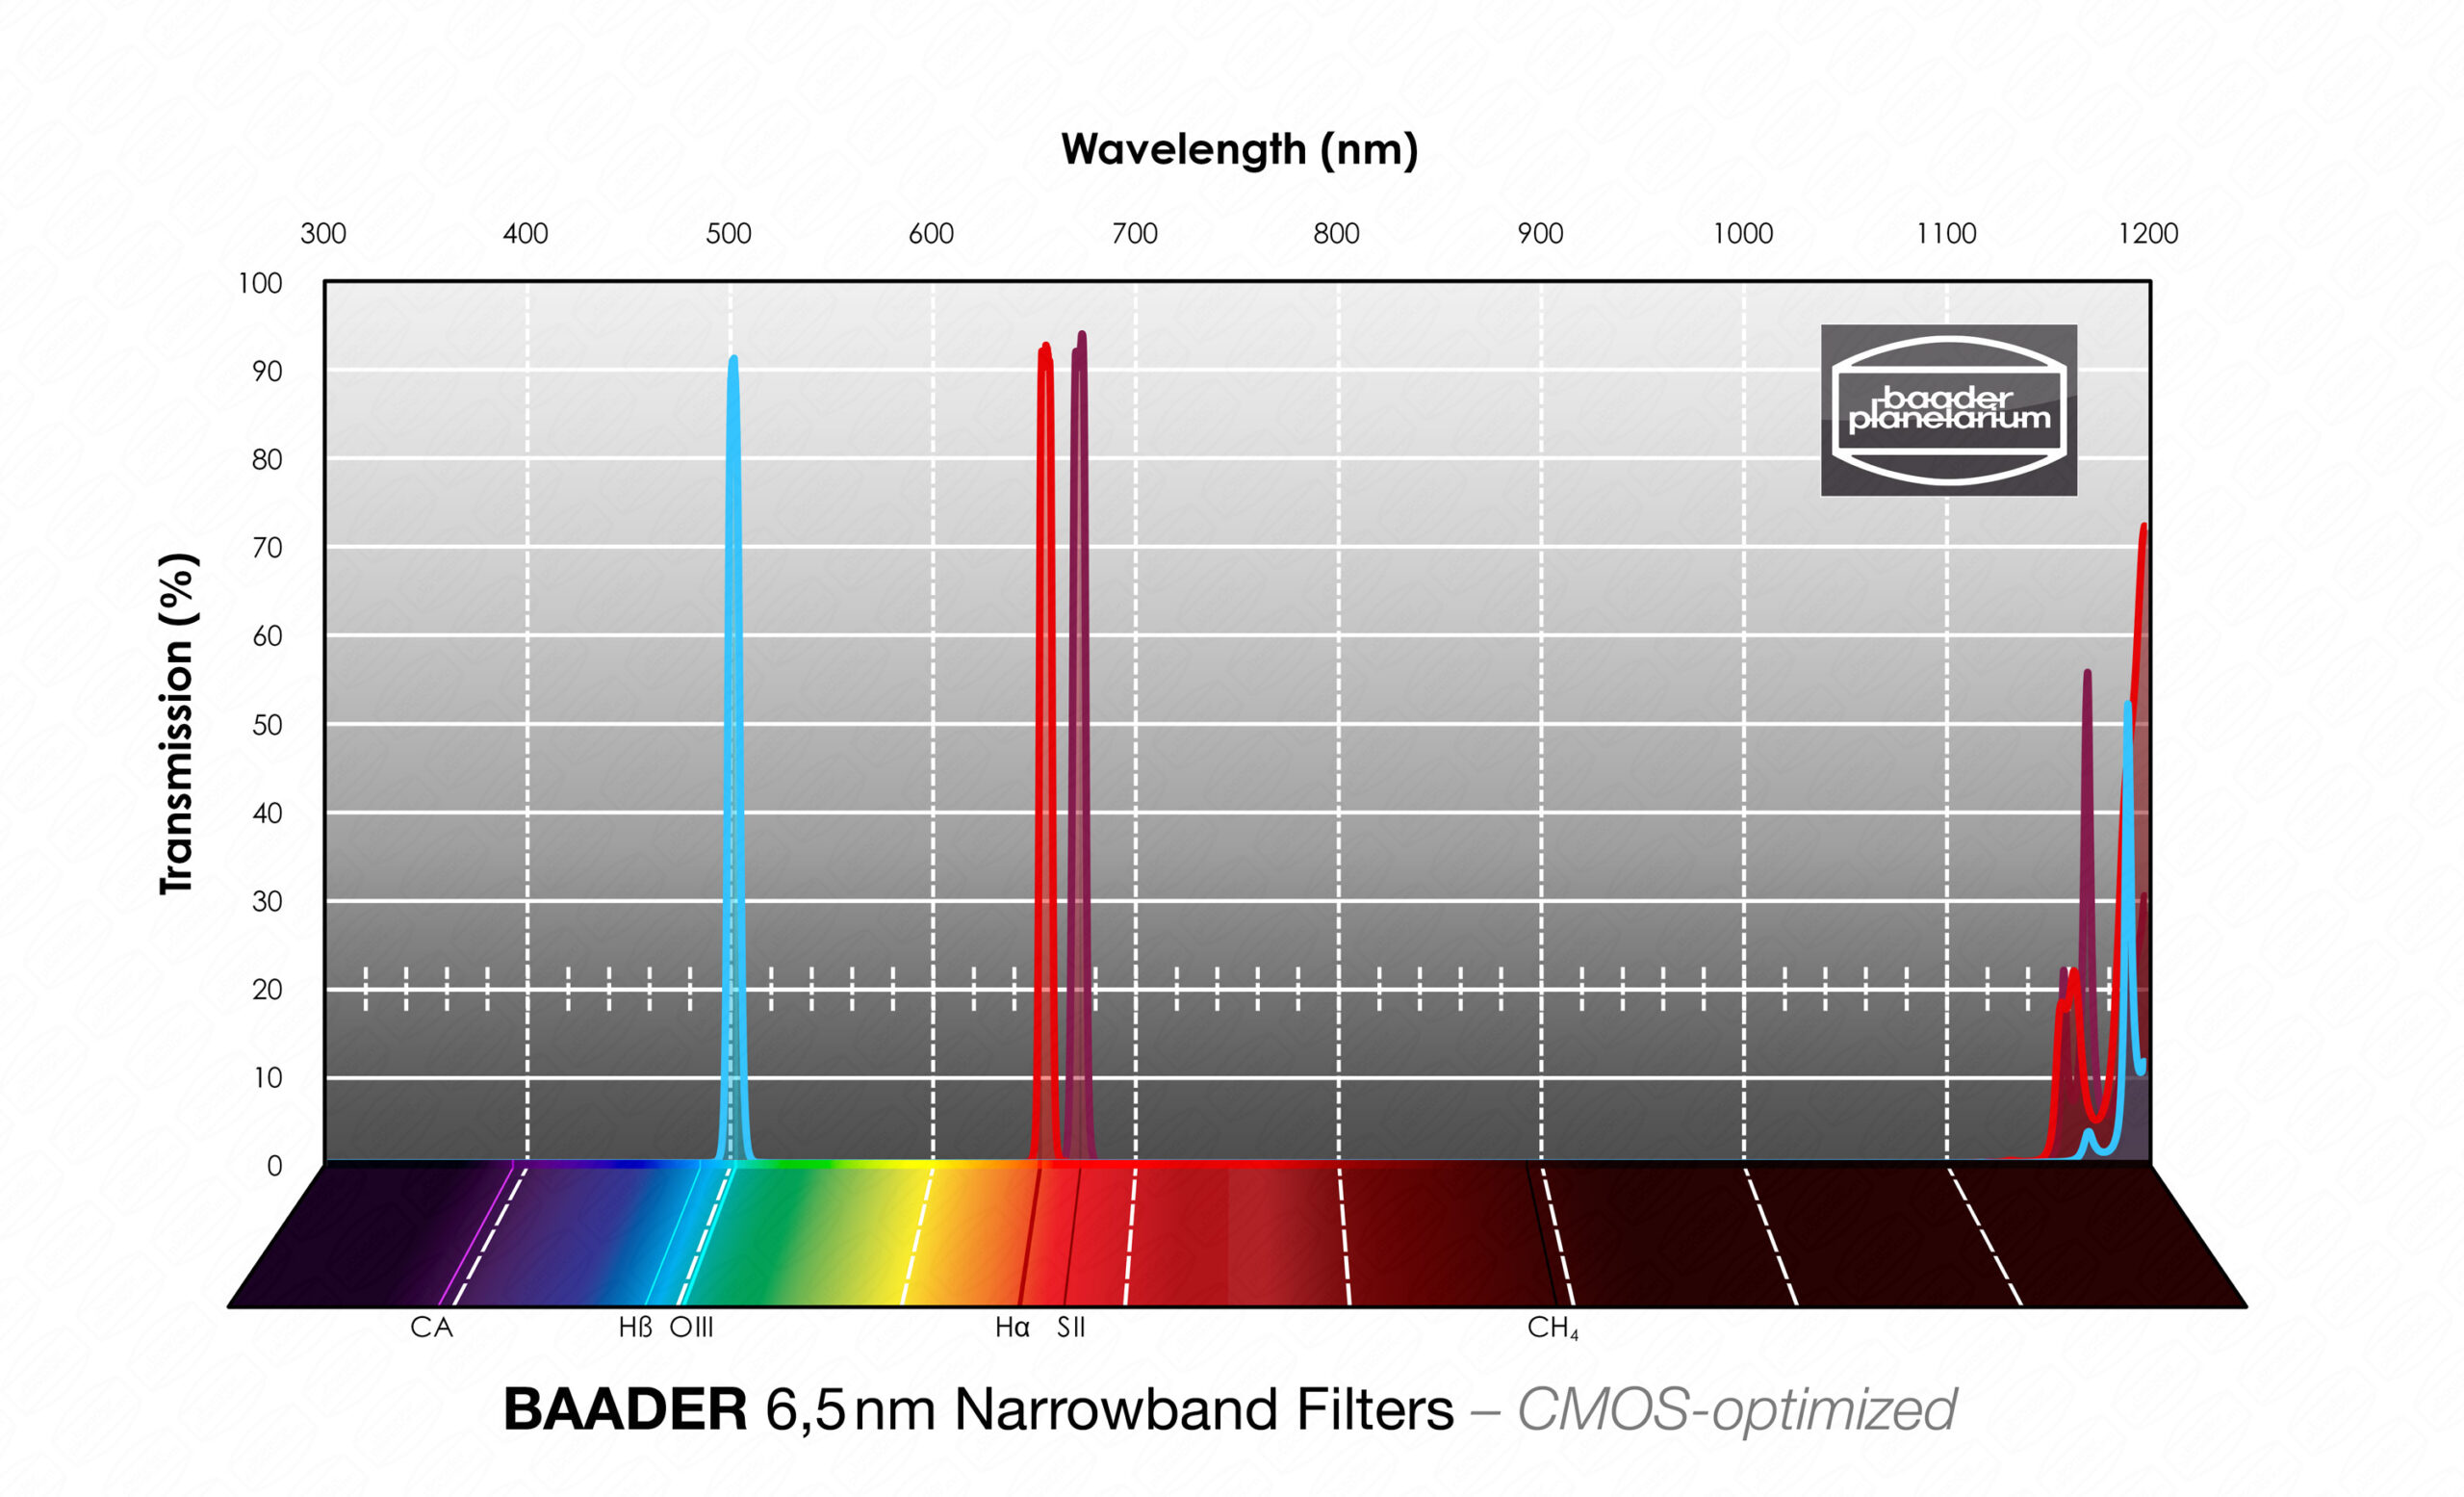
Earlier filters were called “single-cavity filter” (many cheap filters still are). Such a filter had only a tiny region of maximum spectral transmittance and is characterised only for use with a particular aperture ration (such as F/10). Baader line-filters are all dual-cavitym, Ultra-Narrowbands even triple-cavity and have a wide plateau, making them usable for a much wider range of aperture ratios without transmission loss and with best signal-to-noise ratio in the transmission maximum.
Mechanical Properties
- Parfocal and plane polished substrates. Each individual filter is optically fine-polished to 1/4 wave.
- Baader line filters are hard coated individually.
- Baader filters especially are not cut out of large size plate-glass, which is a typical manufacturing process for economy filters (cut-out filters exhibit micro-cracks around all edges. Capillary action between glass and coating layers will lead to premature ageing due to moisture deposition – read more here).
- All Baader filters have individual coating sealed edges, impermeable against ageing because the penetration of moisture is impossible.
- Baader filters are being tested repeatedly to comply with MIL-specifications. One common process is to boil the test specimen for one hour in salt water. Baader filters remained completely intact as opposed to filters drilled out of large glass plates.
- All Baader filters sport scratch resistant hard coatings which can be cleaned repeatedly throughout their entire lifetime as many times as needed - preferably with Baader Optical Wonder cleaning fluid.
- CMOS-optimized (Ultra-) Narrowband / Highspeed Filters feature a
Optical Properties
- Very low halo and reflective angle - compared to competing line filters.
- Balanced sensitivity and excellent coordination in modern CMOS characteristic allows the H-alpha, O III and S II lines recordings with virtually the same exposure time - very important for automated continuous shooting.
- Maximum colour contrast for each of four colour channels - achieved through steep slopes at all transmission curves combined with science approved placement of spectral windows.
- Dual cavity design at CMOS Narrowband-filters, Triple-Cavity Design at Ultra-Narrowband Filters - for applicability over a wide focal length range of f / 10 to f / 3.5 system.
- The O-III and H-beta emission lines are clearly separated - no colour distortion - results in the highest deep-sky quantum yield.
- Both photographically and visually the stars do not appear by any of the Baader line filters as multi-coloured "dunghill", since each filter passes only the light to pass the respective emission line. In this context, a careful comparison of the various manufacturers published Transmission data sheets is recommended. In all Baader filter curves the entire spectral range is always shown with comparison to what a modern CMOS chip can represent, typically (from 300 to at least 1200 nm). It can be seen, whether the offered filter has undesirable weaknesses in the spectral blocking. Many manufacturers only show the spectral region around the filter and are "silent" about their filter so-called "side lobes" (= holes in light suppression), which decreases the contrast and the cleanliness in the reproduction of the star colours sensitive.
Baader Astro T-2 System™ Component Chart
For over 30 years we have focused on the Astro T-2 thread system (M 42 x 0.75 mm); virtually every telescope manufacturer must offer this thread far ahead of the focal point of his instrument, such a universal T-ring (for DSLR cameras) can be connected.
The only exceptions are (still) Russian equipment, there the thread diameter is the same, but the pitch is still 1mm per revolution - rather than 0.75mm! Therefore, we offer among other things a "Russians adapter". At only 7mm additional optical length it can allow so many Russian lenses or telescopes to be compatible with an international Astro T-2 (M 42 x 0.75mm) connector!
For the sake of better recognition mostly are marked. See marking small 'a' or small 'i' in the respective indication! "a"; identifies an external thread (male); or, if Ø sign which a diameter, "i"; - a female is always (female) or - Ø character - an inner diameter.
The Optical Length
A small selection from the variety of products from the Baader Astro T-2 System™
The optical length describes the extension of the optical path caused by an adapter or accessory when inserted into the beam path of the telescope. The values listed in the system table rounded to 1/2 mm. For pure threaded adapters or tubes such as the T-2 ring (#25), the optical length arises directly from its geometric shape. Because the optical design lengths apply to the assembled, external threads are not included in the bill. This explains the extremely short optical length external thread adapters compared to female threaded adaptors.
Parts that contain optical elements (such as Zenit prisms and binocular) the optical length can vary strongly from the geometrical form of the housing. Hence the values for the optical length by such accessories was determined directly on the telescope. When used with the unique Alan Gee tele-compressor the optical length depends in addition to the distance from the primary focus.
In general: If you add an accessory an item from the Astro T-2 System ™ into the beam path of the telescope, the extension length of the focuser to the value of the specified optical length must be shortened so that the eyepiece tubes moves closer to the lens. For negative values, the focuser must be extended because the distance between the focal plane of the lens increases.
The Baader Astro T-2 System™ Overview
T-2
Component # |
LABEL (i)=internal THREAD, (a)=external THREAD |
Opt. length (mm) |
Connection: objective |
connection: eyepiece |
auxiliary thread or diameter |
| # 1A |
[product sku="2456100"] |
43 |
T-2(i) |
T-2(a) |
M34(i) out #3 |
| # 1B |
[product sku="2456095"]
|
38.5 |
T-2(i) |
T-2(a) |
M34(i) out #3 |
| # 1C |
[product sku="2456005"] |
35 |
T-2(i) |
T-2(a) |
M34(i) out #3 |
| # 2 |
[product sku="2456130"]
|
47.5 |
T-2(i) |
T-2(a) |
M34(i) out #3 |
| # 3 |
[product sku="1508039"]
|
0.5 |
M36.4 x 1(a) |
T-2(a) |
M34(i) |
| # 4A |
[product sku="2456314"] (incl. Teflon-centering) |
≤ -30 |
----- |
M34(a)/T-2 clamp Ø 38mm |
----- |
| # 4B |
[product sku="2456316"] (incl. Teflon-centering) |
-65 |
----- |
M34(a)/T-2 clamp Ø 38mm |
----- |
| # 4c |
[product sku="2456317"] (incl. Teflon-centering) |
-120 |
----- |
M34(a)/T-2 Kclamp Ø 38mm |
----- |
| # 5 |
[product sku="1905130"] |
18.5 |
M28(i) |
M28(a) |
Ø 26mm(i) |
| # 6 |
[product sku="2456313"]
|
11 |
T-2(i) |
Ring-clamp |
----- |
| # 6A |
[product sku="2456313A"] |
11 |
T-2(i) |
Ring-clamp |
----- |
| # 7 |
[product sku="2456320"] |
4 |
Ring-clamp |
T-2(a) |
Ø 38mm |
| # 6+7 |
[product sku="2456321"] |
15 |
T-2(i) |
T-2(a) |
Ring-clamp |
| # 6A+7 |
[product sku="2456322"] |
15 |
T-2(i) |
T-2(a) |
Ring-clamp |
| # 8 |
[product sku="2458100"]
|
32-38 |
T-2(i) |
Ø 1¼"(i) |
T-2(a) |
| # 8A |
[product sku="2458125"] |
29-34 |
T-2(i) |
Ø 1¼"(i) |
----- |
| # 9 |
[product sku="1508041"]
|
14 |
T-2(i) |
M44 x 1(i) |
Ø 40mm |
| # 10 |
[product sku="2408191"] |
6.5 |
Ø 1¼"(a) |
Ø 24,5mm(i) |
M28,5(i) |
| # 11 |
[product sku="2408195"] |
27 |
M36.4 x 1(a) |
Ø 1¼"(i) |
----- |
| # 12 |
[product sku="2458199"] |
0,8 (!) |
M43(a) |
T-2(a) |
M34(i) for #4a,b,c |
| # 13 |
[product sku="1508005"] |
5 |
M44 x 1(i) |
T-2(a) |
Ø 38mm |
| # 14 |
[product sku="2458105"] |
0,5 |
Ø 1¼"(a) |
T-2(a) |
M34(i) / M28,5(i) |
| # 15 |
[product sku="2408190"] |
9 |
Ø 2"(a) |
Ø 1¼"(i) |
M48(i) / T-2(a/i) / M34(i) |
| # 15A |
[product sku="2408151"] |
1 |
Ø 2"(a) |
Ø 1¼"(i) |
M48(i) / T-2(i) |
| # 15B |
[product sku="2956214"] |
9,5 |
Ø 2"(a) |
Ø 1¼"(i) |
M48(i) / T-2(i) |
| # 16 |
[product sku="2408150"] |
2 |
Ø 2"(a) |
T-2(a) |
M48(i/a) / T-2(i) |
| # 17 |
2" SC Deluxe eyepiece (#2408140, € 49,-) |
53 |
UNC 2"(i) |
Ø 2"(i) / S65 |
M58(i) |
| # 17A+B |
2" SC Deluxe eyepiece with 2" filter holder (for SC & HD) (#2958144, € 65,-) |
53 |
UNC 2"(i) |
Ø 2"(i) / S65 |
2" Filter Thread / M58 |
| # 18 |
[product sku="2408145"] |
0 |
UNC 3.3"(i) |
----- |
----- |
| # 19 |
[product sku="2408155"] |
0 |
Ø 2"(a) |
UNC 2"(a) |
M48(i) |
| # 20 |
[product sku="2454400"] |
≈≤ 50 |
T-2 clamp |
T-2 clamp |
----- |
| # 21 |
[product sku="2408160"] |
16 |
UNC 2"(i) |
T-2(a) |
T-2(i) |
| # 21 B |
[product sku="2958500B"] |
7 |
UNC 2"(i) |
T-2(a) |
T-2(i) |
| # 22 |
[product sku="1508037"] |
2,5 |
M43 x 1(a) |
T-2(a) |
Ø 38mm |
| # 23 |
[product sku="1508015"] |
7 |
M42 x 1(i) |
T-2(a) |
Ø 38mm |
| # 24 |
[product sku="2458010"] |
27.5+11,0 |
T-2(i) |
T-2(a) |
Ø 1¼"(i) |
| # 25A |
[product sku="1508154"] |
15 |
T-2(i) |
T-2(a) |
Ø 38mm |
| # 25B |
[product sku="1508153"] |
40 |
T-2(i) |
T-2(a) |
Ø 38mm |
| # 25C |
[product sku="1508155"] |
7.5 |
T-2(i) |
T-2(a) |
Ø 38mm |
| # 25V |
[product sku="2956946"] |
min. 29 / max. 46 |
T-2(i) |
T-2(a) |
T-Adapter |
| # 25Y |
[product sku="2956929"] |
min. 20/ max. 29 |
T-2(i) |
T-2(a) |
T-Adapter |
| # 26 |
[product sku="1508025"] |
0 |
T-2(a) |
T-2(a) |
Ø 38mm |
| # 27 |
[product sku="1508035"] |
0.5 |
UNC 2"(a) |
T-2(a) |
M48(i) |
| # 28 |
[product sku="2958242"] |
1 |
T-2(i) |
Ø 2"(a) |
----- |
| # 29 |
[product sku="2458110"] |
2.5 |
T-2(i) |
M48(a) |
----- |
| # 30 |
[product sku="1905131"] |
≤ 10 |
Ø 1¼"(i) |
Ø 1¼"(i) |
----- |
| # 31 |
[product sku="1508030"] |
0 |
T-2(a) |
T-2(a) |
M28.5(i) |
| # 32 |
[product sku="2458196"] |
17 |
M68 x 1 |
Ø 2"(i) |
M68 x 1 |
| # 33 |
[product sku="2958130"] |
12 (10) |
T-2(a/i) |
T-2(a/i) |
----- |
| # 34 |
[product sku="2958110"] |
10 |
T-2(i) |
T-2(i) |
----- |
| # 35 |
[product sku="2958120"] |
2 |
T-2(i) |
T-2(i) |
----- |
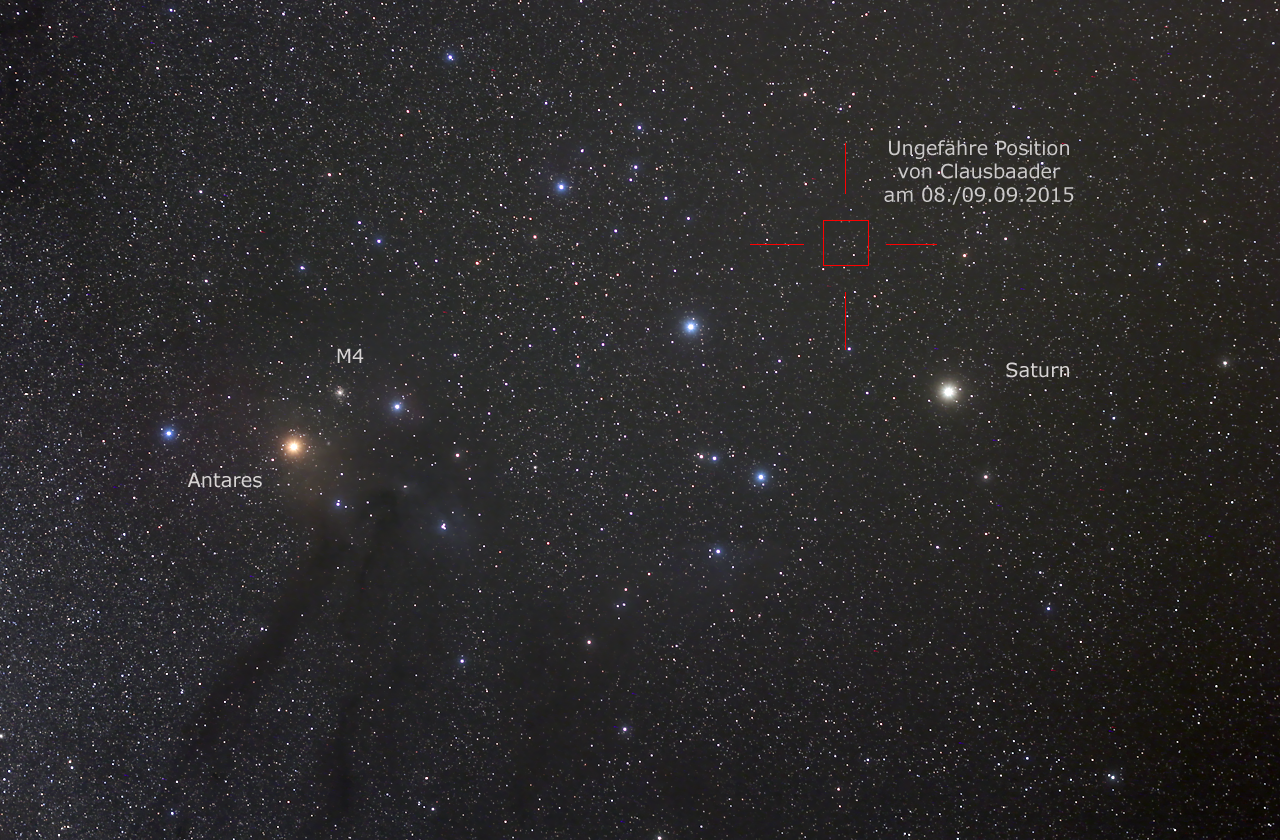
Clausbaader on 09.09.2015 at 18:15 and 18:55 UT
From Dipl.-Ing. Wolfgang Paech – Onjala- and Chamäleon Observatory, Namibia
For this year's longer stay in Namibia we planned to photograph the minor planet (5658) Clausbaader. It had a high altitude in the evening sky, close to Saturn. The series is intended as a small tribute to Mr. Claus Baader, the founder of Baader Planetarium in Mammendorf, who was one of the leading personalities in the field of amateur astronomy and public education in the last century in Germany. Read more under Company History.
The imaging instrument - the 150mm Zeiss APQ refractor and a Celestron C14 on a Astrophysics 1200 GTO mount in the 4 meter dome.
The images were captured at the 150mm Zeiss APQ refractor at Onjala Observatory and an "ancient" SBIG ST2000-XM.
After completion of our "Project Pluto" - the experiment to take Pluto with a classic 2 inch telescope - first test images were made on September 5. The whole project was ill-fated from the very start.
First Paech dropped his glasses and broke it exact in the center. The spare pair worked quite well in daylight however in the dark night the stars remained blurry. Luckily there was a "magical" two-component glue who managed to connect the broken glasses permanentely.
In addition, the drying cartridge of the for years unused SBIG ST-2000 XM CCD camera stopped working. Even at temperatures just above 0 degrees the chip surface iced up despite the low humidity of about 20 percent. Test shot from September 5 with a completely iced chip surface.
Since the kitchen of Onjala Lodge has only gas ovens without temperature display and microwave ovens there was the question: how to "bake" the cartridge.
According to SBIG the cartridges must not be dried in a microwave oven so we decided to use the "hellfire" of regular Saturday BBQ evening and "grill" the cartridge for a few hours.
The success was not stunning but enough to operate the camera within the next two nights at temperatures around 0 degrees celsius.
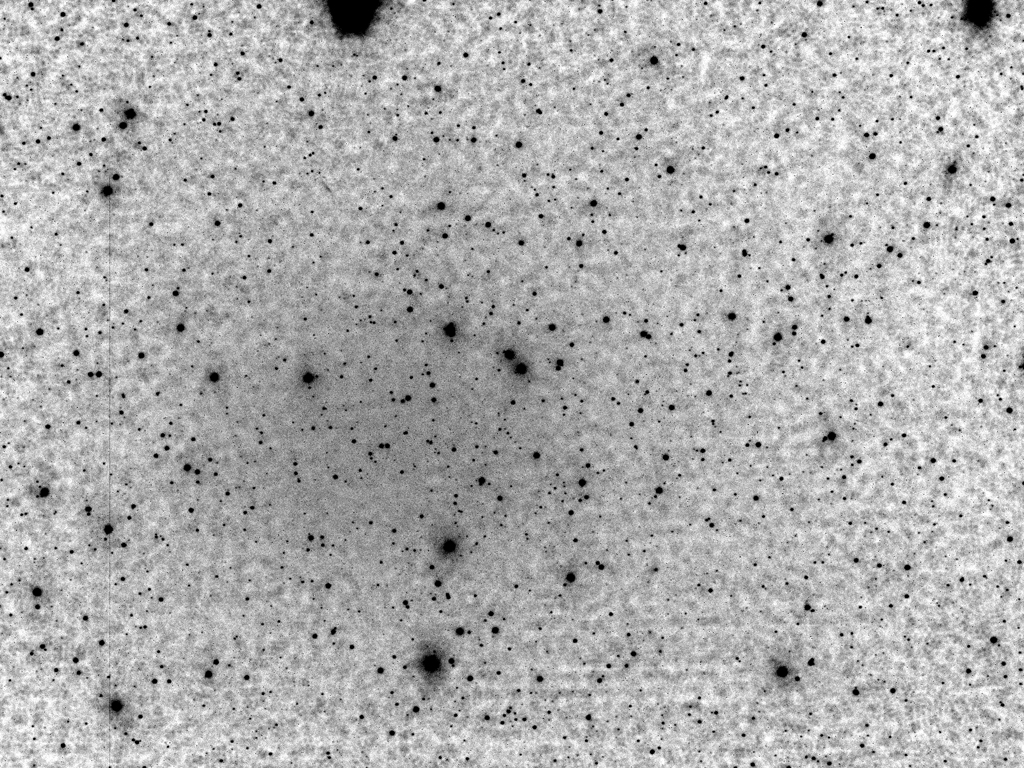
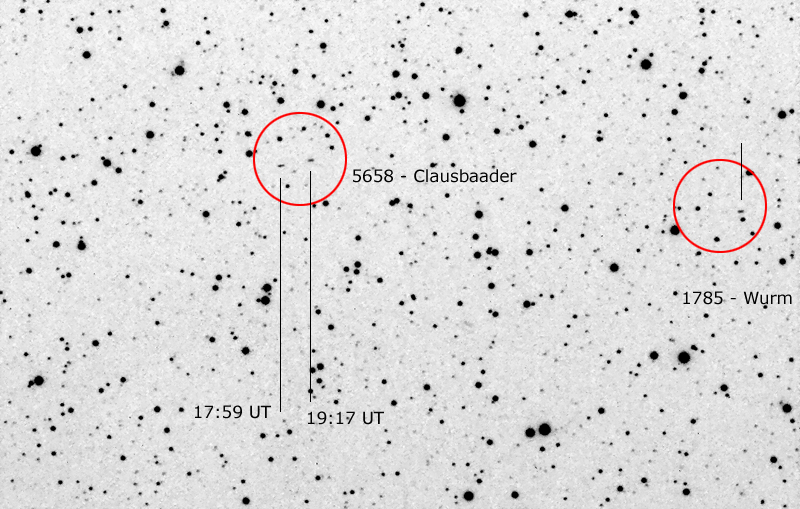
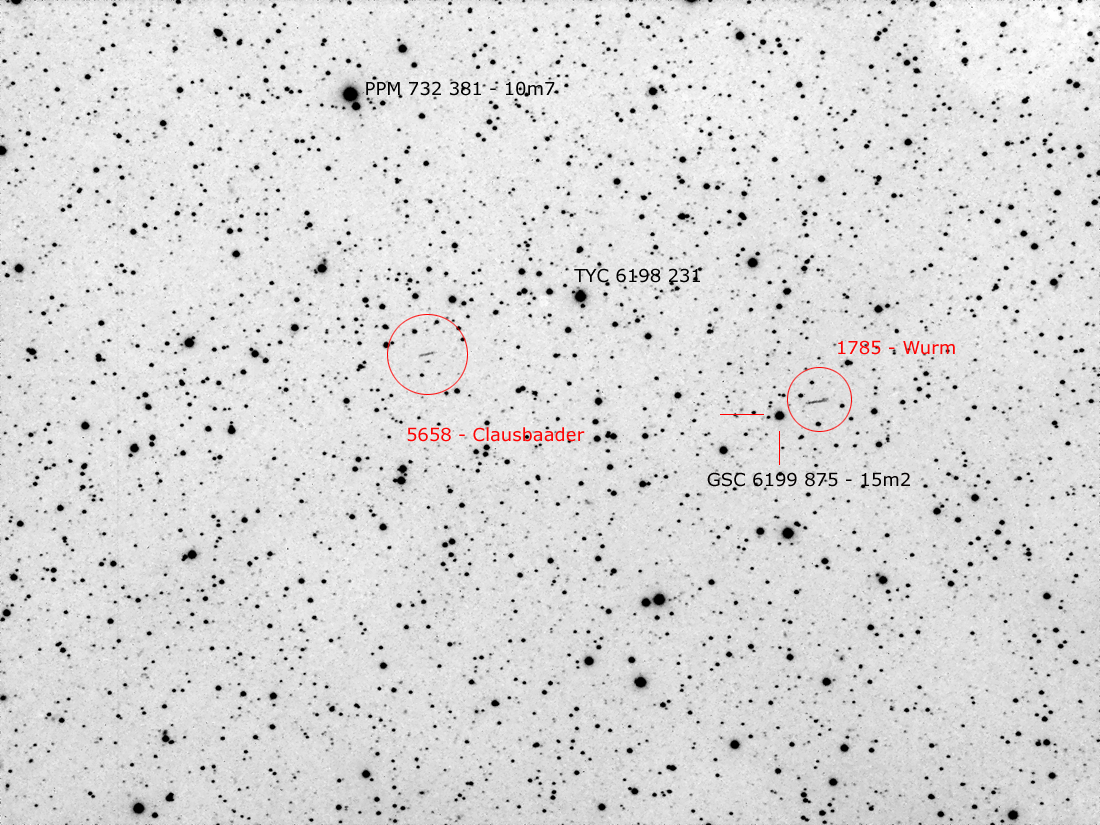
position of Clausbaader on September 09, 2015. In the image field there were also the minor planet Wurm (1785) and some other objects. But they were so faint that they are not detectable with this image equipment.
To be sure that the positioning of the GTO1200 mount points to the correct small field of view, the mount was initially positioned on Saturn, then performed a recalibrate of the controller and then positioned on the coordinates of Clausbaader. To finally check the positioning the corresponding field has been verified with the star map program GUIDE 9.0.
This comparison between GUIDE and the live image of the SBIG camera is not so easy, as the camera shows even at short exposure times far more stars than the sky map shows. In addition, the orientation of the star map must match with the camera image. Unfortunately there were no conspicuous star constellations at the position of Clausbaader which made this step more complicated.
The large rectangular frame on the star map shows the image field of the ST-2000 XM, the minor rectangle shows the field of the guiding chip.
The first attempt to photograph Clausbaader took place on the evening against 19:34 UTC with a 300 seconds exposure. A second image should be taken 2 hours later to identify the minor planet by its movement against the background stars. Unfortunately, the sky clouded at this time. In general, the weather during our stay in Namibia from early July to the end of September was very mixed.
A first analysis of the image confirmed the correct image field (field size: 33.9 x 25.4 arcmin, scale 1.27 "/ pixel), the position of the two galaxies LEDA 92474 and PGC 56147 agree with the map from GUIDE. The minor planet Wurm clearly shows a short line because of its higher proper motion (Img 3)
At the point where GUIDE shows the position of Clausbaader, a faint object is in the image but it could also be a background star. Therefore, the object in the image is marked with a question mark.
On the next evening three images, showing the minor planets Clausbader and Wurm and their movement in the sky, could be taken. The brightness of Clausbaader with 18.5 mag was already at the limit for camera and telescope for a moving object.
The right image (Img 4) shows a superposition of two 600 second exposures. The positions of Claus Baader and Wurm are marked (17:59 and 19:17 UTC). Between these two images, a continuous 2400 seconds exposure was captured (see below). The waiting time was pleasantly spent with a GinTonic in the bar of Onjala Lodge. Now, the other image data:
| Minor planet |
Proper motion |
Angle (Degrees) |
Brightness (mag.) |
| Wurm |
59.1"/h |
98.6 |
17.9 |
| Clausbaader |
41.8"/h |
99.4 |
18.5 |
Clausbaader and Wurm in a 2400 second exposure (09.09.2015 - 18:15 to 18:55 UTC). The stellar limiting magnitude is around 21 mag.
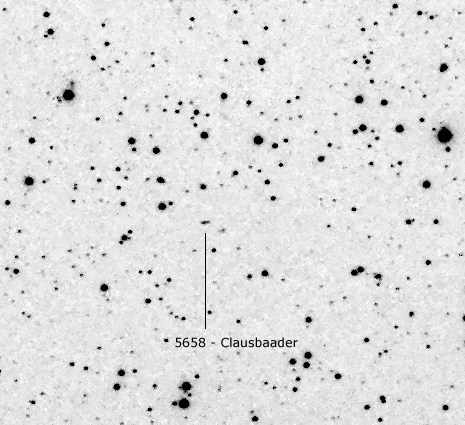
Animation of (5658) Clausbaader from 09.09.2015 (17:59 and 19:16 UTC).
The minor planet Clausbaader was at the time of shooting at a distance of 2,971 AE or 444,447,000 km from the center of the Earth.
Due to the fact that the minor planet Clausbaader was located in a very attractive part of the sky at this time, an overview image was also taken (see image below).
For this purpose an original Canon EOS 60Da with a 50mm lens (1.8) was used. 6 single images with 640 ASA and 600 seconds exposure time were taken. The lens was stopped down to f/4.5.
The picture shows the portable mount, a Celestron CGEM DX. In the background the Onjala 4m dome and the private 3m dome of Chameleon Observatory just before sunset.
The EOS sat "piggyback" on a 105mm Pentax refractor (next to the right a Celestron 80mm Onyx). The mount is performing so well that no guiding was needed.
The minor planet (69230) Hermes - CCD recording from W.Paech, shortly after its rediscovery on October 28, 2003. Exposure time 1800 seconds with a SBIG ST-10 XME. The image shows three more minor planets in the circles. Raw image was taken in Germany, near Hannover, Lower Saxony
Karl Wurm (born July 21, 1899 in Siegen; † 16 February 1975 Bonn) was a German astronomer. Wurm studied at the University of Bonn mathematics, physics and chemistry with a doctorate in 1926. Then he went to the Astrophysical Observatory in Potsdam, where he studied band spectra of molecules from stellar atmospheres and comets. This led to a contribution in the Handbuch der Astrophysik (1930). He did research on comets and in particular after a atudy stay at Yerkes Observatory (Otto von Struve) on spectra of gaseous nebulae. In 1941 he was main observator of the Hamburg Observatory in Hamburg-Bergedorf. In 1950 he was a few months visiting professor at the Humboldt University in Berlin and at the observatory in Babelsberg. Due to the poor observation conditions in Hamburg he observed since 1954 regularly in Asiago (Veneto). SOURCE: Wikipedia
Karl Wilhelm Reinmuth (born April 4, 1892 in Heidelberg, † May 6, 1979) was a German astronomer who worked at the observatory on the Königstuhl near Heidelberg. Reinmuth attended secondary school and then studied at the University of Heidelberg. Even as a student, he worked at the observatory under Max Wolf in 1916. He received his doctorate with a thesis of photographic positioning of 356 Schultz's nebulae. Until his retirement in 1957 he was employed at the Königstuhl, only interrupted by military service in World War I. Since 1914 as an assistant, since 1926 as an observer and since 1937 as a top-observer. In 1928 he married Lina, born Alstede. The couple had three sons. Reinmuth discovered two short-period comets, namely 30P/Reinmuth and 44P/Reinmuth and 395 asteroids (see List of asteroids), including Apollo, the namesake of a group of asteroids (Apollo-type), whose paths can cross the Earth's orbit. Reinmuth's discoveries of asteroids was in the period from 1914 to 1957. SOURCE: Wikipedia
 There are no monochrome DSLR-cameras on the market, so a filter holder (e.g. the Baader-UFC) may seem quite useless for DSLR imaging, but if you take a closer look, there are indeed some interesting use-cases.