When it comes to astronomical accessories, first impressions can be just as important as the technical specifications. The [product sku="SafeyHerschelMarkii"] is no exception. In this blog our customer Ian Aiken is going to list some of the key features that he has read in promotional material, from observations he has made and from his own experience using this product.
My name is Ian Aiken and I live in the North East of England in the United Kingdom, which experiences a temperate maritime climate characterized by mild summers and cool winters. Cloudiness can vary throughout the year and it feels like I only get 20 usable clear nights per year at my Bortle 7 location during the 6 months where astronomical darkness actually occurs. I've been an Astrophotographer for over 20 years and I've had all kinds of telescopes, solar telescopes, mounts, filters (including Optolong, Astro Hutech, Chroma, Baader) and cameras (Atik, QHYCCD, ZWO, Canon) in this time, for both planetary, lunar, solar, and deep sky photography. Financially, I've learnt the hard way through fine tuning my current collection to something which supports my sky conditions, budget, time, and imaging goals.
What is it?
The Baader 2" Cool-Ceramic Safety Herschel Prism Mark II 2" is an optical wedge prism that refracts most of the light out of the optical path for solar observations. This is a different approach to white light filtering using products like Baader AstroSolar Safety Film, whereby a filter blocks the light at the front of the telescope. This method was first proposed and used in 1830s by an astronomer John Herschel, hence the name.
Unboxing and First Impressions
Packaging - Right from the get-go, Baader captures your attention with its thoughtfully designed box. Not only is it user-friendly with its easy opening, but it also offers comprehensive information about what's inside, ensuring users know exactly what they are receiving.
Pelican Case - Nestled within the packaging is the Peli Case - a testament to Baader's commitment to quality. Firm locking mechanisms coupled with auto venting show that this case isn't just about aesthetics; it's designed to protect the precious cargo inside. I did find the locking mechanism on my case quite firm and took some effort to open. I can probably ease that somehow.
Quality of Components - On handling the filters and Prism, I can instantly feel the premium build quality. These are not mere accessories, but tools crafted for enthusiasts who demand the best. German engineering is still a "thing", with focus on engineering and technical skill. That mindset shows here.
Presentation - The 'WOW' factor isn't just present; it's predominant, elevating the eagerness of the first-time use.
Versions - I opted for the photographic version which comes with three additional ND filters than the visual. Everything else is the same. I was very happy that the new [product sku="solarcontinuumfilter"] is included, a new addition to the CMOS-Optimized family of Baader filters superseding the previous 10nm version.
[br]
Diving into the Details
It might be strange to talk about the manual first. Most times, the manual is never read or referenced. I highly recommend reading the manual (Baader recommend in the manual to read the manual). Maybe not word for word, but there are sections which will really help to get the best out of this product.
The Baader manual is not your typical product manual and deserves a special mention given how comprehensive of a guide it is. It’s rich in details about the product, but what struck me was its educative approach. It's not just about operating the Prism; it dives deep into its applications. The manual gives insights into optimal usages, sun observations, and even touches upon aspects like lucky imaging and how different factors can influence image quality. What and why to use different filters for different scenarios are underscored, showcasing Baader's commitment to ensuring users get the most out of their purchase. The manual subtly introduces other Baader products, but it doesn’t feel pushy. Instead, there's a clear intent to educate the user, enhancing their overall experience with the product. It is very informative and well received. It is clear Baader want you to play and experiment with different configurations, many examples on how to do this, and their adaptor systems really help you to achieve this.[br]
Top Ten Features
Superior Optical Quality and Solar Safety: The Baader 2" Cool-Ceramic Safety Herschel Prism Mark II combines safety with superior optical quality, offering exceptionally clear and sharp solar images without the risk of eye damage or equipment overheating. Its prism-based system exceeds the performance of traditional solar safety films and no introduction of color fringing reducing image sharpness.
Enhanced Heat Management: Featuring "Cool-Ceramic" technology, the Baader 2" Cool-Ceramic Safety Herschel Prism Mark II ensures efficient heat dissipation, which maintains image stability and reduces the risk of damage to the equipment, promoting safer solar observation sessions.
High-Contrast and Detailed Solar Imaging: With Phantom Group anti-reflective coating and precision polishing, the Wedge reduces light scattering and blocks harmful UV and IR light, allowing for high-contrast views and detailed observation of solar phenomena like sunspots, granulation, and flares.
Longevity and Durable Build Quality: Crafted with high-quality materials, the Baader 2" Cool-Ceramic Safety Herschel Prism Mark II is designed for durability, ensuring longevity and performance that outlasts solar safety films and withstands wear and tear.
Versatile Solar Observation: The Baader 2" Cool-Ceramic Safety Herschel Prism Mark II provides multiple filtering options with included Neutral Density and Solar Continuum filters, enabling various solar features to be observed in different lights. It can be used with a wide range of telescopes and cameras, making it a versatile tool for solar imaging. It can be attached directly to the telescope's focuser or connected to most cameras using a suitable adapter. This flexibility allows both visual observers and astrophotographers to capture stunning solar images using their preferred equipment.
Improved Design and User Experience: The Mark II version boasts an improved build quality and refined design, ensuring a better performance and an engaging unboxing experience that enhances user interaction from the start.
Education and Enhanced User Insight: The detailed manual and added insights offer an educational aspect, improving user understanding of solar observation and providing a more informative experience compared to simpler guides.
Advanced Image Results Potential: Leveraging advancements in technology, the Baader 2" Cool-Ceramic Safety Herschel Prism Mark II aims to deliver better contrast, more detailed images, and a more authentic white-light view of the sun than previous models and traditional solar films. The Solar Continuum Filter is designed to enhance the contrast of solar images, it brings out the finest solar details, making sunspots, granulation, and faculae more visible.
User-Friendly Setup and Operation: The wedge is engineered for ease of use with minimal setup time required, ensuring that observers can focus more on the observation and less on equipment configuration.
Comprehensive Solar Observing Solution: Combining safety, educational value, high-quality construction, and user-friendly design, the Baader 2" Cool-Ceramic Safety Herschel Prism Mark II stands as a comprehensive solution for both amateur and experienced solar observers, promising many years of enjoyment in solar astronomy.
[br]
Cool Under the Sun - Heat Management and Optimum Image Contrast
The "Cool-Ceramic" technology it boasts isn’t just a fancy term, although it is cool… pun intended; it's a crucial innovation that sets this product apart from competitors in my opinion. Drawing inspiration from the heat tiles used on space shuttles, which protect astronauts from the intense heat of re-entry, the Cool-Ceramic element in the Herschel Prism serves a similar protective purpose. It absorbs and dissipates solar heat, preventing the equipment from overheating without impacting the surrounding environment and view. This feature is crucial for maintaining a cooler operating temperature, which in turn helps in providing clearer and more detailed views of the sun by preventing thermals and astigmatism caused by the unwanted heat.
Moreover, the precision polishing and multi-coating of the Prism's optics are more than just about achieving high-contrast and detailed solar images. The coatings are designed to reduce the scattering of light, improving the overall image quality while simultaneously blocking harmful UV and IR radiation. This isn’t just beneficial for your equipment; it’s a safety feature that protects your vision during solar observation.
Included Filters
The Herschel prism ensures safe full-aperture solar views without image degradation, offering superior resolution and contrast compared to many other white-light filters. Its efficient internal baffling and prism rear-face multicoating further reduce scatter and maximize contrast. For safety and optimal performance, the prism includes a permanently pre-installed precision polished and coated Baader ND 3.0 filter within the housing. This filter is critical for any visual observation, as it ensures that the observer is never exposed to unfiltered light which may cause irreversible damage to the eye. Baader, putting safety first, recommend to always "reset" the Herschel Prism after every use, ensuring to put the ND 3.0 filter back so that it is always ready for visual, as you may forget to reset it next time you use it.
The scope of supply also includes the latest Solar Continuum filter 7.5nm (540nm CWL), also preinstalled, for maximising contrast, and on the photographic version ND 1.8, 0.9 and 0.6. As an option, a polarising filter ( [product sku="polarizingsingle"] ) can also be installed and using the integrated rotation mechanism brightness can be adjusted easily.
Matching with the right telescope
In terms of compatibility, the Herschel prism can be used with various telescopes, but it is important to consider both the aperture and the f/ratio of the telescope. A telescope with a longer focal length will produce a wider beam of light, which distributes the energy over a larger area, reducing the risk of overheating. However, this also means that there is a higher risk of the light not completely hitting the prism when observing details at the edge of the sun. Baader state that the Prism is compatible up to 4.5m focal length (approx. every 1m focal length equates to a solar image of 1cm, on a telescope up to 6 inch. They also state the Prism can be used on telescopes between 6 and 8 inches, but recommend you swing it away from the sun periodically to prevent heat buildup, and finally a focal ratio of f/6 or lower.
It's worth noting that when observing or photographing the Sun, it is crucial to follow appropriate safety guidelines to protect your eyes and equipment. Always consult the manufacturer's instructions and consider seeking advice from experienced solar observers or astronomers before undertaking solar observations.
So… what do I do? Read the manual first. Yes, done that, sort of, most of it. The benefits of living somewhere with lush greenery from the persistent clouds and rain, means plenty time to read and plan. Which filters do I need? Let's start with what it's installed with. The Solar Continuum and the ND 3.0. I'll check the brightness visually and then with camera. I may not need to change and can adapt and fine tune later with more use.
I first attempted to use the prism with a 102mm Skywatcher achromat refractor, however, it was very hazy (if not just cloudy) and I gave up. This is typical conditions for me in Winter in the Northern Hemisphere. I'm located 55.54N, and the Sun is reaching a max alt of around 26 degrees by transit, and I am only at 38 metres altitude above sea level. Not ideal.
Disclaimer: Eagle-eyed readers will notice the product photography is with the Skywatcher 102mm telescope and a [product sku="1931035"] from the first attempt, but the images I later produced of the Sun are with the Bresser and [product sku="1931032"] (the giveaway is the 200M uses a USB-C cable, and 462M uses the larger USB-B 3).
On my second attempt, I opted to use BRESSER Messier AR-127L/1200 Achromatic f/9.4 telescope (which has a lovely smooth and stable Hexafoc focuser) mounted on a AZ EQ5 GT in my garden. Unfortunately, I was not able to mount this telescope in my roll off roof observatory because I already have a RASA 11 side by side with a C9.25 and its close if not already at the imaging limits on the EQ8.
The camera I opted to use is the IR sensitive QHY 5-III-462M Mono Camera. Let's not dwell on the fact I am blocking all the IR I can with the Solar Continuum filter so that sensitivity is wasted, it was primarily purchased for lunar imaging (which is more stable in IR).
You may think my Celestron C9.25 telescope would produce better results with the Herschel. It doesn't, unfiltered sunlight hitting the primary and being focussed down to the secondary would most certainly destroy the telescope and is not recommended, in this use case I'd need to use Baader AstroSolar film and block all that energy before it entered the telescope.
Let's just see what happens before the cloud roll in.
Setup
The setup process is remarkably straightforward. Sticking with the default configuration, I left the Baader Herschel Prism equipped with the pre-installed Solar Continuum filter and the ND3 filter. This combination proved to be spot-on for observing the Sun's spectrum without any exposure issues. The filters not only provided a safeguard against the intense solar brightness but also enhanced the surface detail, allowing for a crisp and clear image.
The setup process was also a great opportunity to appreciate the solid build, which really stood out, and the attention to detail that Baader has put into this product.
Connecting Camera
Connecting the camera was as seamless as the rest of the process. The Baader Herschel Prism accommodates a variety of camera attachments, which is a testament to its versatility. I used the provided T-ring adapter to connect my camera, ensuring a secure and stable connection that gave me confidence during the imaging session.
Pointing to the Sun
Once the setup was complete, pointing the telescope at the Sun was the next step. Aligning the telescope to the Sun initially seemed daunting, but the Baader Herschel Prism's design made it simpler than anticipated. I am very used to trying to use finders, not necessarily aligned with the telescope fully, to pinpoint a small disc onto an even smaller sensor. A lot of back-and-forth slewing was anticipated, but with the aid of the built in solar finder on the back of the Prism, pinpointing the Sun was done with ease and precision and within seconds. Literally seconds. Think of it as a built-in flip-mirror, but easier.
The rear plate of the Herschel Prism, often referred to as the 'solar finder', was instrumental in achieving this quick alignment. Its purpose is to help you align your telescope with the Sun safely. The sun's image is projected onto the rear plate, allowing for precise alignment without the risk of looking directly at the Sun. It's a small but critical detail that enhances the overall user experience and makes aligning to the Sun easier than opening the very strong and sturdy Peli case that it comes in.
Imaging
Finding focus was easy. The Baader Herschel Prism has same back focus as a typical diagonal, so all I need to do was pop an eye piece or camera in as I'd normally do. I achieved focus manually with ease even without the upgraded Bresser 1:8 gear-set (I didn't have a motor fitted at the time otherwise I'd have used that). The imaging capabilities of the Baader Herschel Prism are where this tool really shines (enough with the puns?), quite literally. The sun's image, once projected through the prism and onto my camera's sensor, was nothing short of stunning. The detail in the sunspots and the solar surface granularity was exceptionally clear. The high-contrast imaging this device provides is a game-changer for both amateur and serious solar photographers.
I was delighted to find that the exposure length was not a problem; I could capture images at my camera's maximum frame rate with a low enough exposure / gain combo. This speaks volumes about the efficiency of the Prism's design in managing light transmission and heat. By not having to fiddle with filter configurations or exposure settings, I was able to focus on what mattered most: observing and capturing the Sun's dynamic features.
More on imaging later.
Visual Use and Baader MaxBright BinoViewer
For those who prefer visual observation, the Baader [product sku="mb2" style="imgright"] pairs perfectly with the Herschel Prism, and features pop out as if you could touch them. It's an experience that's hard to describe and needs to be seen to be believed.
I recently managed to acquire a customer return MaxBright BinoViewers Mk2 with a bit discount from a reputable dealer here in the UK which I matched with two [product sku="2454826"]. The BinoViewer makes the solar observation experience more comfortable and immersive, providing a three-dimensional effect that makes the solar surface pop! I was not prepared for the view. I did use a glass path corrector to achieve focus, and I didn't use the optional direct connection, which is fully explained in the manual.
I did try with just a single Baader Hyperion Zoom, and the view was great, but not as immersive as when using the MaxBright BinoViewer.
Opening the Herschel Prism can seem daunting, but it is straight forward enough to take apart and more importantly put back together. Baader provide a handy tool to remove the filters within. Interestingly, while the box prominently displays the polarising filter, it's the Solar Continuum filter that comes with the photography package. Now, it's not an error — the inclusion of the Solar Continuum is explicitly mentioned. However, the polarising filter's prominent display might be a nudge for an additional purchase. After a bit research, and read of the manual, I concluded the polarising filter is simply to adjust the brightness (that just didn't click, even though I have used these types of filters frequently with terrestrial photography over the last 35 or so years) and that I didn't really need to adjust the brightness, at least not yet, but noted that it is a very simple and effective solution for controlling brightness, particularly for visual use. I've learned from other users that once you install a polarizing filter and utilize the built-in rotation mechanism, you would always want to use this setup due to the simplicity of adjusting brightness. It's incredibly user-friendly. This is a testament to Baader's clever design and attention to detail.
With regards to heat management, by this point I had the scope pointing at the Sun for a number of hours and I couldn't really notice any increased heat, nothing that stood out. Nothing was hot. Ceramic plates can certainly reach to temperatures over 100 Celsius, or 212 Fahrenheit, but this handled the heat very well and was no where near this. The ceramic plate is the "solar-finder". The combination of the ceramic plate, the grills for airflow and the "heat cage", as described in the manual as only being connected to the outer shell with four screws, works very effectively dissipating heat.
Baader Herschel Prism Mk2 fitted with Baader MaxBright BinoViewer and Two Hyperion Zooms
Baader Herschel Prism Mk2 fitted with Baader Hyperion Zoom Eyepiece. The solar disc is shown on the Herschel's built-in "Solar-Finder".
Baader Herschel Prism Mk2 fitted with Baader Q-Turret
Imaging Workflow
I was thankfully able to image one of the largest Sunspots visible on the sun for many years, AR3590 captured on the 24th of February 2024. For this I used the Bresser AR127/1200L with QHY 5-III 462M camera. I shot native focal length at 1.2m, and with the [product sku="2956185"] at 2.7m.
Baader Herschel Prism Mk2 fitted with QHY Imaging Camera
Processing: From Capture to Masterpiece
Capturing the Sun is just the beginning. The raw data collected through the Baader 2" Cool-Ceramic Safety Herschel Prism Mark II holds untapped potential that, with the right processing, can transform into a stunning solar portrait. Here's a look at the processing workflow I followed to bring the data to life captured during the "lucky imaging" session.
Stacking with Autostakkert 4
It all begins with Autostakkert 4, a powerful tool for stacking images. Stacking is essential in astrophotography to increase image sharpness and reduce noise. After importing the .ser video file captured through the Baader Prism, Autostakkert analyzes, aligns, and stacks the sharpest frames, effectively boosting the signal and bringing forward the subtle textures of the solar surface. I'd recommend reading and viewing videos on best usage. Until recently I didn't really understand all the settings, but after reading Solar Astronomy published by Axilone, edited by Christian Viladrich and authored by many authors, I came to understand more about AP size in relation to details and some other points, which has really resulted in better stack outputs. This book is well worth the investment.
Refining with IMPPG
Next, the stacked image is passed to IMPPG for deconvolution and sharpening. Deconvolution is a sophisticated technique to correct the blurring and improve the image's fidelity, while sharpening accentuates the fine details. IMPPG is particularly adept at enhancing solar images, where every granule and sunspot's edge can become more defined, making the image pop with clarity.
Final Touches in PixInsight with SolarToolBox
The penultimate stage is PixInsight, a powerhouse of astrophotography processing. Using the SolarToolBox, the final touches are applied. Adjustments to the black and white points set the tonal range, ensuring that the full spectrum of luminance is represented. Contrast enhancement deepens the darks and brightens the lights, giving the image a dynamic range that mirrors the Sun's intense radiance. Very thankful for this new toolbox, which I became aware of a few days after capturing the data. If you've not got this, check it out.
Bringing Color to the Sun
In the last step, a false color is applied. This isn't just for aesthetic appeal; different colors can represent various layers and features of the Sun, often used to highlight specific elements like magnetic fields or temperature ranges. The choice of color is both a scientific and artistic decision, reflecting the features you wish to emphasize. I went with defaults, although I did boost a bit colour contrast.
The Result
The final images stands as a testament to both the Baader Herschel Prism's capabilities and the power of post-processing in astrophotography. From a series of video frames to a sharp, detailed, and beautifully rendered image of our closest star, the processing workflow is as crucial as the capture itself. It's a blend of art and science, where technology meets creativity, resulting in images that not only educate but also inspire.
Bresser AR127/1200L with the Baader Herschel Prism Mk2 and QHY Imaging Camera
Native Focal Length - AR3590 at 1.2m with Bresser AR127/1200L and QHY 5-III-462M
Ansel Adams stated, "you don’t take a photograph, you make it". How appropriate for solar imaging. To make a good image, you need good data. You can only do so much with poor data, be it from equipment or atmospheric seeing. The image starts with the Herschel.
As mentioned, at 55.54N, the Sun in Feb only reaches around 26 degrees alt, so it's very low, and midday when I can image the Sun at this time of year. But I did, and the results speak for themselves.
In these examples, I feel for both focal lengths show good detail in granulation, in the 2.7m you can see the polygonal shapes of the granules. The penumbra (spot halo) is irregular but not overly complex in the main spot, more complex in other parts, with good definition on the outer of the umbra (spot), and a few solar pores surrounding the sunspots.
With the Baader 2.25x Barlow at 2.7m with Bresser AR127/1200L and QHY 5-III 462M
Other Sunspots
As expected, granulation detail lessens towards the darkening limb of the Sun, but granulation and faculae visible.
Final Thoughts: The Verdict on the Baader 2" Cool-Ceramic Safety Herschel Prism Mark II
Reflecting (last pun) on the use of the Baader Herschel Prism, it's not just about the technical excellence of the product; it's about the experience it provides. Whether you are a seasoned astronomer or a hobbyist, the Baader provides a window into the dynamics of our Sun with unmatched clarity and safety. It's an investment that pays off with every use, revealing more of the Sun's secrets each time.
After numerous sessions with the Baader 2" Cool-Ceramic Safety Herschel Prism Mark II, I can confidently say that this tool is a game-changer for solar observation and photography. From the unboxing experience, which speaks volumes about Baader's commitment to quality and customer satisfaction, to the actual field use where it performs admirably, every aspect of this product has clearly been crafted with precision, passion, and care. It meets the high standards of quality and functionality without compromise.
The ease of use, combined with the educational value of the detailed manual, makes it accessible for beginners while its advanced features satisfy the demands of seasoned astronomers. The safety measures are reassuring, the build quality is impeccable, and the imaging results are exceptional. In the realm of solar observation, where the fine line between quality imaging and equipment safety is often hard to navigate, the Baader Herschel Prism stands out. It’s an investment that not only enhances your view of the sun but also enriches your understanding of solar astronomy.
In conclusion, the Baader Herschel Prism isn't just a piece of equipment; it's a portal to the sun's fiery grandeur, a shield against its might, and a teacher of its dynamics. For anyone serious about solar astronomy, this isn't just a recommended purchase; it's an essential one.
You can find further product information as follows:
[product sku="SafeyHerschelMarkii"]
[product sku="2956185"]
[br]
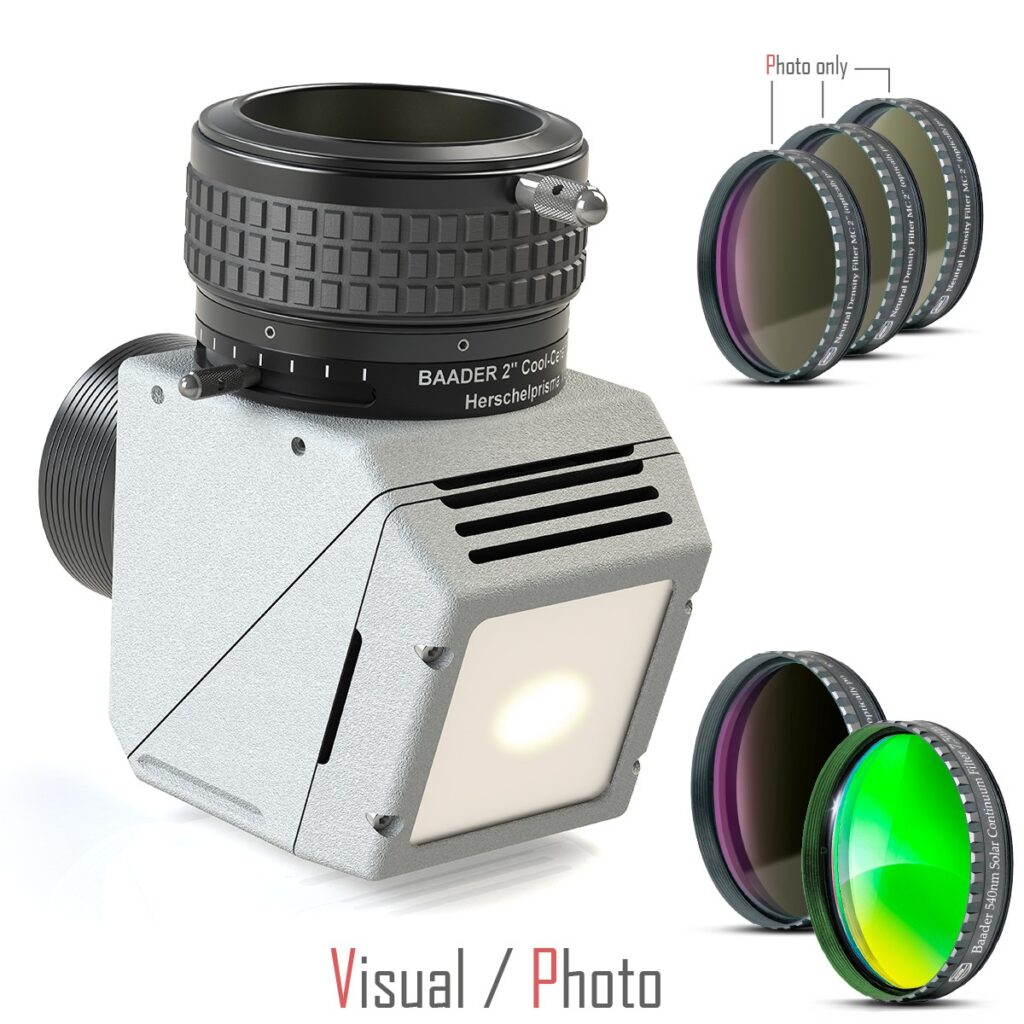
Combination of photometric and RGB filters to highlight dark nebulae
Photographing dark nebulae is a fascinating challenge for astrophotographers, often posing difficulties due to the low brightness and high contrast between celestial objects and dark nebulae. This often requires the use of different techniques and exceptionally dark skies to bring out fine details in the dark nebular structures.
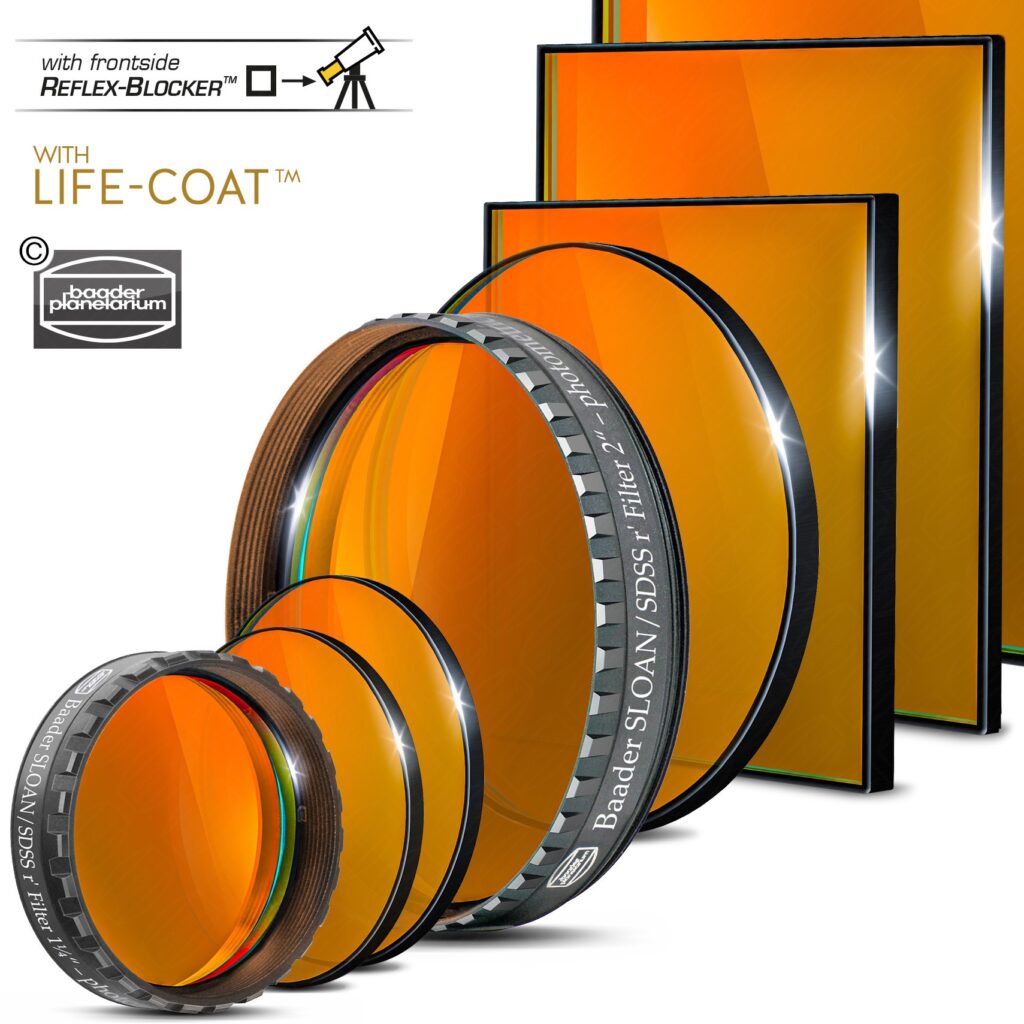
In this test report, we examine the photographic results and the effectiveness of the combination [product sku="cmosSLOANset" style="imgright"] und [product sku="cmosRGBset"] to evaluate its effectiveness in improving contrast and detail, as well as enhancing them in all their colorful glory, while maintaining natural color reproduction.
Equipment used:
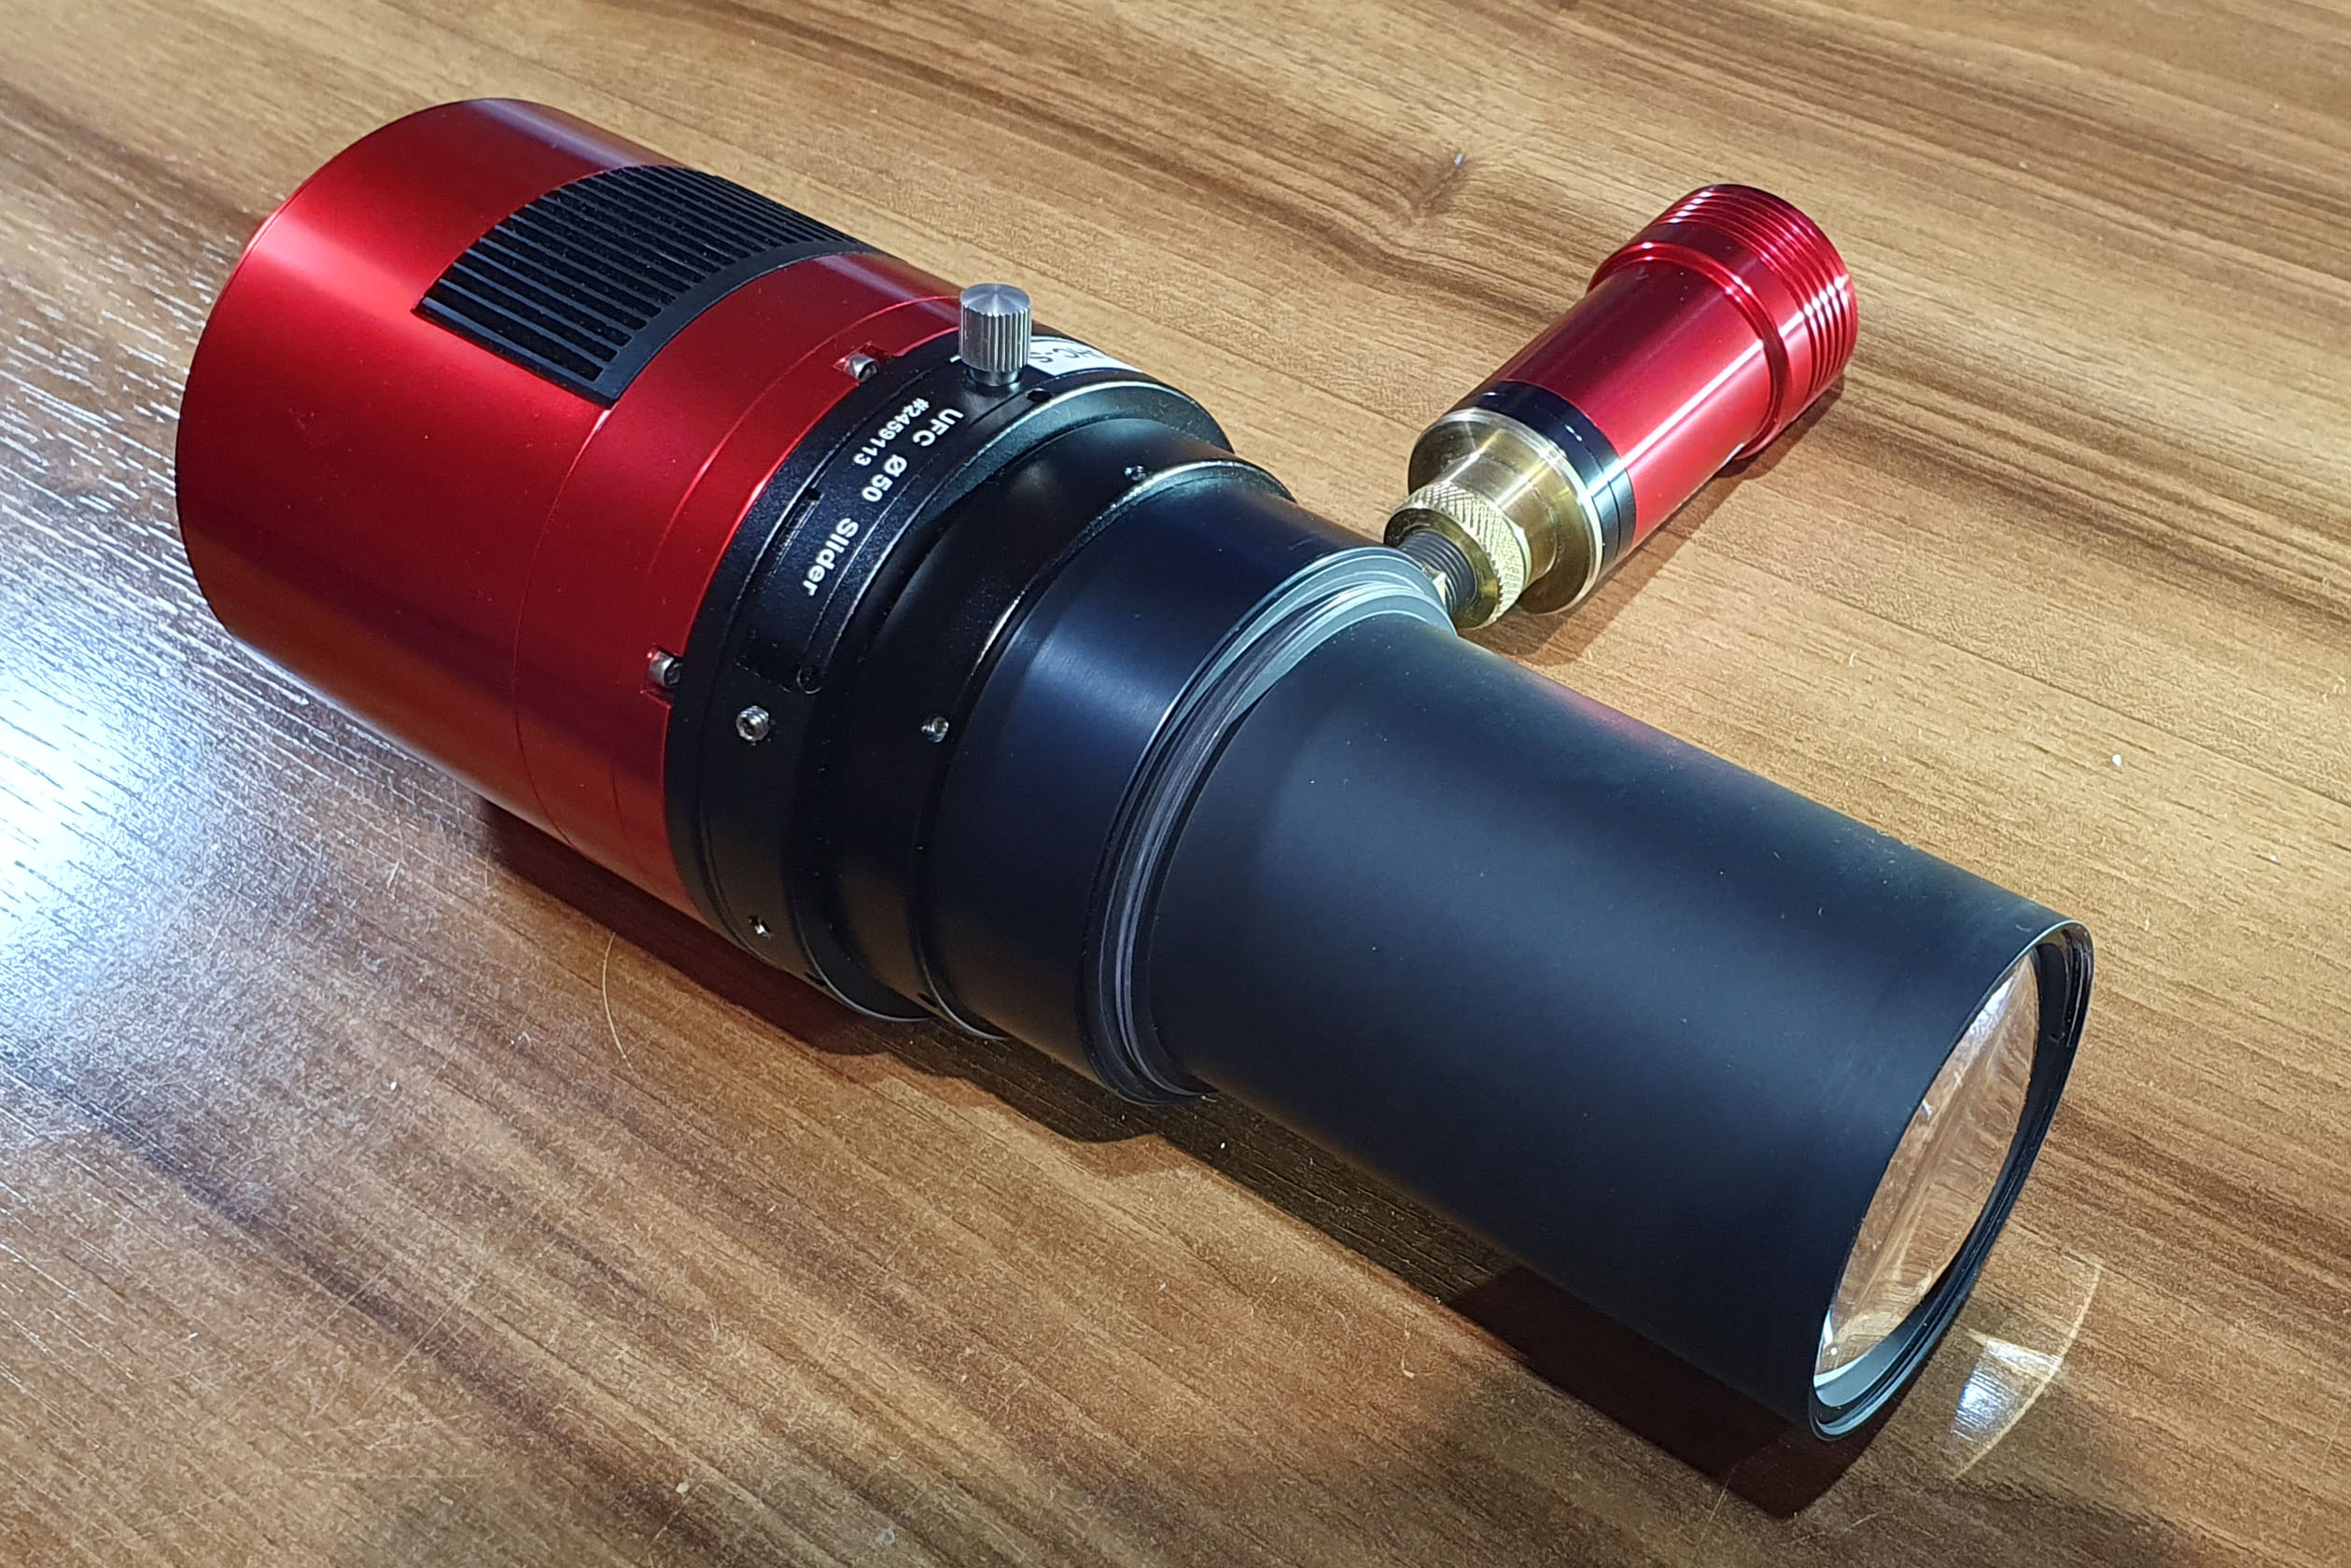
All single frames and the final image were taken with a [product sku="1931096" style="imgleft"]and the Celestron RASA 11“ as well as a selection of 9 different filters, which were changed manually using the UFC (Univeral Filter Changer) System.
The entire system was controlled and monitored by the N.I.N.A. imaging software. Filters were changed manually using the UFC Filter Changer. After each filter change, an automatic focusing motor was used to refocus (always after 90 minutes or sooner if the temperature dropped rapidly) in order to always hit the perfect focus point. Flat frames were taken at the end of the filter session BEFORE each filter change.
Gain settings:
High Gain Mode Gain 0 / Offset 25 (for all wideband exposures) High Gain Mode Gain 56 / Offset 25 (for narrowband exposures)
Acquisition conditions and software:
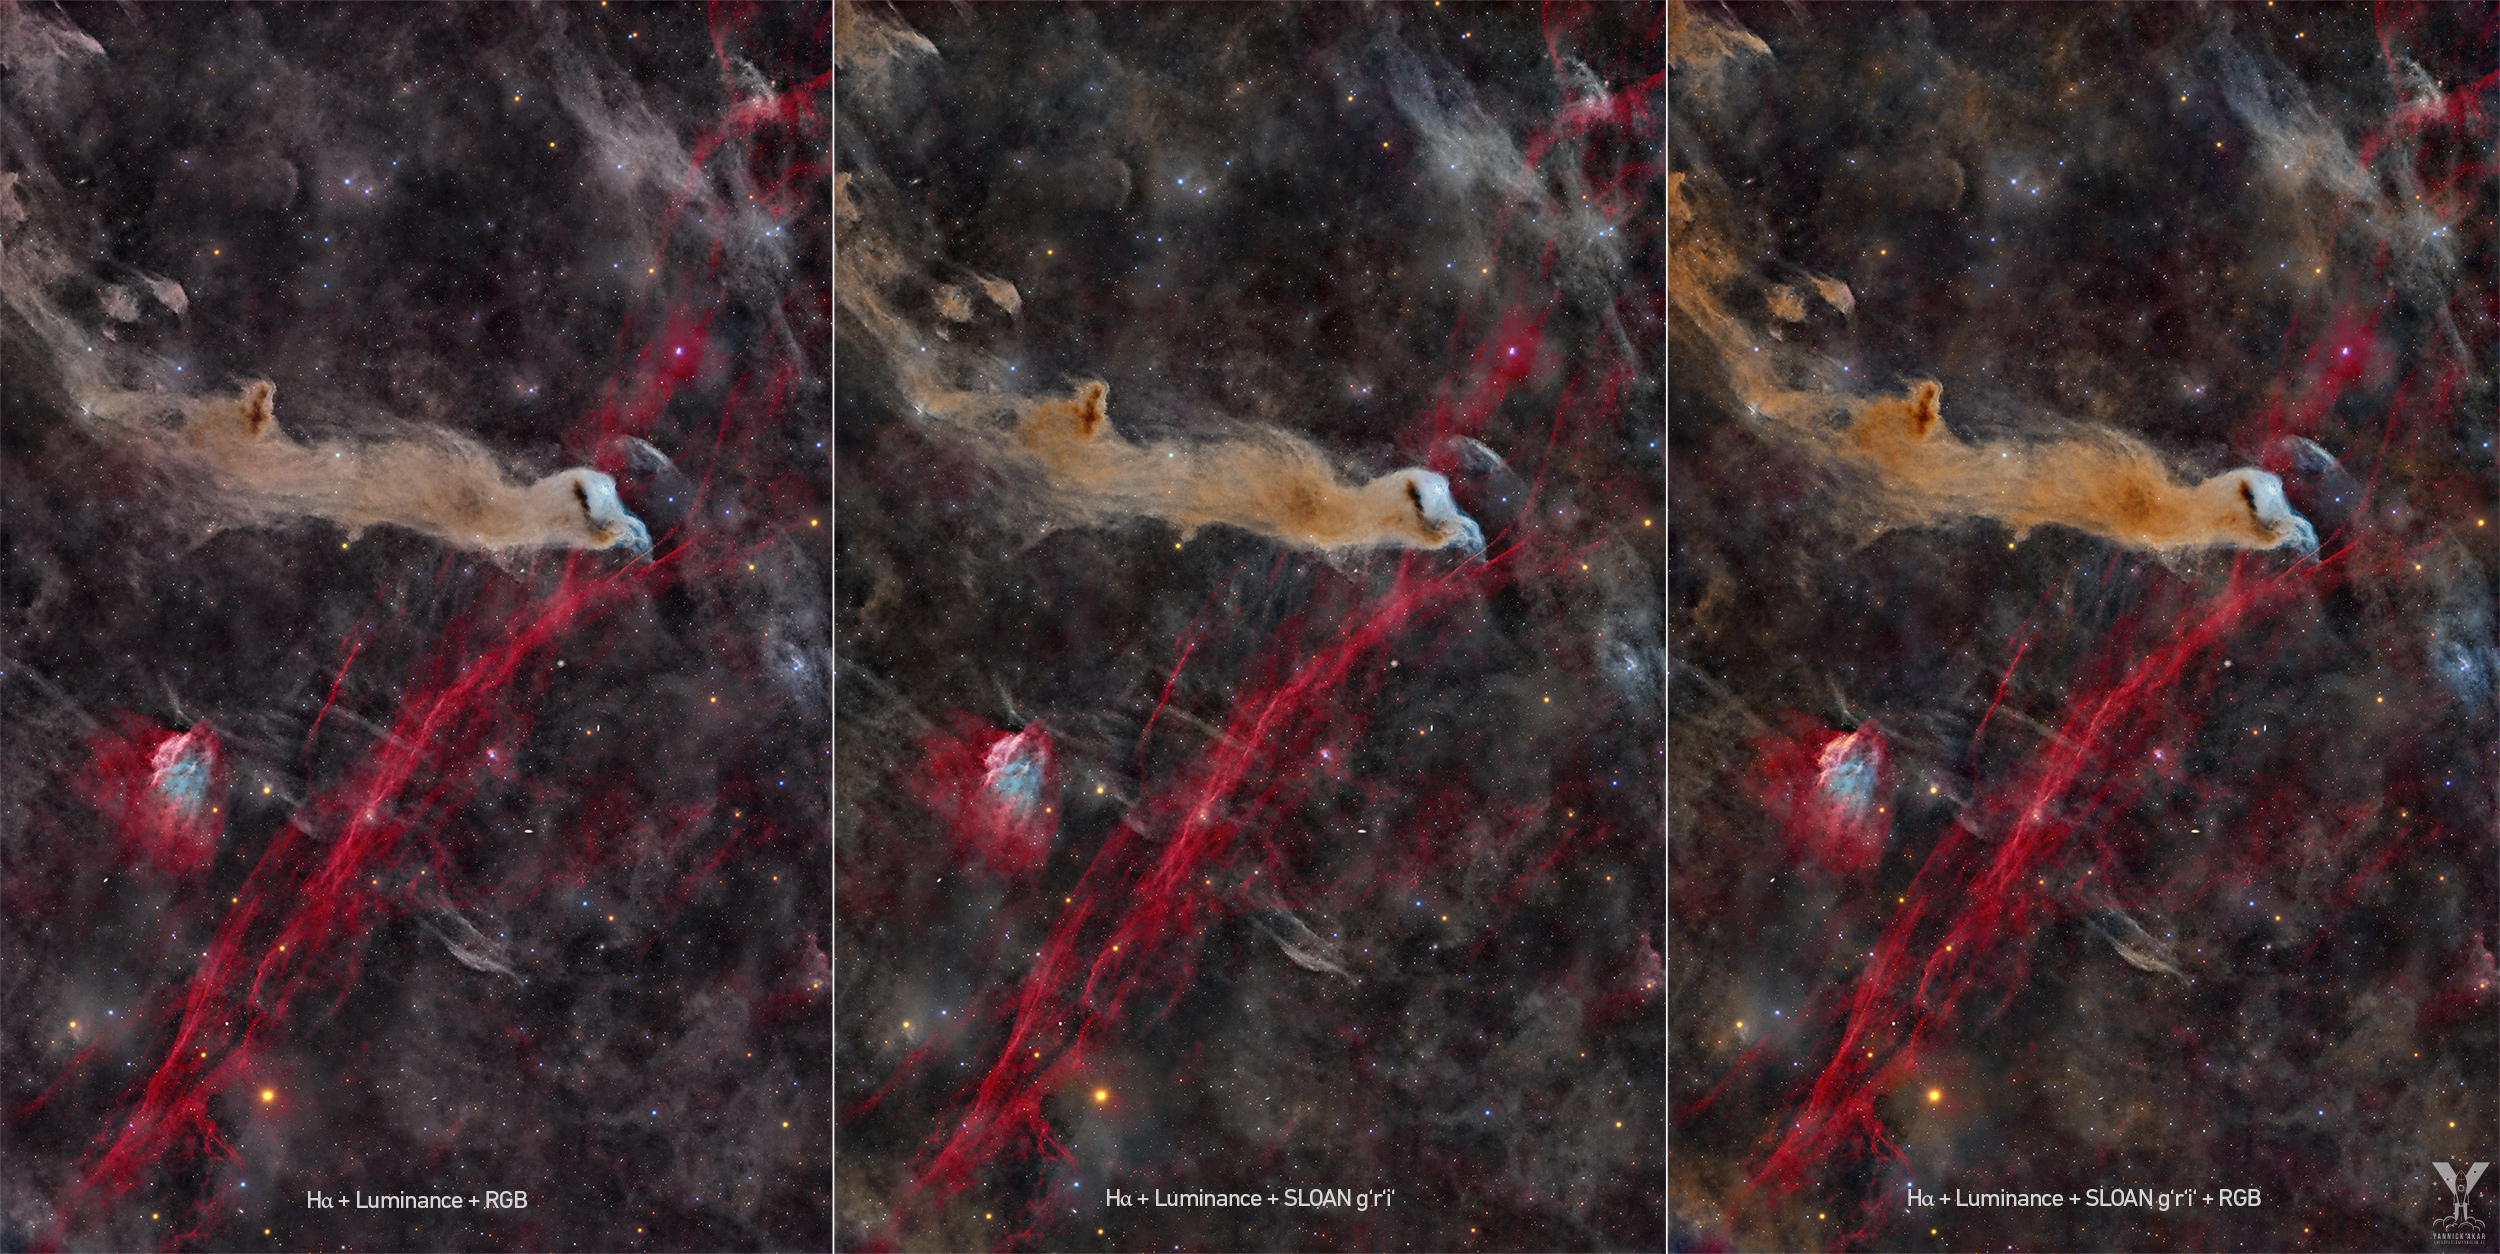
The images were taken far from optimal conditions under city skies. With an exposure time of over 70 hours, spread over all filters, the images were taken on every clear night with good seeing conditions between May 2023 and July 2023. The main image shows the reflection nebula Van den Berg (vdB) 152 in the constellation Cepheus together with the very faint and diffuse molecular cloud LDN 1217 (LDN = Lynds Dark Nebula). The object is also known among astrophotographers as "Wolf's Cave Nebula".
Details on filter applications:
Photometric filters to increase contrast:
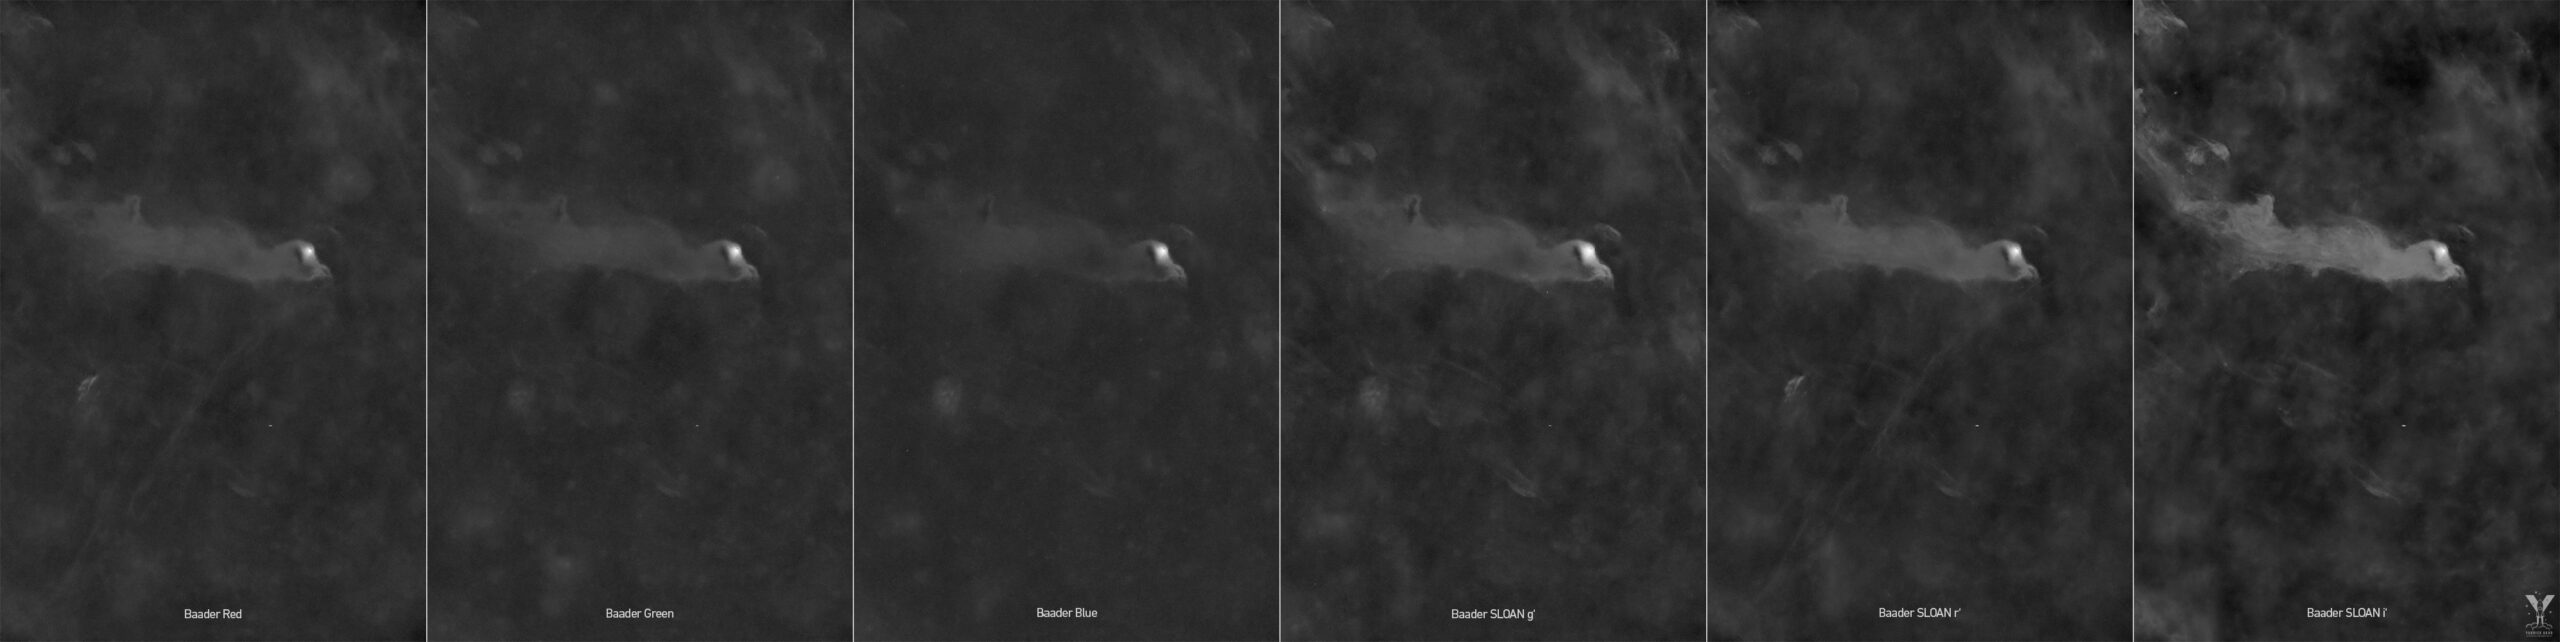
The use of photometric filters in combination with RGB-Filters led to a significant increase in contrast in the dark nebulae regions. The use of SLOAN g‘, SLOAN r‘ and SLOAN i‘ improved the visibility of fine structures and details, while RGB filters preserved the natural colors.
The three central filters used for the Sloan Digital Sky Survey (SDSS) divide the spectral range into three roughly equal parts: g': 410nm to 550nm, r': 555nm to 695nm, and i': 695nm to 845nm. These filters are therefore the perfect choice for three-color imaging with modern cameras.
Wavelength range of the Celestron RASA 11": The manufacturer specifies the Celestron RASA 11“ with an optimized wavelength range of 400 to 700nm. However, the test with the SLOAN i‘ Filter (695-845nm) clearly shows that a sharp and detailed image is also possible far beyond the fully corrected range. The prerequisite for this is refocusing after each filter change.
Filters for the reduction of light pollution:
The application of the [product sku="uhcl" style="imgright"], as well as the IDAS LPS-P2, were used to capture the luminance images. The UHC-L booster filter, which was also specially designed to reduce light pollution, led to a considerable improvement in image quality. The sky appeared darker, which significantly increased the contrast to the dark nebulae. In combination with the LPS-P2 luminance filter, this led to better recognition of fine details and structures.[br]
Use of the f/2 Ultra-HighSpeed H-alpha narrowband filter:
By integrating the narrow-band [product sku="cmosHaUltraHighspeed" style="imgright"] certain emission lines could be selectively emphasized. The hydrogen regions, which are rather weak for color filters, could be precisely extracted and re-inserted into the final color image in the subsequent image processing. This helped to enhance the structures around the dark nebula and the H-alpha regions.
Combination of RGB filters for natural colors:
Using RGB-Filters alone tended to reduce the contrast between the sky and dark nebulae. The integration of photometric filters helped to increase this contrast, while RGB filters preserved natural colors and allowed for a balanced color appearance.
Overall appearance and aesthetic gain:
The combination of photometric and RGB-Filters resulted in impressive structures within the dark nebula LDN 1217, emphasizing the fine details and structures while preserving the natural colors, resulting in an aesthetically pleasing and well-balanced image.
Red Green Blue SLOAN g‘ SLOAN r' SLOAN i' UHC-L IDAS LPS-P2 H-Alpha f/2 3.5nm
3.25 hours (195 x 60”) 3.15 hours (190 x 60“) 3 hours (180 x 60”) 5.4 hours (325 x 60”) 6.3 hours (380 x 60”) 8.5 hours (340 x 90”) 6.4 hours (385 x 60”) 12,7 hours (1525 x 30”) 21.5 hours (645 x 120”)
Note from Baader Planetarium: The following article was kindly provided to us by Christoph B. for publication.
Discover this 2.1M Classic Slit Dome also on our World Map[br]
Background
My journey to establishing my own observatory began with an extraordinary heirloom, a Baader observatory dome over 30 years old, carrying its own remarkable history. This dome had been in the possession of Mr. Ernst Blättler (✝) for decades, who had donated it to his club, the Astronomical Society of Zürcher Oberland (AGZO), some years ago. Until his old age, he was active as a passionate demonstrator. A few years ago, however, the club expressed the desire to operate a modern dome with the latest technology, which could be remotely operated by the club members.
Therefore, the club ordered a new 2.1m split dome, which was installed in September 2020. The heirloom, the over 30-year-old manually operated dome, was kindly left to me by AGZO. This dome, a testament to artisan craftsmanship and enduring quality, thus came into my possession and offered me the unique opportunity to transform it into a functional, modern observatory – a project that not only reflected my passion for astronomy but also a deep appreciation for astronomical heritage.
The challenge was to restore this historic dome, which had observed the sky for decades, and equip it with modern technology. It was a journey full of technical, physical, and emotional challenges. This dome had its own personality – shaped by its past, age, and many stories it had collected over the years. My goal was to not only breathe new life into it but also transform it into a modern observatory that could utilize the latest astronomical technologies.
Refurbishing the Classic Baader Dome
Restoration and Construction
The restoration of the dome was a mix of challenge and passion. Thanks to the know-how and materials from my brother-in-law's boatyard, I was able to breathe new life into the dome. The dome quality was impressive, and after replacing the rubber parts and rollers and repairs to the gelcoat, the dome shined like new.
In May 2023, I was finally able to start assembling the dome. The previous months were marked by continuous rain, which slowed down the excavation, formwork, and reinforcing work. I chose self-leveling pump concrete for the foundation, as direct access for a conventional concrete mixer was impossible. Within 10 minutes, the nearly 2.5 cubic meters of concrete were poured, and after two weeks, I could de-shutter. Then in early June, the dome and mount were set up in one day.
Foundation PreparationsFinished Foundation with Self-Leveling Pump ConcreteAssembling the Dome
Technical Challenges
An important step was determining the precise position of the pillar. I had previously set up all the equipment in the dry in the shed to test the positioning. After Baader Planetarium warned me about the dimensions of the large refractor in a 2.1m dome, I left nothing to chance. A few days after the dome was set up, the mount and finally the telescope were installed and both were put into operation. More on this below.
The GM 3000 HPS on the Baader Steel PillarMy CFF 185mm APO on the GM 3000 HPS MountThe Finished Dome Shines in New Splendor
Weather Resistance and Practical Test
The dome was already exposed to extreme weather conditions, including a heatwave of over 36° C and two thunderstorms, one with 120 km/h winds and heavy rain. The dome withstood, and thanks to the replacement seal kindly provided by Baader Planetarium for free, the interior remained dry.
As already mentioned, I am thrilled at how well the dome could be renovated. Although it was a lot of work as mentioned above, without the substance of the object, the best polishing machine is useless. And the substance of the dome is first-class.
State-of-the-Art Instruments
Commissioning the Mount
The mount, a 10Micron GM3000 HPS, was another crucial factor. The commissioning was surprisingly simple:
I started with a short drift alignment as I was used to, and already saw that there was no PE. Then I conducted a 10-point alignment with Mount Wizzard 4. After adjusting Polaris and generating a 60-point model, I was impressed with the precision and performance of the mount. The images in long exposures, such as 15 minutes on M101, were visually and metrically flawless – only turning the dome made me sweat.
First 60-Point Model45 minutes later 3.1 RMS and 55” PA ErrorFirst Target, 10 min. exposed: WOW – absolutely round starsNext Target: M101 15 min exposed, still round measured starsThird Object NGC 6888 - 20 min exposed on the other pier side
First Astronomical Successes
After these results on the first evening, I was overwhelmed. The mount enables absolutely precise and clear shots, commissioning completed successfully in one night! Particularly impressive were the results in unguided long exposures.
In the following weeks, I stayed with the Crescent Nebula and was able to collect 7h Ha and OIII with 10min subs each, as well as 14*3min RGB for the stars. All un-guided! Below I show the first finished processed image, for a First Light I am already extremely satisfied.
NGC 6888 – 7h Ha and OIII with 10min subs and 14x3min RGB
Final Remarks
As you can see, I am thrilled so far. The 30-year-old dome is brilliant and now shines again in full splendor – the mount alone could already become a hobby. The next project step will be the automatic rotation of the dome, so I don't have to turn it every 15 minutes – but this is currently only in the planning phase.
I am extremely pleased that this dome with a long history will continue to serve me well for many years.
Sure, here's the English translation:
FROM A FOUND OBJECT TO A MODERN OBSERVATORY: THE STORY OF MY "ANTIQUE" BAADER DOME Note from Baader Planetarium: The following article was kindly provided by Christoph B. for publication.
Discover this 2.1M Classic Split Dome also on our world map Background My journey to establishing my own observatory began with an extraordinary heirloom, a Baader observatory dome over 30 years old, carrying its own remarkable history. This dome had been in the possession of Mr. Ernst Blättler (✝) for decades, who had donated it to his club, the Astronomical Society of Zürcher Oberland (AGZO), a few years ago. Until his old age, he was active as a passionate demonstrator. A few years ago, however, the club expressed the desire to operate a modern dome with the latest technology, which could be remotely operated by the club members.
Therefore, the club ordered a new 2.1m split dome, which was installed in September 2020. The heirloom, the over 30-year-old manually operated dome, was kindly left to me by AGZO. This dome, a testament to artisan craftsmanship and enduring quality, thus came into my possession and offered me the unique opportunity to transform it into a functional, modern observatory - a project that not only reflected my passion for astronomy but also a deep appreciation for astronomical heritage.
The challenge was to restore this historic dome, which had observed the sky for decades, and equip it with modern technology. It was a journey full of technical, physical, and emotional challenges. This dome had its own personality - shaped by its past, age, and many stories it had collected over the years. My goal was to not only breathe new life into it but also transform it into a modern observatory that could utilize the latest astronomical technologies.
Refurbishing the Classic Baader DomeRestoration and Construction The restoration of the dome was a mix of challenge and passion. Thanks to the know-how and materials from my brother-in-law's boatyard, I was able to breathe new life into the dome. The quality was impressive, and after replacing the rubber parts and rollers and repairs to the gelcoat, the dome shined like new.
In May 2023, I was finally able to start assembling the dome. The previous months were marked by continuous rain, which slowed down the excavation, formwork, and reinforcing work. I chose self-leveling pump concrete for the foundation, as direct access for a conventional concrete mixer was impossible. Within 10 minutes, the nearly 2.5 cubic meters of concrete were poured, and after two weeks, I could de-shutter. Then in early June, the dome and mount were set up in one day.
Foundation Preparations
Finished Foundation with Self-Leveling Pump Concrete
Assembling the Dome
Technical Challenges An important step was determining the precise position of the pillar. I had previously set up all the equipment in the dry in the shed to test the positioning. After Mr. Risch warned me about the dimensions of the large refractor in a 2.1m dome, I left nothing to chance. A few days after the dome was set up, the mount and finally the telescope were installed and both were put into operation. More on this below.
The GM 3000 HPS on the Baader Steel Column
My CFF 185mm APO on the GM 3000 HPS Mount
The Finished Dome Shines in New SplendorWeather Resistance and Practical Test The dome was already exposed to extreme weather conditions, including a heatwave of over 36 degrees and two thunderstorms, one with 120 km/h winds and heavy rain. The dome withstood, and thanks to the replacement seal kindly provided by Baader Planetarium for free, the interior remained dry.
As already mentioned, I am thrilled at how well the dome could be renovated. Although it was a lot of work as mentioned above, without the substance of the object, the best polishing machine is useless. And the substance of the dome is first-class.
State-of-the-Art InstrumentsCommissioning the Mount The mount, a 10Micron GM3000 HPS, was another crucial factor. The commissioning was surprisingly simple:
I started with a short drift alignment as I was used to, and already saw that there was no PE. Then I conducted a 10-point alignment with Mount Wizzard 4. After adjusting Polaris and generating a 60-point model, I was impressed with the precision and performance of the mount. The images in long exposures, such as 15 minutes on M101, were visually and metrically flawless – only turning the dome made me sweat.
First 60-Point Model
45 minutes later 3.1 RMS and 55” PA ErrorFirst Target, 10 min. exposed: WOW – absolutely round stars
Next Target: M101 15 min exposed, still round measured stars
Third Object NGC 6888 - 20 min exposed on the other pier sideFirst Astronomical Successes After these results on the first evening, I was overwhelmed. The mount enables absolutely precise and clear shots, commissioning completed successfully in one night! Particularly impressive were the results in unguided long exposures.
In the following weeks, I stayed with the Crescent Nebula and was able to collect 7h Ha and OIII with 10min subs each, as well as 14*3min RGB for the stars. All un-guided! Below I show the first finished processed image, for a First Light I am already extremely satisfied.
NGC 6888 – 7h Ha and OIII with 10min subs and 14x3min RGBFinal Remarks As you can see, I am thrilled so far. The 30-year-old dome is brilliant and now shines again in full splendor – the mount alone could already become a hobby. The next project step will be the automatic rotation of the dome, so I don't have to turn it every 15 minutes – but this is currently only in the planning phase.
I am extremely pleased that this dome with a long history will continue to serve me well for many years.
Acknowledgments
I would like to thank AGZO for generously leaving the dome to me and especially Baader Planetarium for their support and the provided seal. Without their products and their service, I could not have realized this project. My dream of owning my own observatory has become a reality.
Christoph B., November 2023
Takahashi is known for excellent telescopes, but when it comes to adapting accessories, they sometimes go their own way, which can make life hard for astronomers. In particular, the use of a bino viewer on the Takahashi Mewlon kept raising questions, and since we don't sell Takahashi telescopes, we couldn't simply try it out ourselves.
Thus, we are all the more grateful to our customer Maiko, who was able to successfully use the [product sku="2456460"] with his Mewlon 180 C and gave us feedback on his setup. We thank him for the information and would like to briefly present the required parts here.
At the Mewlon 180 C, he used:
[product sku="2458130"]
[product sku="2456005"]
[product sku="2456313A"]
[product sku"=2456314Z"]
[product sku="2456460"]
Takahashi Mewlon 180 C with MaxBright II Bino-Viewer
Of course, it is not just a matter of adapting the bino viewer mechanically, you also have to come into focus – on the Mewlon, the 1.25x glass path corrector is sufficient for this. Another advantage of a glass path corrector: it picks up the light beam "further back" in the telescope, where the beam of light is narrower, so that vignetting is avoided.
And how does it work under the night sky? Here, this combination fulfills the expectations, as the following observation report proves.
We thank Maiko for the information about the adaptation to the Mewlon and wish him many clear nights!
Observing with the Mewlon 180 C on the roof top. May 17th/18th 2023
Actually, yesterday would have been a much better night for the first deep sky session with the Mewlon 180 C: My SQM showed values of 21.2 to 21.3 MPSAS – and that on the roof top in the middle of a small town! The Milky Way was clearly visible and structured, which corresponded probably to a good Bortle 4 sky.
Well, I had to use the following night: The SQM showed 20.6 MPSAS, the Milky Way was barely structured, slightly blurred, probably between Bortle 4 and Bortle 5.
MaxBright®II Bino and Rigel Quickfinder at the Mewlon 180 C
For moon and planets, I tested the combination of HEQ 5, Mewlon 180 C and the Baader bino-setup, consisting of MaxBright II, BBHS T2 prism, 1.25 x GPC, ring dovetail and heavy-duty changer a few times. With the Panoptic 24mm and the Nagler 12mm T4, which were modified to 1.25", there were good to very good moments for observing the moon. During the brief moments of good seeing, the view is breathtaking. Unfortunately, I have been waiting in vain for good seeing (lasting longer than a few seconds) so far this year. Last August and September I had conditions that made for wonderful Jupiter and Saturn observations (at that time still monocular), also from the roof. Saturn appeared almost like in a photo at 240x in the 9mm Nagler, at about 20° height above the horizon. Several years before, I had a spectacular view of the moon with the Mewlon in April at 180x: contrast and sharpness were overwhelming, the image as if cut out... so I hoped that this spring the seeing would play along... well, maybe when the morning visibility of Saturn and Jupiter begins. After setting up the telescope and finishing the polar alignment, I wanted to start with M3, but had no success. So I tried M13 and struggled, until finally I had it in the eyepiece. Why? Because of GoTo-refusal or purism...
To be able to use the setup binocular and without GoTo, I had to solve some problems. When pointing the telescope to a new object, the system must be in good balance, because the clamps are loosened. But this only works if the bino is always in the same position. I decided to align it to the axles of the mount. But this blocks the 30mm finder. I roughly locate the object in the Rigel finder I have attached. Then I clamp the axles. Now the bino can be carefully rotated into observation position. The Mewlon viewfinder can then be used for more precise adjustment, with corrections made via the motors.
This works fine for moon and planets, but I would not recommend this method for deep sky objects. Besides the usual observing problems, the limited visibility of the objects in the mewlon viewfinder and the necessary bending of your body to look into both finders cause lots of frustration when you have to guess in the Mewlon's viewfinder in which direction the invisible target has to be moved relative to the invisible crosshairs by the tracking motors which move only at snail's pace.
Ready to go: Monocular and binocular configuration
You're better of searching the objects monocularly with a long focal length 2" eyepiece, so that the object is in the field of view when switching to the bino-viewerrn.
Well, M13 was a delight in the binoviewer at about 110x: A quite dark sky background, and countless little stars in a cluster. At 220x the image naturally became quite dark.
M92 was a dream. I caught myself saying: "What a cute little bunch." On the same telescope, 220x was more usable, but not really good either. I mean, this magnification is better suited for the moon and planets in nights with really good seeing.
For a higher magnification in the bino-viewer, which is for medium seeing or brighter deep sky objects, I will probably try 16/17mm eyepieces, as 16mm will give you about 169x...There was something very touching about being able to enjoy M92 resolved into stars with both eyes almost meditatively on the roof garden of my small town at 3 o'clock in the morning.
The Mewlon is best known as a telescope for planets, but I encourage you to try bright, compact deep sky objects.
Monocularly, I had beautiful observations of M13, M92, M57 and the Eskimo Nebula in the Mewlon under a medium Bortle 4 sky.
Bino-viewers are also often praised for planetary and lunar observation.
Here, too, I recommend trying brighter deep-sky objects at the Mewlon. It can be very rewarding.
Since I am observing without GoTo, it is important for me to be able to quickly switch between the bino viewer and a 2" eyepiece to find objects more easily. I have now found a working combination for this too:
Mewlon 180 C on HEQ 5 in tracking-only mode monocular vs Baader PlanetariumMaxbright II
It seems that my Mewlon setup is now ready to suit my observing style.
My equipment:
Mewlon 180 C upgraded with Rigel Quickfinder
ScopeStuff FineFocusKnob
mirror diagonal Televue Everbrite 2“
LVW 42mm, Nagler 22 T4, Nagler 12 T4 eyepieces
Baader Planetarium Maxbright II Bino-viewer, GPC 1,25 x, Zeiss Heavy Duty Quick Changer, T2-BBHS Prism
Panoptic 24mm eyepieces and Nagler12mm T4, modified for 1,25“
First night, June 11th, 2023, starting shortly after midnight:
My goal with the Mewlon was to find a solution to be able to quickly switch between mono and bino observations. On the one hand, I want to be able to observe optimally adapted to the conditions, on the other hand, I want to give fellow observers the option of going the "easier" way of monocular observation, and then to be able to observe effortlessly with a bino-viewer. In addition, I have developed the ambition to find objects in the classic way without a goto-mount with the setup described and to be able to observe either monocularly or binocularly.
The observation site is my small-town roof garden, which provided me several nights of very good seeing.
At dusk, I set up my telescope relaxed in a T-shirt – tt must have become summer... I used the Kochab method to polar-align the telescope. I used the the Celestron power tank as power source. My first object was M13. I found it quite easily with Rigelsucher and the LVW 42 eyepiece. Then I switched to the bino: M13 was beautiful to see for a short time, then fog moved in. The focus difference between mono ans bino is noticeable, but far from dramatic. In all configurations I reach focus effortlessly.
I paused, relaxed, looked a few times through the telescope. Eventually the fog cleared and I looked for M13 again. At 113x it was quite respectable in the 12mm Nagler. In about 30 minutes, the cluster remained reasonably in the centre of the field of view, which speaks for an acceptable polar-alignment.
M3 was a bit harder to find, but finally I succeded. Not very impressive at 113x and quite low in the sky...
On the other hand, M92 was a beauty: resolved into fine stars in the bino-viewer, again at 113x. It is wonderful to be able to experience this from the roof at home! Only a welcome-back-party of the neighbours distracted me a little.
After a break, I tried my luck at Saturn. Around 3:30 it was a little over 15° high above the horizon, of course still too low. But still it was quite pleasant at 113x, with a few quiet moments every now and then. Then I bravely tried the 12mm eyepieces at 225x. Surprisingly, there were quite passable phases despite the bad seeing. Cassini division, ring shadow, and colours of the cloud bands were well visible. I'll get back to Saturn when the conditions are better. Saturn was one reason to use a bino-viewer with the Mewlon. Oddly enough, at 225x it didn't seem that big to me.... if only the seeing was a bit more reliable...
All in all, it's a successful start. It's wonderful what is possible when using both eyes and combining Takahashi and Baader.
Every now and then I read about back-focus problems. I would like to encourage you to find out on your own Mewlon whether it is possible to successfully use a bino-viewer, and also use it for deep sky.
It seems to work very well for me.
Maiko
What do you look for in an astronomical filter? Everyone has different requirements and goals and with a myriad of filters available today; how do you choose the right filters to unleash the full potential of Astrophotography?
In this blog our customer Ian Aiken gives some high level advice on what to look for when choosing a filter, coupled with reasoning why he choose the Baader's CMOS-Optimized LRGBand Ultra Narrowband f/2 filters, along with example LRGB and SHO images taken with these filters on his Celestron RASA 11 from his Bortle 7 suburban location.
New CMOS-optimized Baader filters
Blog Post by Ian Aiken:
I live in the North East of England in the United Kingdom, which experiences a temperate maritime climate characterized by mild summers and cool winters. Cloudiness can vary throughout the year and it feels like I only get 20 usable clear nights per year at my Bortle 7 location during the 6 months where astronomical darkness actually occurs. I've been an Astrophotographer for over 20 years and I've had all kinds of telescopes, mounts, filters (including Optolong, Astro Hutech, Chroma, Baader) and cameras (Atik, QHYCCD, ZWO, Canon) in this time, for both planetary and deep sky photography. Financially, I've learnt the hard way through fine tuning my current collection to something which supports my sky conditions, budget, time, and imaging goals.
Currently I own a Skywatcher EQ8 mounted in my roll off roof observatory. On this I have a RASA 11 with Baader UFC, QHY268M camera and Baader's CMOS-Optimized LRGB and Ultra-Narrowband f/2 filters.
Here are the factors I've considered when choosing my filters:
Price: Assess the price of the product in relation to its features, quality, and performance. Is the price reasonable and competitive compared to similar products in the market? Consider whether the product offers significant advantages or unique features that justify its price.
In my opinion, Baader filters are absolutely value for money. They've kept the price competitive and performance high. A set of Baader filters costs a little more than a single Chroma. Chroma are good, but did not feel value for money in comparison (Baader 2" LRGB set ~ € 500 vs. Chroma LRGB ~ € 2.238).
Quality: Examine the quality of the product. Does it meet your expectations in terms of durability, craftsmanship, and overall build quality? A product that is well-made and built to last will provide better long-term value.
Baader CMOS-Optimized filters come with Baader Planetarium's Life-Coat technology. Baader warrant the coatings for the life of the filter guaranteeing that the coatings will not peel, flake or physically degrade and they have no issues with you cleaning the filters with fine optical cleaning equipment. You can see the build quality is high, the coatings look durable, and I can understand how Baader can offer such a life time warranty. I don't think anyone else offers this.
Performance: Evaluate how well the product performs its intended function. Does it deliver the expected results or fulfil your requirements? Consider its efficiency, accuracy, reliability, and any additional benefits it provides compared to alternative options.
I'm going to post some images later in this blog, and you can judge the quality for yourself. Yes, there were initial problems with halos and these have been resolved. I haven't had any issues that I am concerned about. Halos can be a real pain, and it's not always the filter that causes this (most cases it is not the filter). Reflections can occur in your imaging system and could be caused by a number of factors: including spacing between optical elements; distance to CMOS camera; the CMOS camera front window itself etc. You have to spend time to understand your entire optical system and its individual nuances.
Features and Specifications: Review the features, specifications, and capabilities of the product. Are there any unique or advanced features that differentiate it from competing products? Determine whether these features are essential to your needs and whether they justify the price.
I opted for high-speed ultra-narrowband to match with my RASA 11. This was based upon my needs (explained a bit further below). In terms of features, what stood out was the features integrated into the filters to help prevent reflections and halos. For instance:
Reflex-Blocker - with coatings to reduce halos caused by my imaging system.
Parfocal - this helps to not have to refocus so much during a filter change. As a filter change is manual on my RASA 11 with the Baader UFC system, it means less movement with my motorised focuser and I am back to imaging quicker (and the focuser isn't off on some mission to reach focus by going further out of focus, which can happen when using an SCT type design).
Blackened edges - again to help reduce reflections in my imaging system, lots of mirrors and glass = high potential for reflection
Sealed Coating Edge - each filter is coated individually and not cut from a sheet. This is probably why they will last forever, and Baader are able to offer Life-Coat warranty.
Brand Reputation and Customer Reviews: Research the brand's reputation and customer reviews of the product. Look for feedback from other customers who have used the product to gain insights into its performance, reliability, and customer satisfaction. Positive reviews and a strong brand reputation can indicate better value for money.
Baader Planetarium have been in business since 1966. I've never experienced any poor customer care from dealers or Baader directly (I admit, I've not really had any issues either, with exception of one issues with the early Baader Steeltrack software which was swiftly resolved by Baader themselves). As a family run business, I feel they are passionate with what they do, and want to do the right thing at the right price, making astronomy accessible to all budget types, and truly are Aiders in Astronomy (this is their slogan).
Longevity and Future Compatibility: Consider the product's longevity and future compatibility. Will it remain relevant and usable for a reasonable period? Assess whether the product is upgradable or compatible with future advancements or technologies to ensure its value over time.
I have the older Baader 2" CCD filters which are in the same condition that I purchased them in. I have no concerns about the longevity of the Baader CMOS Optimised filters, especially backed by the Life-Coat warranty. 2" filters are going nowhere, and while the sensors on modern CMOS cameras are getting larger, I cannot see the need to upgrade anytime soon. I've been using 2" filters for the past 20 years.
Warranty and Customer Support: Evaluate the warranty offered by the manufacturer and the availability of customer support. A reliable warranty and responsive customer support can provide additional value by offering peace of mind and assistance in case of any issues or defects.
Baader offers Life-Coat, a lifetime warranty on their CMOS-Optimized filters (providing used and handled correctly). As a family run business operating for over 50 years, Baader are trustworthy and offer great customer support.
Personal Needs and Preferences: Finally, consider how well the product aligns with your specific needs, preferences, and intended use. Different products may cater to different requirements, so it's essential to choose one that best suits your circumstances and priorities.
What did I choose?
I decided on the Ultra Narrowband High-Speed filters on my RASA 11. Why? Well, the reasoning may surprise you. While the filters are excellent value for money, my garden backs onto other gardens and my neighbours have lots of LED lights lit, especially on weekends when it's not windy, the moon is not out, and the sky conditions are good. You can picture the challenges already. Also, there are trees which do not belong to me which get in the way. I work full time, and have two small children, time is limited. I'm middle-aged, but not retired, so I cannot stay up all night imaging into the early hours. So, I went for a RASA for high speed imaging, reducing my imaging time significantly. While I may image across multiple nights, I don't need to. It just works for my current situation. The Baader filters are brilliant on the RASA 11, and I'm able to produce some excellent results (see further in the blog) even with all my challenges.
I hope the above helps you make a decision on what filters would be good for your needs. Baader Planetarium has a really nice tool to help you match which filters would be best for your imaging system. At time of writing you can access this tool: Baader Narrowband-/Highspeed Filter Selector
Example of Astrophotography taken with Baader CMOS Optimized Filters
I could talk about how tight the stars are (they are), how the filters have much more contrast than their predecessors (they do), but this can still be very subjective and influenced by sky conditions. My skies aren't great, they really aren't, and I have to battle with all the other issues living in a suburban environment. These images were also shot in reasonably poor conditions with thin haze. I also have to point out that I don't spend a massive amount of time processing my images. I think partly, if you capture good data you can produce a good image. You don't, in my opinion, need to push an imagine in processing so that it looks so bright and colourful. To me this looks over processed, and I prefer the darker looking style images with simple histogram and curves transformations. There's the disclaimers out of the way.
My workflow consists of using PixInsight to Calibrate, Stack, Automatic Background Neutralisation, BlurXterminate, NoiseXterminate, and maybe StarXterminate. I may use TGV Denoise post stretching but haven't on these examples. I simply use the ScreenTransferFunction (STF) in PI applied to the Histogram, and a hint of Curves Transformation before exporting off into a PNG/JPG. There's probably so much more I could do, but I don't. Oh, I nearly forgot. I do use PhotometricColorCalobration in PixInsight, which applies a white balance to the image.
NGC 7023 - The Iris Nebula 2 hour integration from Bortle 7 sky
NGC 7023, also known as the Iris Nebula, is a captivating and visually striking celestial object located in the constellation Cepheus. This reflection nebula lies approximately 1,300 light-years away from Earth, and its unique features have made it a favourite target for amateur and professional astronomers alike. The Iris Nebula gets its name from the distinct shape and appearance of its central region, which resembles an iris or an eye. This prominent feature is created by a dense cloud of interstellar dust, which scatters and reflects the light emitted by nearby stars. The dust particles in the nebula also create intricate dark filaments, adding to its overall visual allure. At the heart of NGC 7023 lies a young star cluster, illuminating the surrounding gas and dust with its intense radiation. This interaction gives rise to the vibrant hues of blue and yellow seen in many astro photographs of the nebula.
Imaging System: QHY286M CMOS Camera mounted on RASA 11 with Baader UFC. Filters: Baader CMOS Optimised LRGB Mount: Skywatcher EQ8 Exposure Details: 30 x 60 seconds each channel (LRGB). Total 2 hours integration time from Bortle 7 skies.
NGC 7023 - Baader UV IR CMOS-Optimized used for Luminance in LRGB image.NGC 7023 - Baader R CMOS-OptimizedNGC 7023 - Baader G CMOS-OptimizedNGC 7023 - Baader B CMOS-OptimizedNGC 7023 - LRGB with Stars (I'm not sorry for not pushing the colour on this)NGC 7023 - LRGB reduced StarsNGC 7023 - LRGB without StarsNGC 7023 - LRGB without Stars (OK - I pushed the colour saturation a little!)
NGC 7635 - The Bubble Nebula 17 Hour Integration from Bortle 7 Sky
NGC 7635, famously known as the Bubble Nebula, is a captivating and visually stunning emission nebula located in the constellation Cassiopeia. Its unique structure and distinct appearance have made it a popular target for both amateur and professional astronomers. The Bubble Nebula derives its name from the spherical bubble-like structure at its center, which is created by the powerful stellar wind and radiation emitted by a massive, hot, and young central star. This star, known as BD+60 2522, is estimated to be several times more massive than our Sun and emits intense ultraviolet radiation, which ionizes the surrounding hydrogen gas. The ionized gas then emits light, creating the striking reddish glow seen in images of the nebula.
Imaging System: QHY286M CMOS Camera mounted on RASA 11 with Baader UFC. Filters: Baader CMOS Optimised 3.5/4nm f/2 Ultra Highspeed (Ultra-Narrowband) filters. Mount: Skywatcher EQ8 Exposure Details: Ha: 354x60s, SII: 121x60s & 104x120s, OIII: 175x120s. Total ~17 hours integration time from Bortle 7 skies.
Don't ask why the varying exposure! I'd also like to collect more data on SII and OIII in due course given it's about half of what I planned and need. You can tell by the images more is needed. Maybe next time, right? Astrophotography is for life not just for Christmas, or something like that…
I mixed the combination using PixelMath in PixInsight.
NGC 7635 - Baader f/2 3.5nm Ha CMOS-OptimizedNGC 7635 - Baader f/2 4nm OIII CMOS-OptimizedNGC 7635 - Baader f/2 4nm SII CMOS-OptimizedNGC 7635 - RGB/SHO Combination with StarsNGC 7635 - RGB/SHO Combination with Reduced StarsNGC 7635 - RGB/SHO Combination without StarsNGC 7635 - RGB/SHO Combination Crop
And finally to finish off, M45 taken with Baader CMOS-Optimized LRGB on same kits as above.
M45 taken with Baader CMOS-Optimized LRGB
The Universal Filter Changer (UFC) system with its solid mechanics and high flexibility has found a large user base worldwide. Nevertheless, there are always applications that are not covered by the adapters available to date. Therefore, we receive requests for technical drawings from our customers again and again. In the course of further development of our products, we are now pleased to be able to provide the UFC Design Guide.
This design guide contains technical drawings with all the relevant dimensions you need to make your own adapters for both sides of the UFC - be it S70 ring dovetail connection on the telescope- side or the eyepiece/camera-side adaptation:
UFC Design-Guide: Telescope-side UFC adapter Download as PDF
This means that you can now easily design your own adapters for the UFC system and thus implement individual solutions for your special requirements.
We created this small design guide because of the following review by one for our customers. This is a good example of how your feedback and customizations help us continuously improve our products.
He published a very positive review of our UFC system, which highlighted the solidity and flexibility of the UFC system, but also his need for special adaptations, which motivated us to publish these drawings. Our customer has already created his own adapter using our design guide and kindly provided us with pictures as well as his self-created CAD drawings and documentation for it (without warranty), which we are allowed to share here. He himself writes about it:
My new adapter is an off axis guider for the UFC with M68 connection. It is supposed to connect the 2 1/2" corrector of my selfmade Newton (M68 mount) to the UFC and the camera without mechanical compromises. Another design criterion was to realize a clear aperture as large as possible to minimize the vignetting of a full format sensor. Since I had already made very good experiences with a homemade off-axis guider with an M48 connection, I used the Baader information on the UFC to make an M68 off-axis guider with a UFC ring mount that has the required length for my image train. As prism I used a simple 8x8 prism from Chin.
We encourage you to share your similar projects and customizations with us and our customers. Your feedback helps us to continuously improve and enhance our products.
Thank you for your support and trust in Baader Planetarium.
This summer we provided our customer Mr. Rüdiger Proske with the new [product sku="1363080"] for a comparison test with the longer TZ-4. Most interesting was the question how the TZ-4S, which was primarily designed for the SunDancer II H-alpha filter, harmonizes with his large SolarSpectrum H-alpha filter. We are very happy about his very positive conclusion and his field report.
Please read the detailed report of Mr. Rüdiger Proske here:
In June 2023 I was offered the opportunity to test the new "Baader SunDancer II Telecentric System TZ-4S" (short TZ-4S) for the upcoming market launch.
Since I had already been working with the classic, long telecentric systems TZ-4 and TZ-3 for 2 years, my interest and curiosity for this TZ-4Short were immediately aroused. I wanted to know how the new system had developed and how it compared to the older TZ-4. It was also very interesting to see how the TZ-4S, which was primarily designed for the SunDancer II H-alpha filter, would work with the SolarSpectrum filter, which was used here.
The test setup
The new TZ-4S was tested on a TEC 140 ED with a native focal length of 980mm in front of a SolarSpectrum Solar Observer 1.5 - 0.5A H-alpha filter. To get the refractor to the necessary focal length aperture ratio of F=30, the TZ-4S is ideally suited. The achieved focal ratio of F=28 is sufficient.
A camera with a Sony IMX174LLJ was used as sensor, which is particularly suitable for solar images due to the global shutter. A Baader D-ERF was mounted in front of the telescope lens to keep the energy out of the telescope.
Unboxing and mechanical impression
Baader SunDancer II Telecentric System TZ-4SComparsion new and old TZ-4
The TZ-4S comes in a small, Baader-typical cardboard box. When you hold it in your hands, the TZ makes a solid and robust impression. Spontaneously, one is reminded of an eyepiece, and it can be mistaken for one at first glance. Although it is completely made of metal, it is a bit lighter with approx. 250g than the old system with approx. 310g.
What immediately stands out positively is the compact and short design compared to the significantly longer old system. The satin black surface seems to be identical to that of an eyepiece and promises longevity. Both ends are securely closed by dust caps.
Integration into the image train
On the telescope side, the TZ-4S is inserted into the eyepiece clamp like a 1.25" or 2" eyepiece. I use a 2" Baader ClickLock eyepiece clamp. This allows for quick setup and offers the ability to rotate the H-alpha system as needed.
On the camera side, the TZ-4S has a T-2 thread. This makes it easy to adapt standard components such as T-2 extension tubes or quick-changer. But also an integration into the Baader M68 Tele-Compendium is possible. A minimum of 100mm after the last lens element is specified as backfocus. The distance is usually achieved with T-2 extension tubes. Here I have made the experience that it is quite beneficial to the image quality to increase the distance a little. In the end, I found about 150mm to be optimal. However, the system is very tolerant, as is typical for a TZ (in contrast to Barlow lenses).
The short backfocus is a significant advantage over the old TZ-4, which required at least 240mm as working distance. This significantly reduces the enormous length that an H-alpha setup has. This reduces the load on the focuser and reduces the risk of a mechanical collision during meridian flip.
The entire assembly proved to be mechanically robust with no play or "wobble".
Optical performance
As always, pictures say more than a thousand words. Therefore, I refer you to the pictures below. Visually, however, it can be clearly said that the new system is at least equal, if not superior, to the old one. A direct comparison at Lucky-Imaging is always a bit tricky, since conditions are constantly changing and ultimately a statement is always based on the "stacked" images. However, what I could determine in a direct comparison is that the new TZ-4S was consistently a tad sharper and the images had more reserves in terms of dynamic range. This is probably primarily due to the recalculation of the optical setup and the H-alpha wavelength optimization, which pays off here.
Size comparsion old and new TZ-4(S) at the telescope
Conclusion
The new "Baader SunDancer II Telecentric System TZ-4S" is a wonderfully compact and high-quality telecentric system that feels at home on both small and large telescopes. Its connection options allow for versatile use. And when stowed away, the system takes up no more space than an eyepiece.
To me, the new TZ-4S represents a consistent and logical evolution of its several-year-old predecessor.
Pros:
Compact
Relatively light
Robust
Standard connections
Very short working distance for TZ systems
Cons:
None found in two weeks of use
Notes:
The test system was provided on loan by Baader Planetarium. Many thanks for this!
The system was not tested with the SunDancer II, but with a SolarSpectrum.
Our customer Mr. Karrer uses the [product sku="2301003"]. With his fantastic images Mr. Karrer proves that a SC telescope can keep up with the best refractors in solar photography. We are truely impressed – high-res images which compete with well-known professional observatories.
Read here the detailed field report of Mr. Michael Karrer about the Baader Triband SC 9.25":
I own the Baader 9.25 triband SC telescope now since august 2022, but I'm still not using it often enough. Last May, a calm weather phase was coming and I decided to to start working later in the morning than usual and take a look at the sun instead. Visually, there were no air turbulences visible in the small Lunt H-Alpha telescope, the image was "steady". Accordingly, I had high hopes for the camera view through the 9.25" Triband. For the first time I used the 3x Baader SunDancer telecentric system which I had just bought, which allows a quite short image train. Because everything had to go quickly, I saved myself the warm-up phase of the Solar Spectrum H-Alpha filter and used the etalon of a PST instead. The image on the monitor was the steadiest I have ever experienced! And that at around 7 m focal length! Not much later, I had the AVI data on the hard disk. "Autostakkert" selected the best zones as usual.
I compared my results with (the few) top solar photographers who work with refractors with up to 9" aperture: Details with the Triband-SC are at least on the same level, if not even better to recognise! A sensational result for me! A large refractor costs a lot, is heavy, is hardly transportable and requires a massive mount. With the "feather weight" of an SC, all this is no longer necessary.
Let these pictures be the prove that an SC telescope can keep up with or surpass the best refractors in solar photography (be sure to look at the photos in full resolution).
And if you don't know it better, you sometimes do things which are "forbidden": I also used the Triband to take pictures in white light, together with the Baader Solar Continuum Filter. The image looked quite dull, but the details were good. The image processing was challenging. It was only afterwards that I discovered the now available Triband manual on Baader's website. The Triband-coating blocks the wavelength of the Solar Continuum Filter – hence the pale image! I should have used an OIII filter. Depending on the focal length extension, the sensitivity of the camera or even the transparency of the sky, a photographic Baader film or the Baader Herschel wedge may be necessary for further light attenuation.
How much of an issue is the obstruction of an SC compared to a refractor? It does reduce contrast, I can see that when I compare the image with that of my refractors. But image processing with dedicated contrast enhancement largely makes up for this disadvantage.
My conclusion:
Highest resolution, that's the goal. With the compact design of an SC, there is also the elegant option to observe at places with better chances for good seing seeing. Because only there can the optics unfold their true potential – and that is amazingly high! A refractor of the same size, on the other hand, will suerly stay at home...
Prominence taken with Baader Triband SCT 9,25", Baader SunDancer TZ-3S, PST Etalon, Player One Saturn M, Seeing 7/10Sunspots AR3311/13/14 in H-alpha-Light taken with Baader Triband SCT 9,25", Baader SunDancer TZ-3S, PST Etalon, Player One Saturn M, Seeing 6-7/10Sunspots AR3323 im H-alpha-Light taken with Baader Triband SCT 9,25", Baader SunDancer TZ-3S, PST Etalon, Player One Saturn M, Seeing 5/10Eruptive Prominence taken with Baader Triband SCT 9,25", Baader SunDancer TZ-3S, PST Etalon, Player One Saturn m, Seeing 7/10Sunspots AR3311 in H-alpha-Light taken with Baader Triband SCT 9,25", Baader SunDancer TZ-3S, PST Etalon, Player One Saturn M, Seeing 7/10Sunsports AR3310 taken with Baader Triband SCT 9,25", Baader SunDancer TZ-3S, Player One Saturn M, Seeing 7/10Eruptive Prominence taken with Baader Triband SCT 9,25", Baader SunDancer TZ-3S, PST Etalon, Player One Saturn M, Seeing 6-7/10
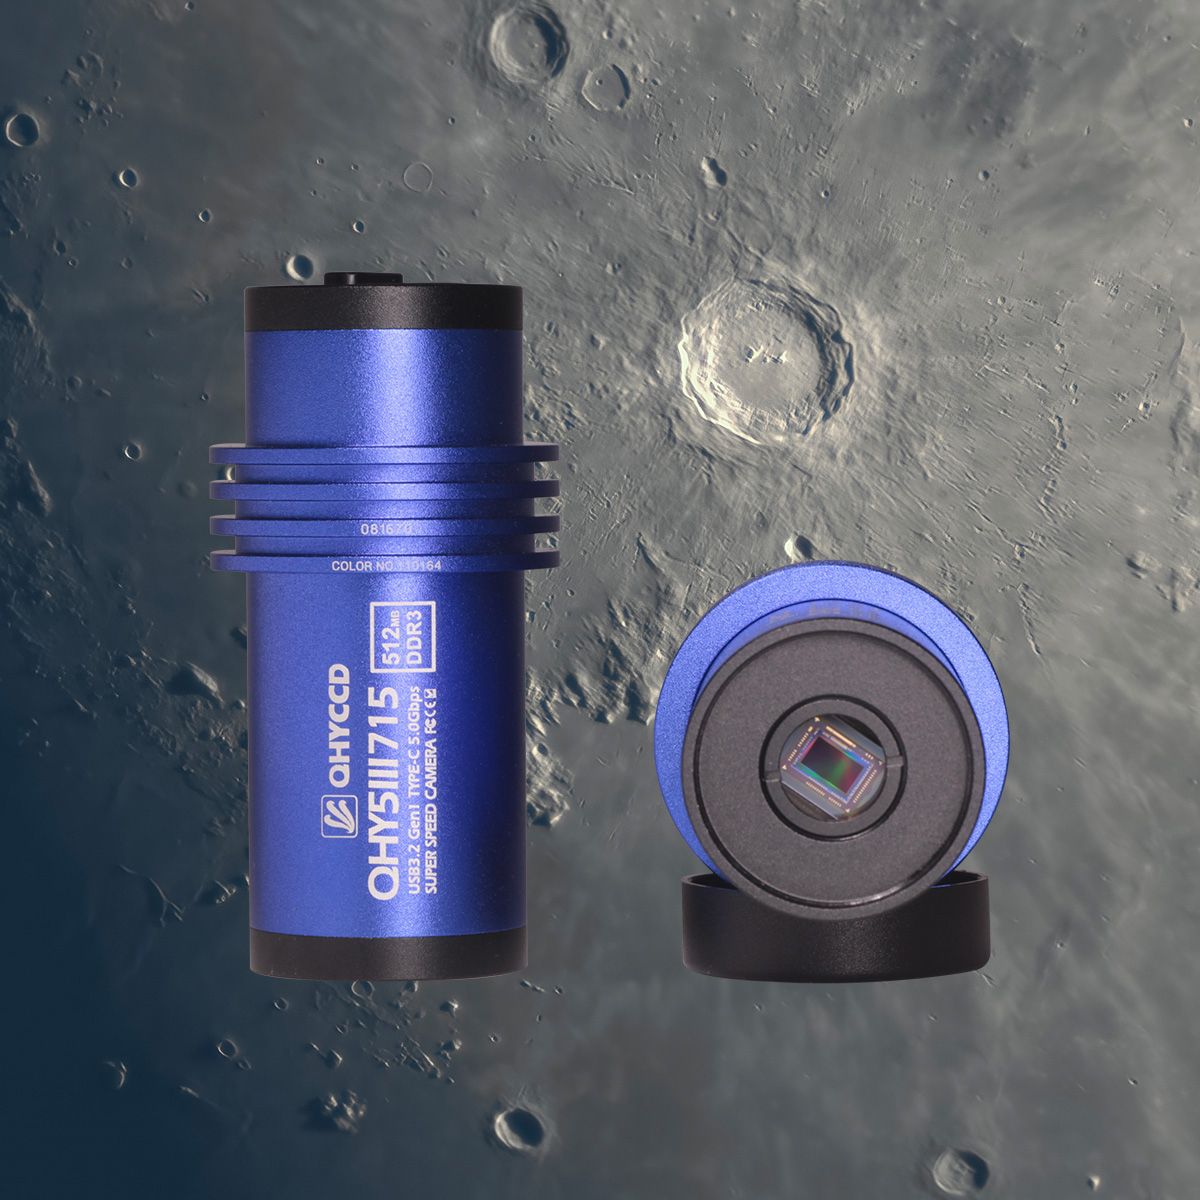
The new QHY 5-III-715 Color of the 2nd generation is an affordable solar, lunar and planetary camera and at the same time a perfect guiding module for extremely short focal lengths.
General description of the QHY 5-III-715 Color
[product sku="1931038"]
The QHY 5-III-715 Color is now the 4th camera of the 2nd generation of lunar and planetary cameras with integrated SBIG ST-4 guiding port. The advantages compared to the 1st versions of this camera series are among others:
Large internal 512 MB DDR3 image memory
Improved front-end design
Compatibility with CS and C-mount lenses
LED for camera status indication
USB 3.2 Type-C interface[br]
The QHY 5-III-715 Color is an ultra-high resolution color camera with a very sensitive Back Illuminated Sony Sensor (BSI) while maintaining extremely low readout noise. The new USB 3.2 interface allows frame rates of up to 42 frames per second at full resolution (lucky imaging for sun and moon), and significantly more for ROI (planets). Due to the extremely small pixel dimensions of only 1.45 µm x 1.45 µm, an imaging scale (image resolution) of about 1 arc second is already possible with focal lengths around 300 mm, so that reliable guiding is easily possible with focal lengths around 200 mm.
Some highlights of the camera
Lunar, planetary and guiding camera
Sensor: Sony IMX715 BSI sensor - only available as color version
Pixel size: 1.45 µm x 1.45 µm
Number of pixels: 3.840 x 2.192 (5.6 x 3.2 mm) - 8.4 MegaPixel
Readout noise: 0.87e- to 2.17e-
Full well capacity: 5.7ke-
Maximum frame rate: 42 frames per second at full resolution
Exposure times: 11µs - 900 seconds[br]
Extended sensor sensitivity in the near infrared spectral range (NIR)
Similar to the [product sku="QHY5III462C"] the new [product sku="1931038"] also features extended sensitivity in the near infrared spectral range.
In this latest generation of Sony sensors, the photodiodes are embedded deeper in the substrate than in previous sensors, allowing photons with longer wavelengths (NIR) to penetrate deeper into the substrate. This dramatically increases the sensor's sensitivity to red and near-infrared light. The peak sensitivity (quantum effectiveness) of the sensor in the NIR spectral range is almost as high as for light in the visible spectrum.
All further information and the technical data of the new QHY 5-III-715C can be found on our prodcut page.
The [product sku="2458170"]
The M68 system allows for a sturdy and rigid connection of heavy accessories. The M68 tilter is a relatively recent addition to this family of adaptors and was developed to easily compensate for image tilt in an optical train through simple adjustments of three pairs of easily-accessible (even when a camera for example is attached) hex-screws located around the edge of the adaptor. Although the M68 tilter itself is small occupying just 9.50-10.25mm of optical path length, and relatively light weighing in at just under 100g, it can accommodate a heavy accessory payload of up to 5kg. The tilter allows a tilt shift of up to 1° to compensate for misalignments in the image field.
Baader M68 adapter with M68-Tilter + UFC for the QHY600M camera.
Other "members" of the Baader tilter-family include the UFC tilter and the FCCT (Filter Changer Camera Tilter) forr RASA 8" and QHY cameras. You can read more about these here.[br]
The T-2 and M48 adaptations for cameras and accessories are still widely popular and we have been often asked whether (and how) the M68 Tilter can be used with these systems. The answer is YES the M68 Tilter can indeed be used with T-2 and M48 accessories and below we show you how. At the moment we have no plans to introduce a smaller T-2 or M48 tilter as the larger size of the M68 unit allows for fine tilt adjustments and also can accommodate a larger accessory payload too.
[br]
T-2 Accessories
Lets begin by looking at the T-2 system first. The T-2 system is still widely used and there is a wide variety of cameras having T-2 (female) connections and T-2 (male) fitting accessories.
M68 Tilter with parts for connecting to T-2 telescope and camera-side accessories
Starting from the telescope (left) side and moving (right) towards the camera side, we have the following adaptors in place:
Telescope or accessory with male T-2a thread :->
[product sku="2958242"]: The adaptor ring has an internal female T-2i thread (to screw onto the male T-2a thread of the telescope-side accessory) and has a 2"a external male thread. In other words it allows a male T-2a thread to be converted to a 2"a thread.
[product sku="2458232"]: Has an internal 2"i thread with an M68a external thread. With the above adaptor in place it will now convert the telescope accessory T-2a external thread into a male M68a thread.
[product sku="2458195"]: This converts the male M68a thread of the above #2458232 adaptor into a female M68 thread to allow attachment onto the Tilter's telescope-side M68 male thread.
[product sku="2458170"]: The M68 Tilter (external M68a thread telescope side ; internal M68i camera side)
[product sku="2458233"]: This two-piece adaptor steps down from M68 to T-2. The adaptor has external M68a threads to screw into the Tilter's M68i internal threads and has T-2 male threads on the camera side to attach to a T-2 accessory with female T-2 threads (e.g. camera). The adaptor, as whole, consists of two separate parts: [product sku="2458232"] and [product sku="1508035"].
-> fits to Eyepiece/camera side accessory with female T-2 thread (e.g. camera with female T-2 thread or T-ring)[br]
[br]
M48 Accessories
Let us now turn to the M48 system. As with the T-2 outline above, we will once again start from the telescope (left) side and move (right) towards the camera side. You will notice that there are a number of the same parts used as outlined for the T-2 adaptation above.
M68 Tilter with parts for connecting to M48 telescope and camera-side accessories
Telescope or accessory with male M48a thread :->
[product sku="2454834"]: This zero-length adaptor has an internal M48i thread and external 2"a SC thread to convert 2"i SC female into M48i female. This will attach onto an M48 accessory with a male M48 thread. As this zero length adaptor is very thin we suggest it be attached to the male M48 accesory first.
[product sku="2458232"]: Has an internal 2"i thread with an M68a external thread. With the above adaptor in place it will now convert the telescope accessory into a male M68 thread.
[product sku="2458195"]: Converts the male M68a thread of the above #2458232 adaptor into a female M68 thread to allow attachment onto the Tilter's telescope-side M68 male thread.
[product sku="2458170"]: The Tilter unit - which has an M68 male thread on the telescope side and M68 female thread on the camera side.
[product sku="2458229"]: A single-piece step down adaptor with a male M68 thread on the telescope side to screw into the M68's female thread and has a male M48a threads on the camera side to attach to an M48 accessory with female M48i threads.
fits to -> Eyepiece/camera side accessory with female M48-thread (e.g. Camera or M48 adaptor with female M48 thread).
M68 Tilter used with a DSLR and the Baader M68 Quick Changer
It may be that your imaging train uses both M48 and T-2 accessories, for example an M48 male thread accessory on the telescope side and a camera with a T-2 female thread. In this example this is easy to accommodate. Looking at the first T-2 diagram you would simply replace the first (in-line) telescope-side T-2 adaptor (#2958242) for the [product sku="2454834"] which would attach to the M68-2"UNFi conversion ring (#2458232; used in both configurations) and then use the remainder of the adaptors in the T-2 sequence. If you require to use spacer/extension tubes (e.g. for use with reducers etc) you could select one of the fixed or the variable extension from the M68 series and the Baader M68 Quick Changer to use on the telescope side of the tilter (e.g. see image opposite).
Please note: With the Baader family of tilters, the whole "tilt adjustment operation" can be achieved without imaging train removal. Tilt adjustment is performed using three pairs of opposing set screws, on the tilter's outside edge, which independently move the inner tilt mechanics. These hex screws have tapered and hardened points that bear against a precision hardened ‘zero-clearance’ internal steel-counterpart. The direction that each set screw moves the tilter is shown with a helpful etched arrow next to each individual adjustment screw. You can read more on how to finely adjust tilt with the UFC-, M68- and FCCT-Tiltersin an article here.